Sign a free trial account:
- Visit Decision Critical: https://www.decisioncritical.pro/
- Click the "Register" button.
- Enter your name and work email address.
- Click "Get Free Trial" to get start.

Understand Your Workspace
Understanding Your Workspace:
- Accounts: Your starting point, representing your company or user profile.
- Companies: Organize your planning by creating dedicated "Companies" within your account.
- Scenarios: Within each company, create multiple "Scenarios" to explore different possibilities. Each scenario allows you to input assumptions and analyze their impact.
- Assumptions: On the left-hand side of the landing screen, these are the building blocks, driving your budget or strategic plans. Start with best estimates, later refining them with more research.
- Organizational structure: Addition of departments; batch settings for multiple resources in a department to expedite inputs.
- Products: Products for sale and semi-finished products for use in other products are loaded here.
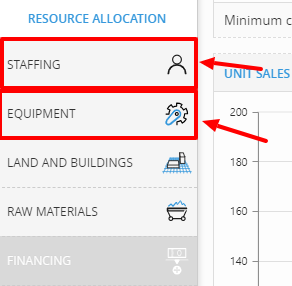
- Staffing: Settings for different types of employee.
- Equipment: Settings for different types of equipment.
- Land and buildings: Management of space and the real estate assets which provide space. Simplified functionality is available for rental, purchase or new site construction.
- Raw materials: All materials that are purchased for use in a manufactured product are loaded here.
- Financing: Debt and equity financing are accessible here
- Tax: Simple income tax, VAT, sales tax and payroll tax settings
- Utilities: Utilities (electricity, water, steam, etc.) purchased from utility providers, consumed according to equipment usage.
- Reports: On the the right-hand side of the landing screen are a series of reports and charts for use in business analysis. Reports and charts are:
- Operational report: For understanding production, throughput and sales.
- Balance sheet, Income statement, Cash flow statement: Standard financial reports.
- Cash balance chart: A fast way to see whether the company has enough cash to execute the contemplated strategy - a cash balance of less than zero indicates insolvency.
- Unit sales: Shows unit sales as the lesser of demand and availability (or, in the case of a service product, as the lesser of demand and capacity).
- Units produced: Shows production as the lesser of the production target and capacity.
- Headcount: Number of employees, by period.
- Footprint: Shows total space requirements, graphed against total space available.
Create your Company and Scenario
Create company and scenario:
- Create your company
- In the
/analyticspage, click "ADD A COMPANY TO START WORKING" - Enter your company details and click "CREATE"
- In the
- Create the scenario
- In the scenario page, click ADD A SCENARIO TO BEGIN WORKING (or CREATE NEW SCENARIO).
- Enter the details of the scenario.
- To add the additional details, click Additional settings.
- Once you have completed adding all the details of the scenario, click CREATE. The scenario will be created and ready to add an assumptions.
Begin Modeling
Once you have created the scenario, navigate to scenario page then add assumptions to the scenario. Here's a step-by-step guide:
STEP 1. CREATE DEPARTMENTS:
Create your departments and assign an activity group to each using the Organizational Structure chart. You can also load your tax settings at this time (via button marked tax) or you can save this for later.

- Establish Departments: Begin by establishing your organizational structure. Create departments that align with your company's functions or teams.
- Assign Activity Groups: Assign an activity group to each department, as it helps categorize expenses for better financial management. This categorization is crucial for the program to effectively classify expenses.
- Configure Tax Settings (Optional): At this stage, you have the option to configure tax settings specific to your business. You can access this by clicking on the "Tax" button. Setting up tax parameters early on ensures that your financial calculations are accurate and compliant with tax regulations. However, if you prefer, you can choose to save this configuration for later.
Please note:
- Choosing an activity group tells the program how to classify the expenses associated with a given item
- For more on "Department" assumption, read the article: Building The Assumptions: Organizational structure
STEP 2: POPULATE RAW MATERIAL AND UTILITIES DIRECTORIES*

- Add Raw Materials for Your Manufacturing Process:
Begin by accessing the "RAW MATERIAL" assumptions. In this step, you'll populate the list with the raw materials required for your manufacturing processes. Think of it as creating a comprehensive inventory of the essential components or ingredients necessary for producing your goods.
For example, if you're running a furniture manufacturing company, your raw materials may include lumber, screws, paint, and fabric

- Add Utilities:
Begin by accessing the "UTILITIES" assumptions. In this step, you'll input the utilities consumed during your manufacturing operations. These utilities play a critical role in facilitating your production processes. Examples of utilities to include are electricity, water, natural gas, etc.
For example, if you operate a metal fabrication facility, you'll want to track the electricity used to power welding machines and the water consumed for cooling processes.

- For more on "Raw materials" assumption, read the article: Building The Assumptions: Raw Materials
- For more on "Utilities" assumption, read the article: Building The Assumptions: Utilities
STEP 3: ADD DIRECT RESOURCES*
Add direct labor (via the button marked Staffing) and direct machines (via the button marked Equipment). Settings for labor and equipment are in the respective resource cards, accessed through the Position list / Equipment list. Actual employee head count and machine count are added through the plus sign (there is one in each row of each list).
- Add Direct Labor:
Begin by accessing the "Staffing" assumptions. There, you can include the direct labor force crucial for your manufacturing processes. Direct labor comprises workers directly involved in producing goods.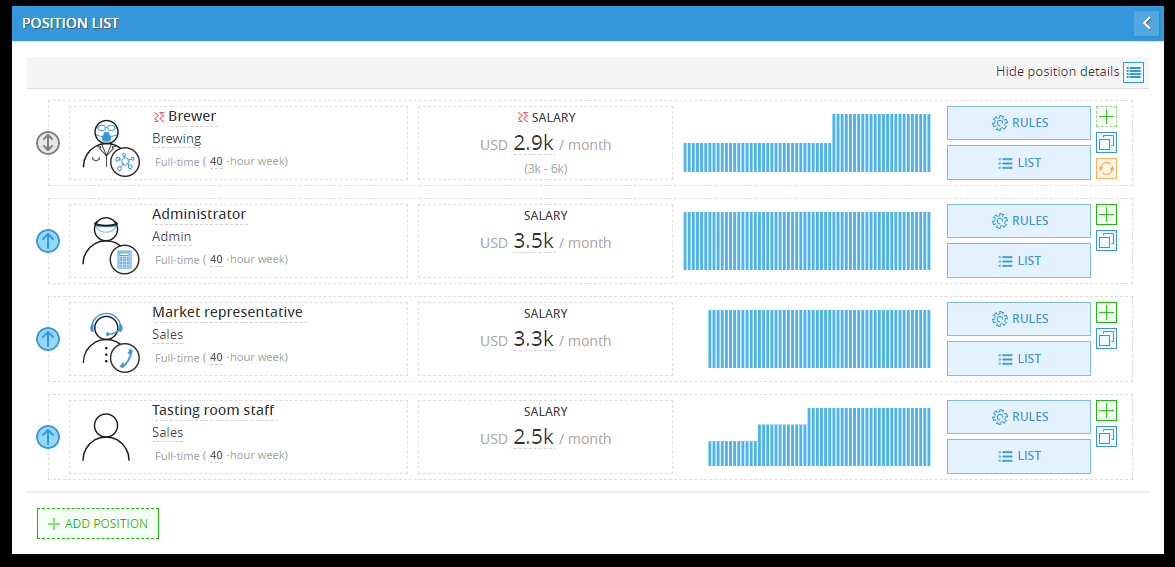
Main employee-specific settings (can be access via RULES button):
- Salary
- Other tasks (other tasks reduce the amount of time available for direct production tasks).
- Work station (minor equipment such as computers, desks, chairs that is purchased per-employee).
- Other expenses (per-employee expenses).
- Add Direct Machines:
Begin by accessing the "Equipment" assumptions. There, you'll introduce the direct machines essential for your manufacturing processes. Direct machines refer to equipment directly involved in production.
Main equipment-specific settings (can be access via RULES button):
- Purchase price
- Useful life
- Maximum usage hours / week (under "shift type" in "capacity").
- Operators (specifies workers needed for proper use).
- Utilities (specifies utility use per machine hour).
- Materials / expenses (specifies other expenses incurred by the equipment).
- For direct labor
- To configure labor resources, manage their details through the resource cards, accessible via the "Position list." Here, you can define roles, skill sets, and labor costs.
- Actual employee headcounts can be added by clicking the plus sign, available in each row of the Position list.
- Resources can be manually added or set to automatic load settings, which can be adjusted in the resource card's 'settings' for employees
- For direct equipment
- To configure and manage equipment resources, utilize the resource cards accessed through the "Equipment list." These cards allow you to specify machine types, capacities, and maintenance schedules.
- Actual machine counts can be added by clicking the plus sign, found in each row of the Equipment list.
- Similar to labor resources, machines can be manually added or configured for automatic load settings. You can make these adjustments in the capacity section of the resource card for equipment.
- For more on "Staffing" assumption, read the article: Building The Assumptions: Staffing
- For more on "Equipment" assumption, read the article: Building The Assumptions: Equipment
STEP 4: ADD PRODUCTS
Create one or more products. Products are either goods sold to customers (manufactured goods, traded goods, simple service) through various channels or parts used in the production of other products (semi-finished products).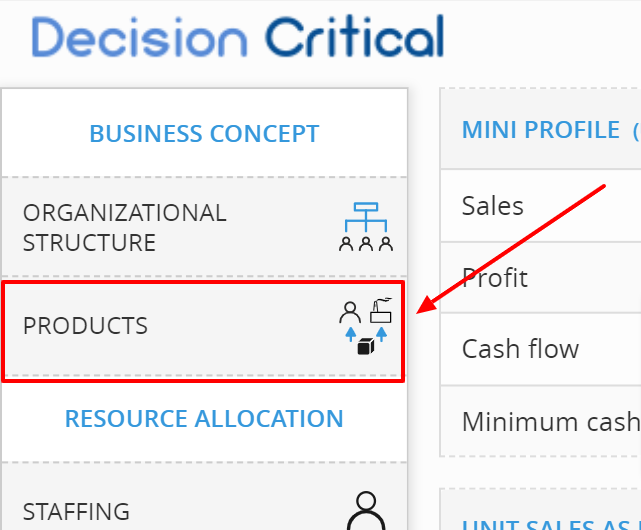
For Goods Sold (manufactured goods, traded goods, simple service):
- Begin by accessing the "PRODUCTS" assumptions.
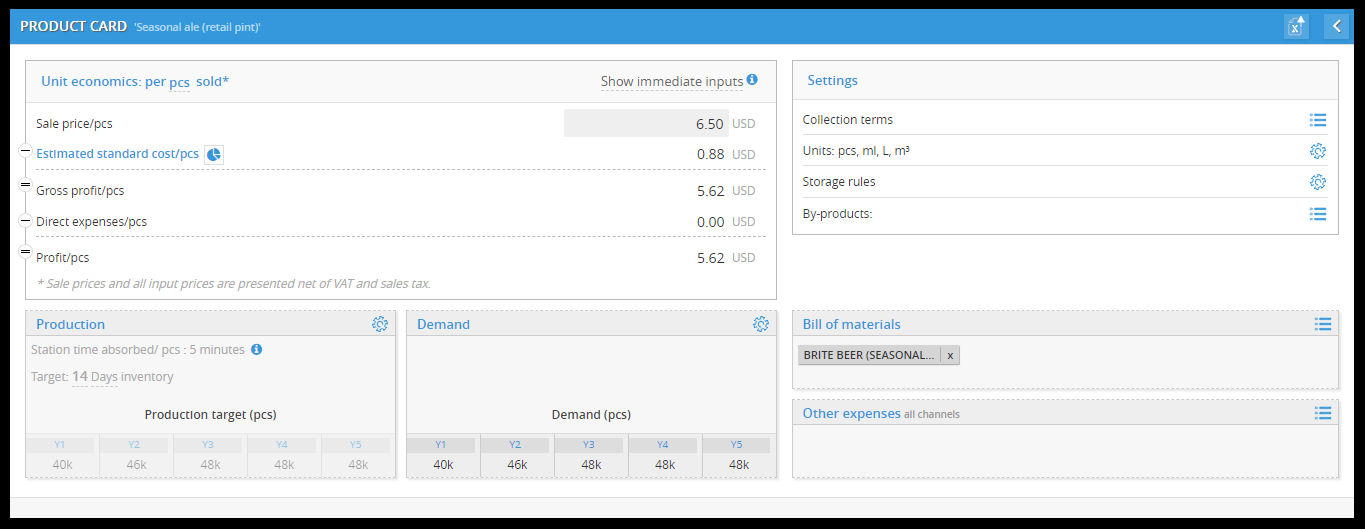
Then defining products that your company sells to customers. These could be manufactured goods, traded goods, or even simple services, depending on your business type.- Manufactured products require:
- 1+ precedents (raw materials or semi-finished products, added through the bill of materials);
- a production process (entered in the production section of the product card);
- a sale price (entered in the unit economics section of the product card);
- demand assumptions for at least 1 channel (entered in the demand section of the product card).
- Traded products require:
- a sale price (entered in the unit economics section of the product card);
- a purchase price (entered in the unit economics section of the product card);
- demand assumptions for at least 1 channel (entered in the demand section of the product card).
- Simple services require:
- Production process (entered in the production section of the product card);
- Sale price (entered in the unit economics section of the product card);
- Demand assumptions for at least 1 channel (entered in the demand section of the product card).
- Manufactured products require:
For Parts Used in Other Products (Semi-Finished Products):
- Begin by accessing the "PRODUCTS" assumptions.
Then defining products that your company sells to customers. These could be parts that are used internally to produce other products. These are known as semi-finished products.
Semi-finished products require:- 1+ precedents (raw materials or other semi-finished products, added through the bill of materials);
- a production process (entered in the production section of the product card).

- For any physical product, it is recommended that the storage settings are filled out. Payable and receivable assumptions can be managed through channel settings or directly in the product card.
- For more on "Products" assumption, read the article: Building The Assumptions: Products
STEP 5: ADD PROPOTIES
Depending on your business needs and circumstances, you can add information about land and buildings, encompassing details such as location, type of property (commercial, industrial, residential), and acquisition method (rental, purchase, or construction).
Add Your properties:
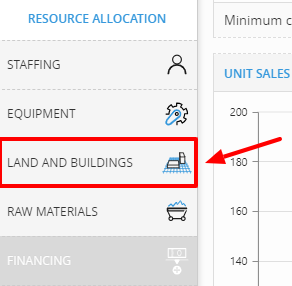
- Begin by accessing the "LAND AND BUILDINGS" assumptions.
Add information about land and buildings, encompassing details such as location, type of property (commercial, industrial, residential), and acquisition method (rental, purchase, or construction).
For example, if your business is a logistics company, you might need to include warehouse and distribution center information in this step, specifying whether they are leased or owned.

Please note:
- Calculations and assessments regarding available space, storage capacity, or facility utilization will be influenced by the values loaded for land and building.
- For more on "Land and Building" assumption, read the article: Building The Assumptions: Land and Building
STEP 6: ADD EXPENSES
Expenses are a crucial component of your financial planning and analysis. There is no single dedicated section for them - instead they are included in the relevant interface for their respective driver.
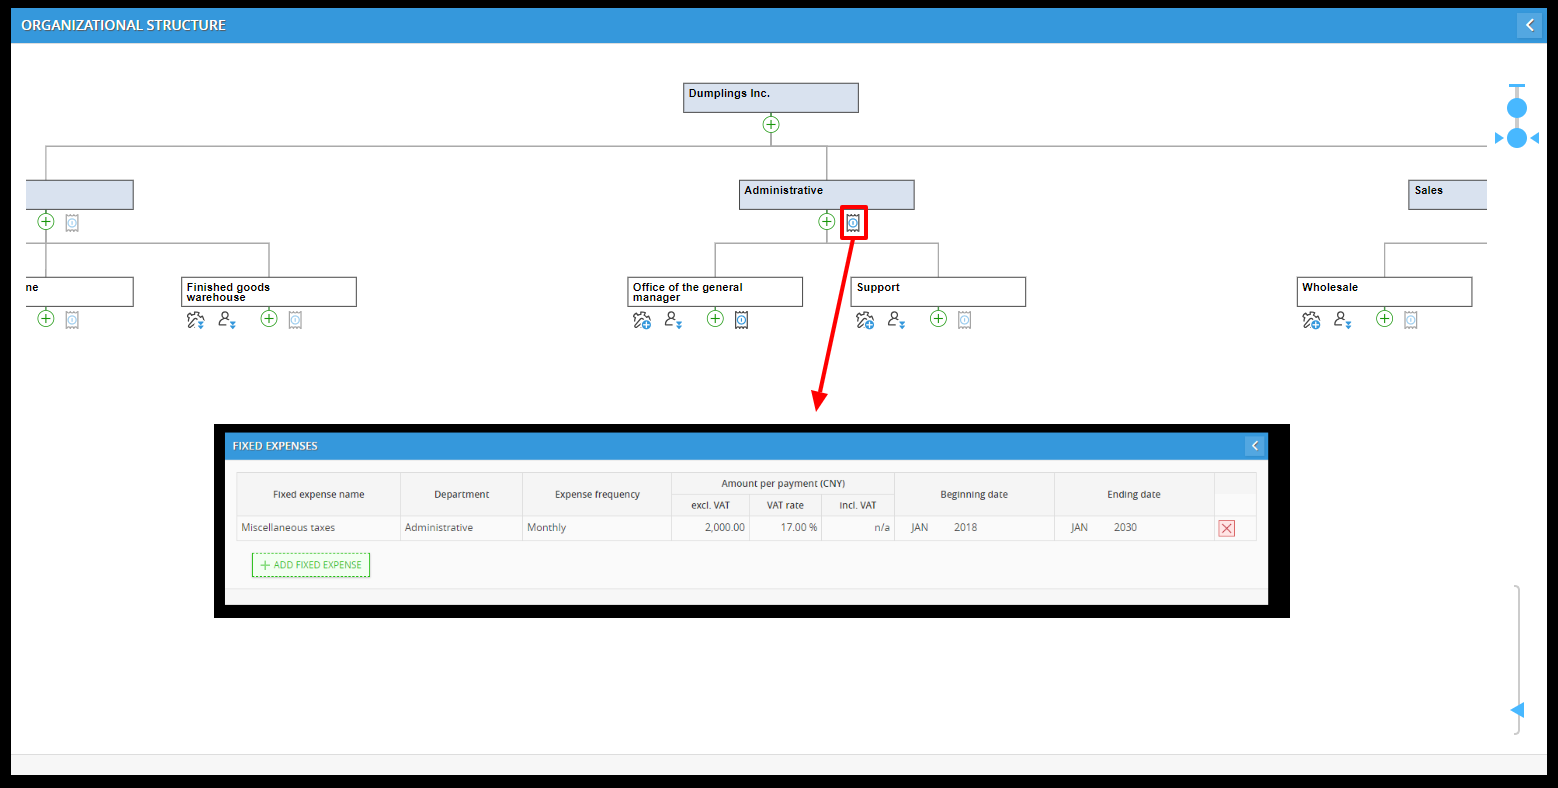
- Load fixed expenses: Fixed expenses can be added directly to a department and they do not have an explicit driver in Decision Critical. Use the expense icon found in the organizational structure chart. Fixed expenses remain consistent regardless of changes in production or activity levels.
- Load the resource-driven expenses: Resource-driven expenses, which can vary based on the number of employees or equipment in a department, can be configured through department settings. This can be accessed via the organizational structure chart. There, you can set per-employee or per-equipment expenses. These expenses are then automatically applied based on the actual number of employees or equipment within the department.
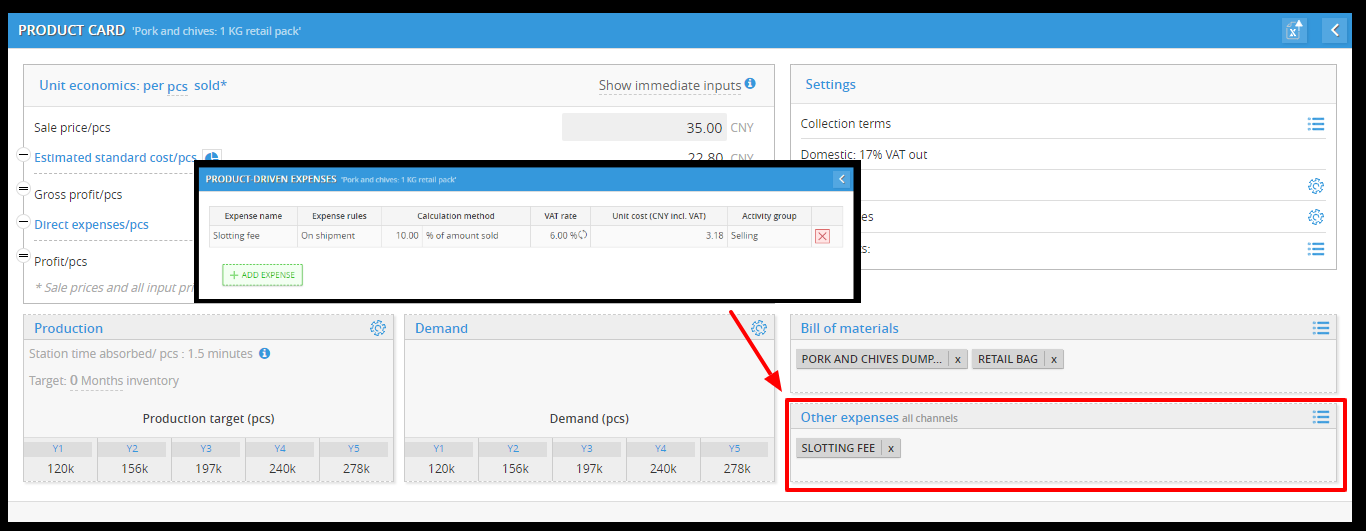
- Load the Product-driven expenses: These are expenses per unit of product purchased, sold, produced, etc. Product-driven expenses have their own section in the product card. They can be included in the product standard cost or recorded separately, depending on the expense rules and activity group assigned.
STEP 7: CHECK YOUR CASH BALANCE
At this stage, you'll assess how much additional financing, if any, your company requires. The goal is to ensure that your financial model remains solvent, meaning that you have sufficient cash to meet your obligations.
- Open the Cash Balance Graph: Access the cash balance graph, which can be found through the reporting buttons on the right-hand side of the landing screen. This graph provides a visual representation of your company's cash flow over time.
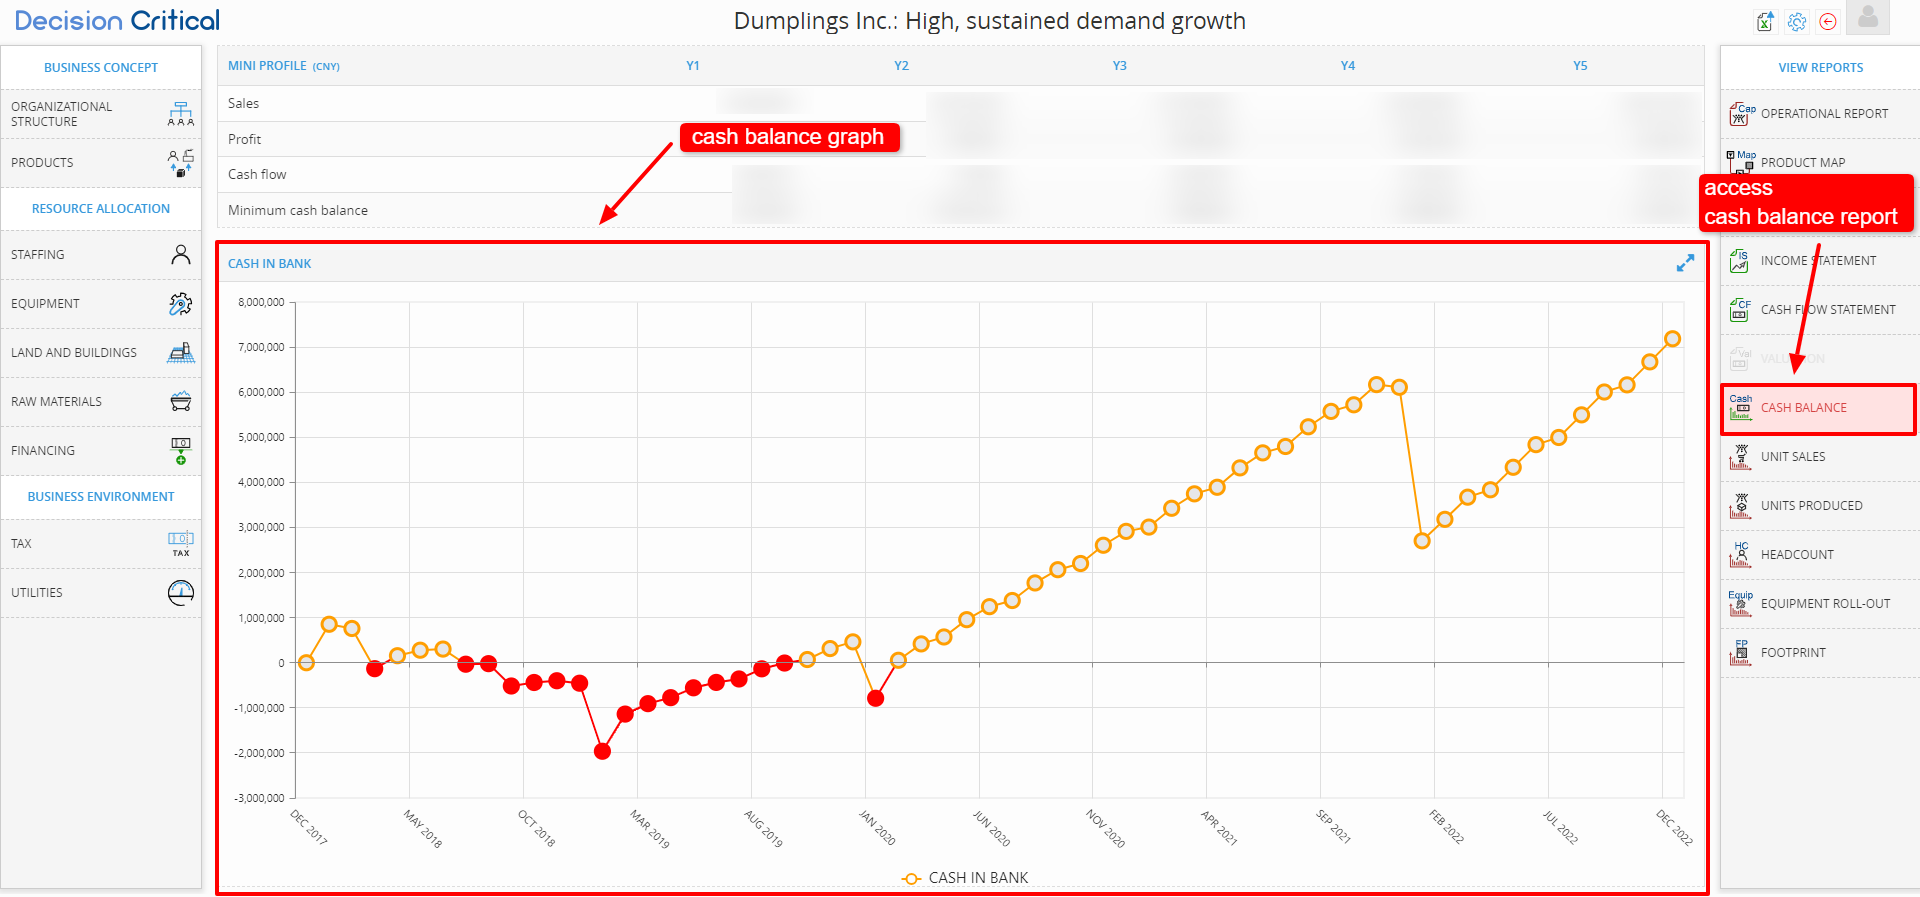
- Check for Negative Cash Balance: Examine the graph closely. If at any point there is a negative value, it indicates that the scenario is insolvent, meaning that your company doesn't have enough cash to meet its financial commitments.
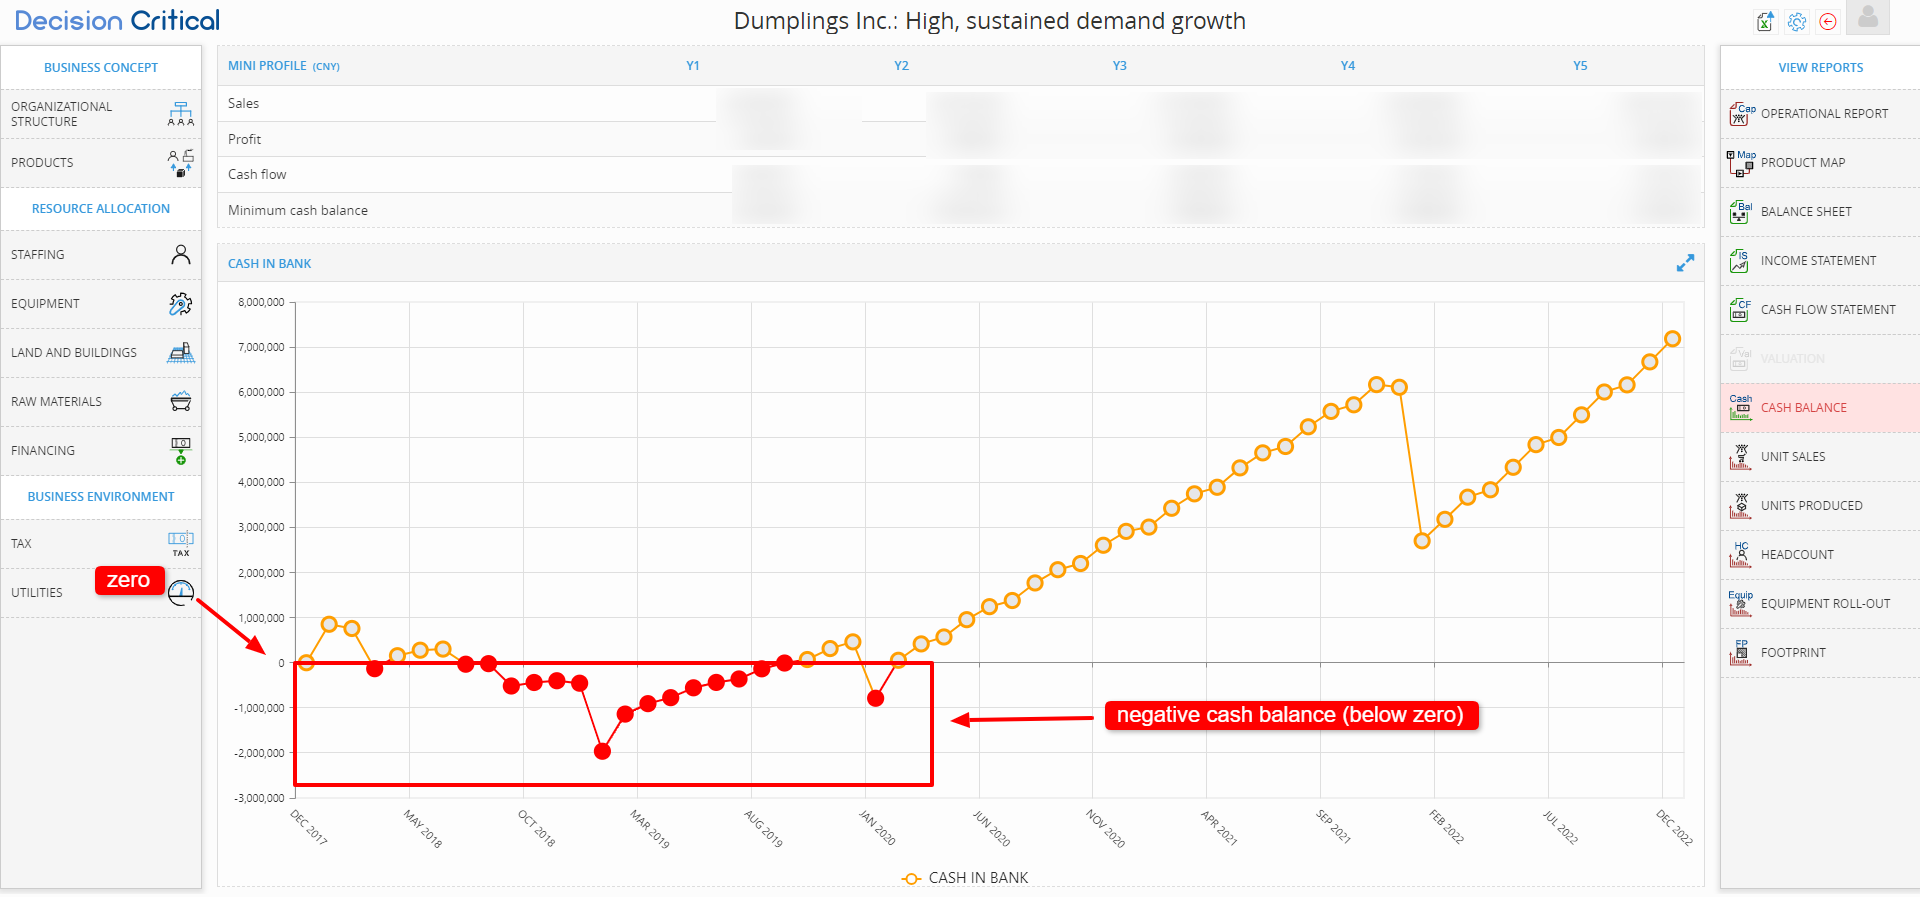
- Remedying an Insolvent Scenario: If you identify a negative cash balance, you'll need to take corrective action to ensure solvency. You can do this by setting up either investment or debt, both of which are accessible via the financing button on the left side of your landing screen.

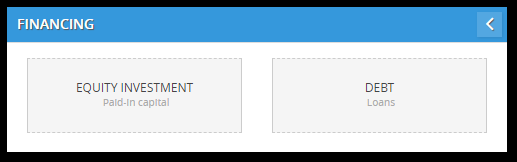
- For more on "Financing" assumption, read the article: Building The Assumptions: Financing
STEP 8: CHECK ADDITIONAL SETTINGS
In this step, we recommend you to address various additional settings (scenario settings) that can impact your financial model within Decision Critical.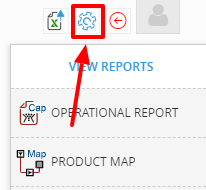
These settings include:
- Payroll Timing
You can configure whether you pay your salaries immediately or in arrears. Access this setting by navigating to "Settings" and then "General Settings." Adjusting this can have implications for your cash flow and financial projections.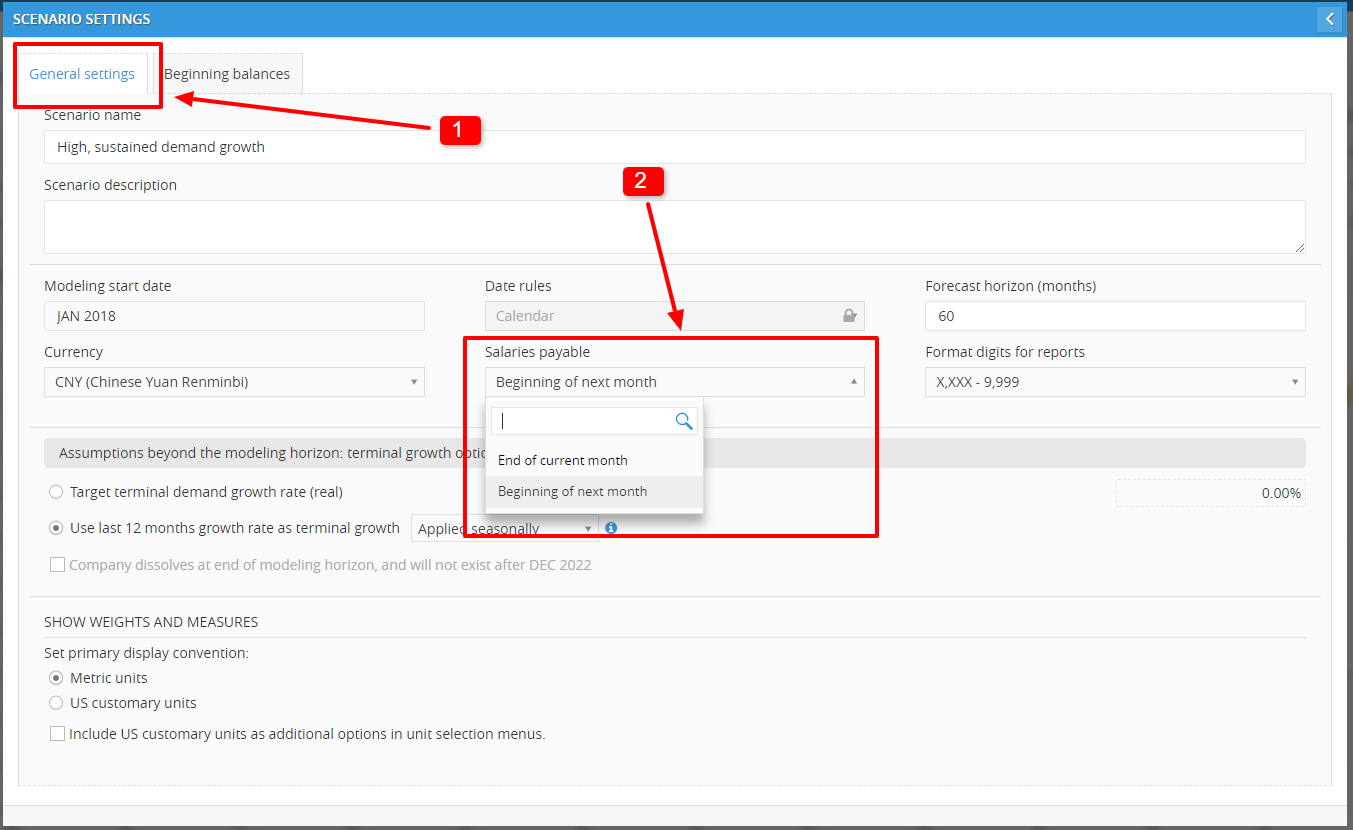
- Click Setting.
- Click on General Setting tab.
- Select drop-down options in Salaries payable: End of current month / Beginning of next month
- Beginning Balances (optional)
For existing companies, you may need to enter your starting balances. This can be done in the "Settings" section under "Beginning Balances." Accurate beginning balances ensure that your model starts with the correct financial position.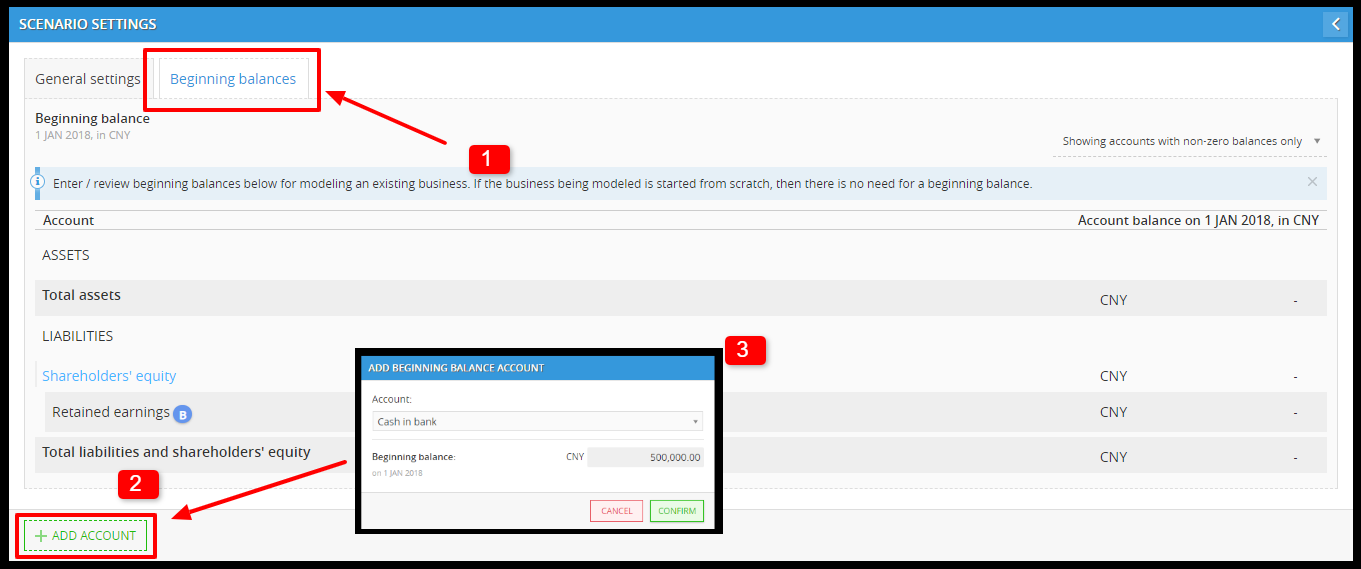
- Click Setting.
- Click on Beginning Balances tab.
- Set your starting balances.
- Click "+ ADD ACCOUNT"
- Select account.
- Add the beginning balance
- Click "CONFIRM"
- Growth Assumptions Beyond the Forecast Horizon
If your business growth extends beyond the forecast horizon, you can set terminal growth assumptions. This can be found in the "Settings" section under "Terminal Growth Assumptions." Depending on inventory and payment settings, these assumptions can influence the final periods of your financial model.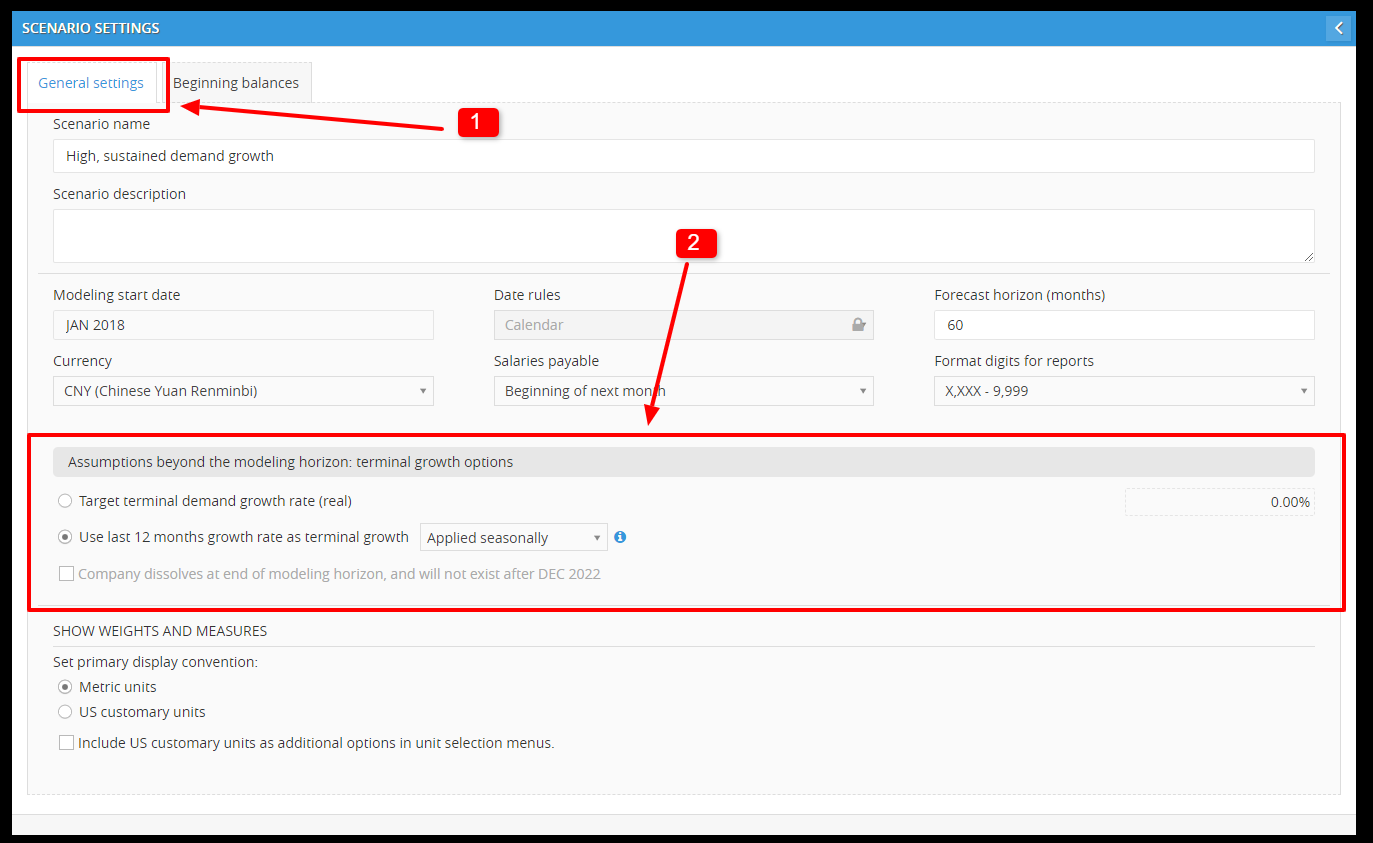
- Click Setting.
- Click on Beginning Balances tab.
- Set the terminal growth assumptions in "Assumptions beyond the modeling horizon: terminal growth options".
- Taxation Assumptions
If you haven't already entered taxation assumptions, it's essential to do so now. You can access tax settings via the "Tax" button on the left side of your landing screen. Properly configuring tax settings ensures that your financial calculations are accurate and compliant with tax regulations.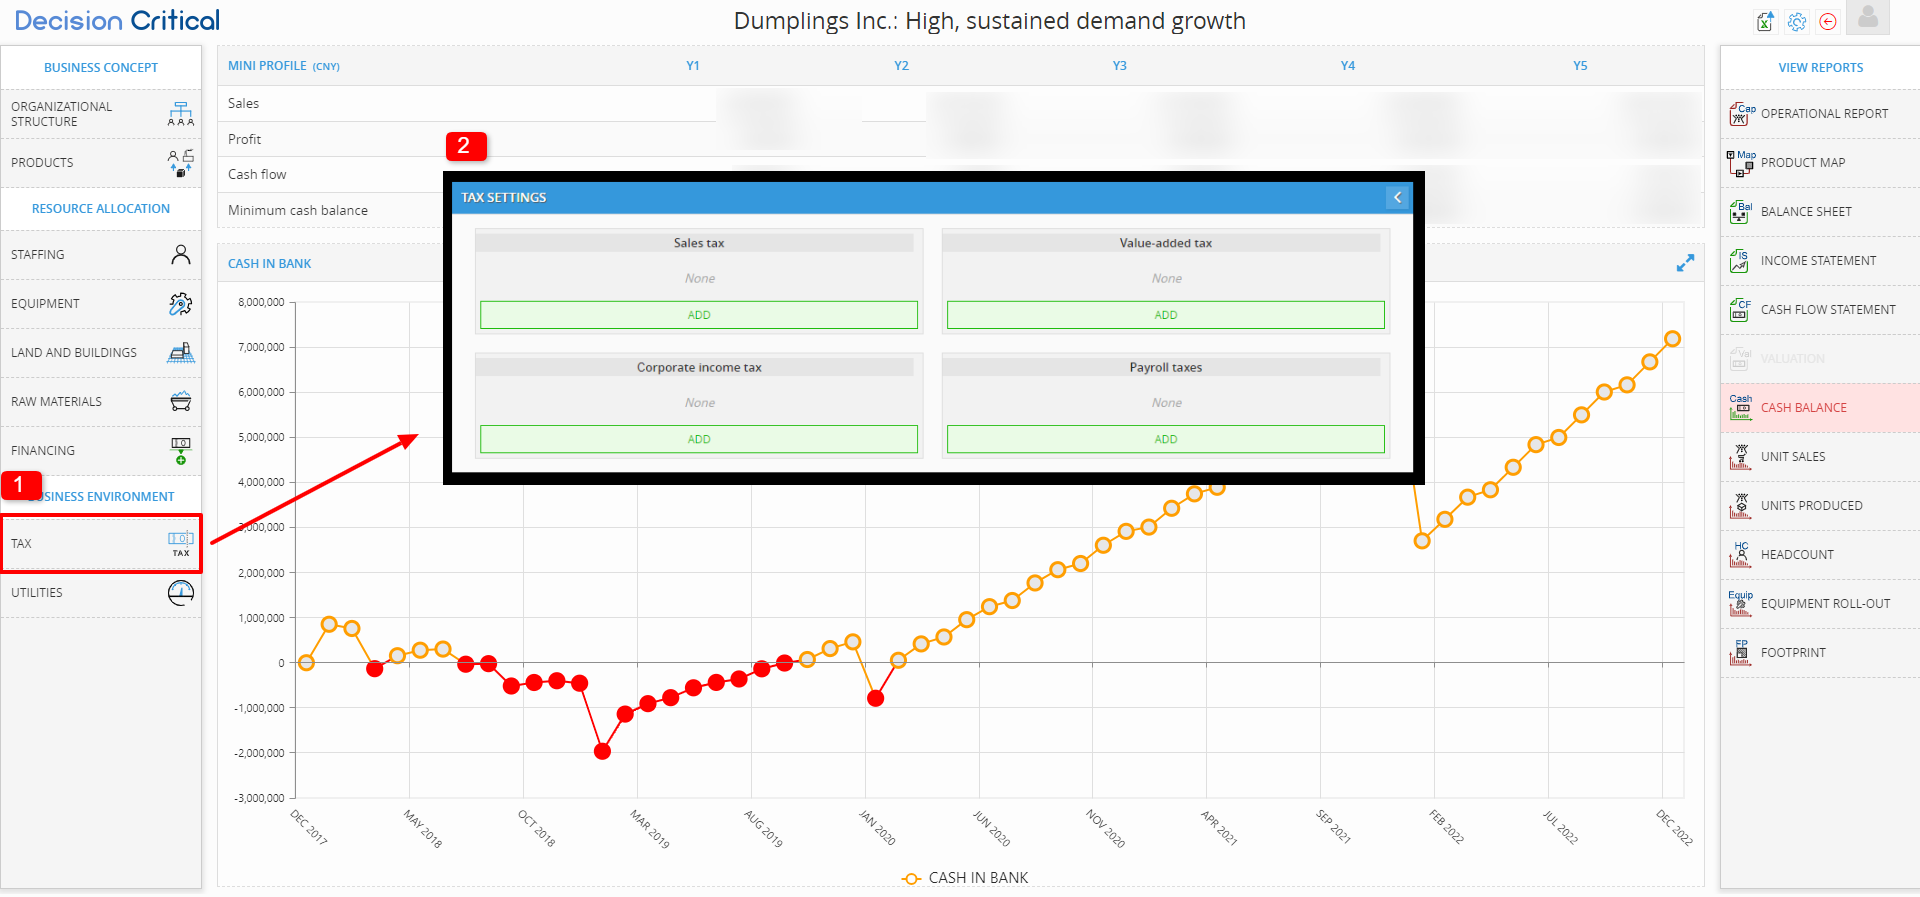
- Click on TAX assumptions.
- Select a type of tax you want to set.
- Click ADD.
- Enter details of the tax.
- For more on additional settings, read the article: Scenario settings
Helpful Tips
- Bottlenecks
-
You can restrict capacity in your scenario by setting up bottlenecks.
For example, limitations in quantities of direct labor, direct equipment and materials will all restrict throughput and, ultimately, sales.
-
- Direct labor
- To set up bottlenecks, ensure that the relevant position is set to manual loading (via settings in the position card – manual loading is the default setting).
- Direct equipment
- For an equipment bottleneck, ensure that the equipment is set to manual loading (via the capacity section of the equipment card – manual loading is the default setting).
- For an equipment bottleneck, ensure that the equipment is set to manual loading (via the capacity section of the equipment card – manual loading is the default setting).
- Purchasing
- For a purchasing bottleneck, load a purchasing plan by choosing manual purchasing in the purchasing section of the product card (automatic purchasing is the default setting).
- For a purchasing bottleneck, load a purchasing plan by choosing manual purchasing in the purchasing section of the product card (automatic purchasing is the default setting).
- Non-standard employee settings
- Employees may have settings that are different from the standard settings for their positions and that may differ from period to period. These may be managed through the individual employee cards (accessible only for manually-loaded employees).
- Manual production plans
- The default setting for production is automatic (i.e. the system tries to produce enough to fulfill demand and inventory goals). Production plans may be loaded manually by changing this session in the product card (under 'production').