🏗️ The Bedrock: Setting Up Raw Materials
In Decision Critical, Raw Materials are the physical building blocks of your enterprise. By defining these precisely, you move away from "ratio-based guesstimates" and toward a model that reflects your actual unit economics.
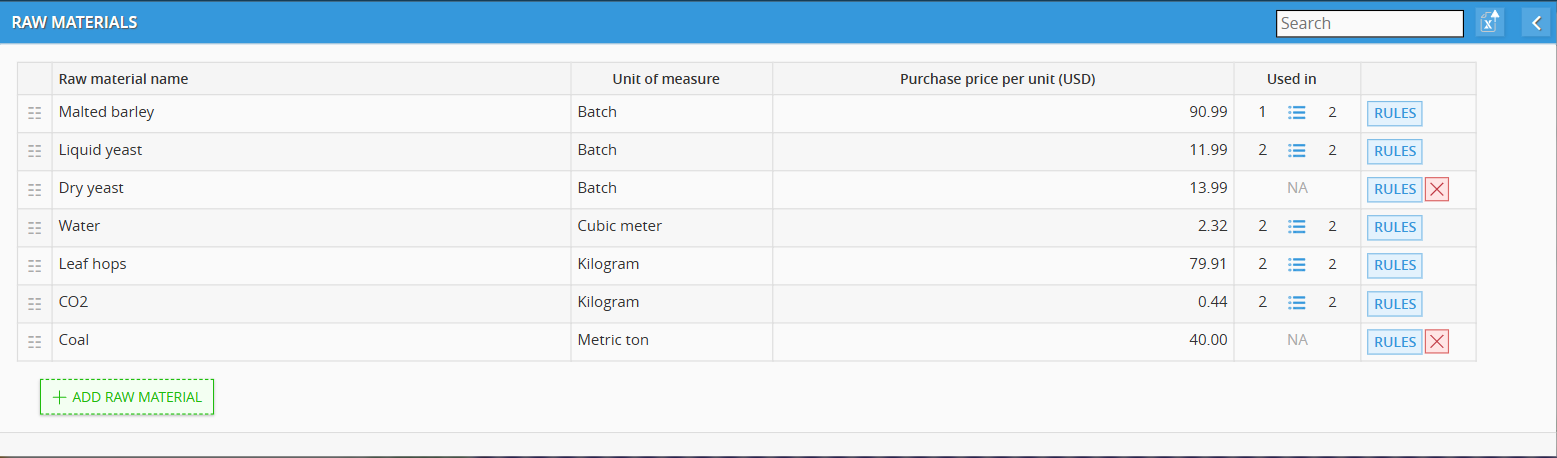
1. Accessing the List
-
Open your Scenario.
-
Under the Resource Allocation menu, select Raw Materials (RM).
-
Click + ADD RAW MATERIAL to start building your inventory.
2. Defining the Material DNA
For each item, you must establish its basic properties:
-
Name: Give it a clear label (e.g., "Organic Malt").
-
Unit of Measure: Define how you count it (e.g., kg, liters, batches, or metric tons).
-
Purchase Price: Enter your baseline cost per unit.
-
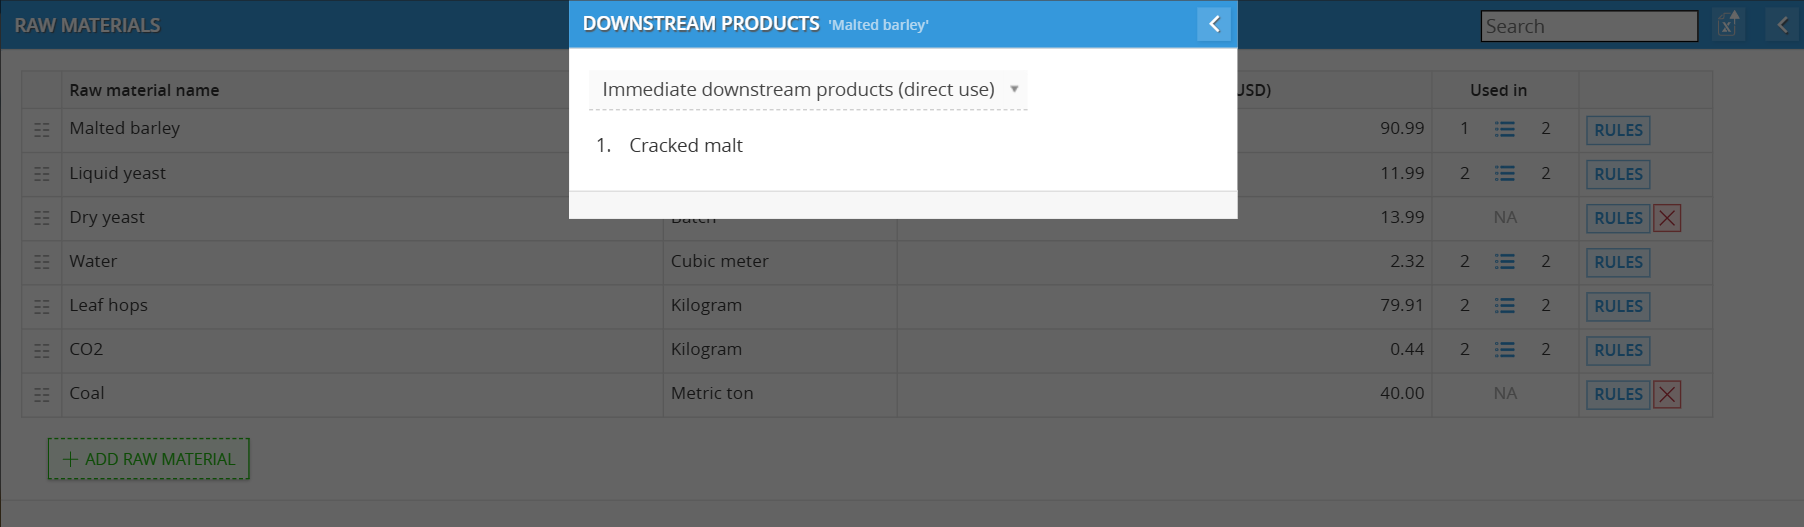
Used In: Shows exactly where your materials go:
-
Immediate Downstream Products: Intermediate steps, like turning "Malted barley" into "Cracked malt".
-
Finished Goods: The final products sold to customers, like a "Golden ale retail pint".
-
Note: If a material price spikes by 10%, you don't hunt through tabs. You check the "Used In" list to see exactly which product margins are now in the red.
⚙️ The Product Card: Setting the Rules
Clicking RULES on a material opens its Product Card. This is the "brain" of that resource, controlling how it behaves in your financial forecast.

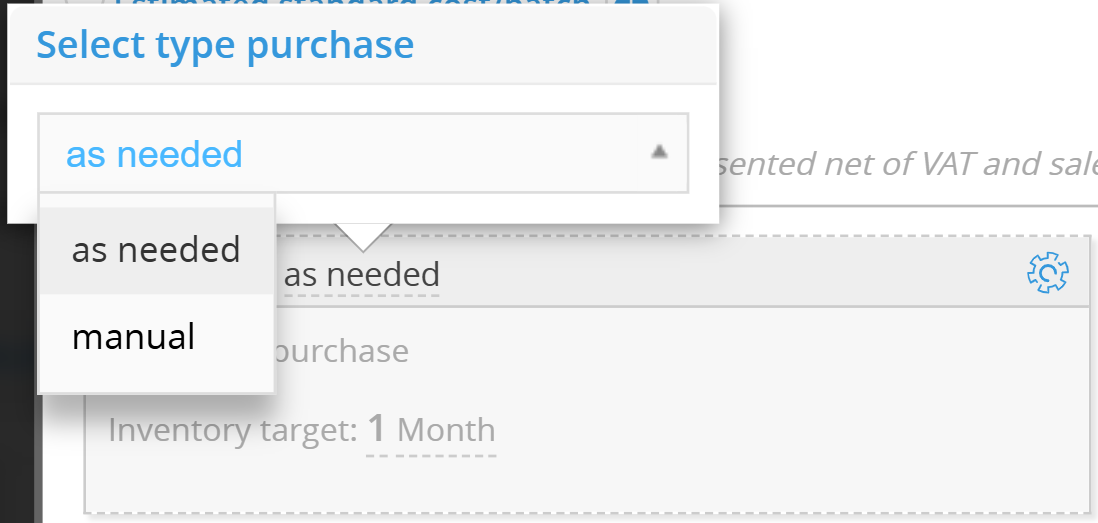
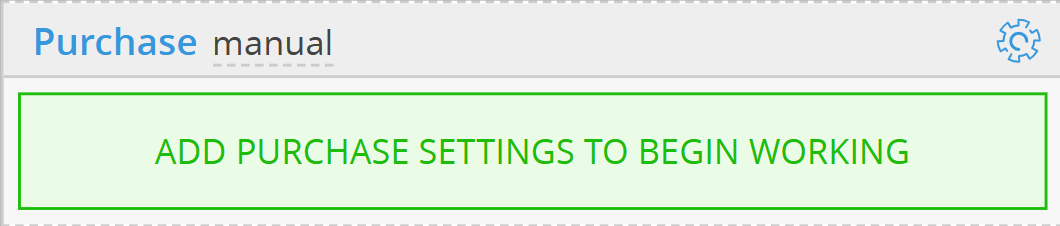
1. Purchase

You decide how and when cash leaves your bank account:
-
As Needed (Auto-Buy): DC "buys" materials only when production requires them. You must set an Inventory Target (e.g., "1 Month") to tell the system how much safety stock to keep on hand.
-
Manual Purchase*: Use this for bulk buys or fixed contracts. You manually define the growth "shape" for your buying patterns.
*If You Choosing Manual
If you go manual, you pick one of five "shapes" for your purchases:
Manual Purchase Growth Types
When you select Manual Purchase, you must define the "shape" of your buying pattern over time.
1. Constant Purchase
Use this for fixed-price contracts or subscriptions where you buy the exact same amount every single month.
Input: You simply enter the Purchase value and the Price/pcs.
Result: DC generates a flat line of expenses in your forecast.
Best for: Raw materials with high stability or "buffer" stock that never changes.
2. Step Growth
Use this to model "milestone" increases, such as when you open a new production line or sign a larger supply agreement.
- Input: You define specific date ranges (e.g., JAN 2025 to DEC 2029) and the volume for that specific period
Result: The graph looks like a staircase; the volume stays flat for a while, then "steps" up to a new level on a specific date.
Best for: Phased expansions or tiered vendor discounts.
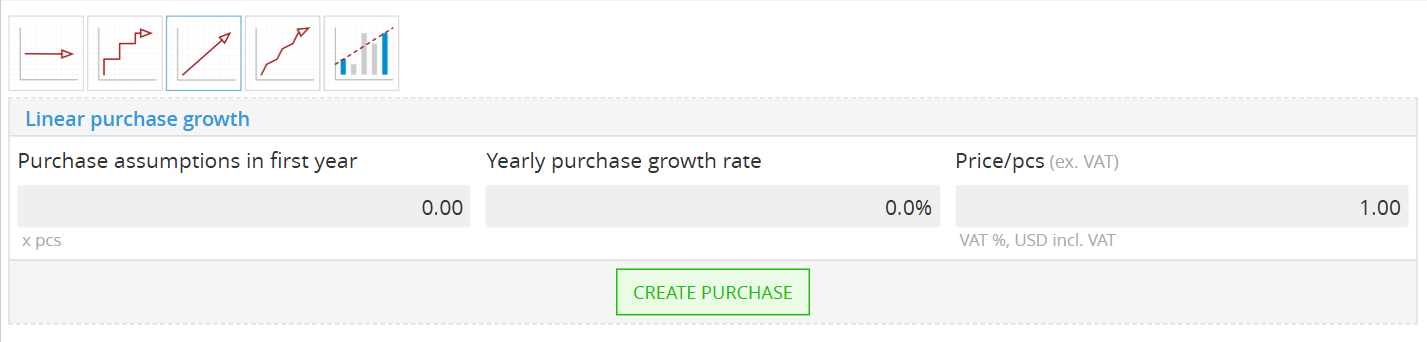
3. Linear Purchase Growth
Use this for a business that is scaling at a steady, predictable percentage every year.
Input: Enter your First-year assumptions and a Yearly purchase growth rate (e.g., 10%).
Result: DC calculates a smooth upward slope. Every month, the purchase volume is slightly higher than the last to keep up with the annual goal.
Best for: General scaling of a established business.
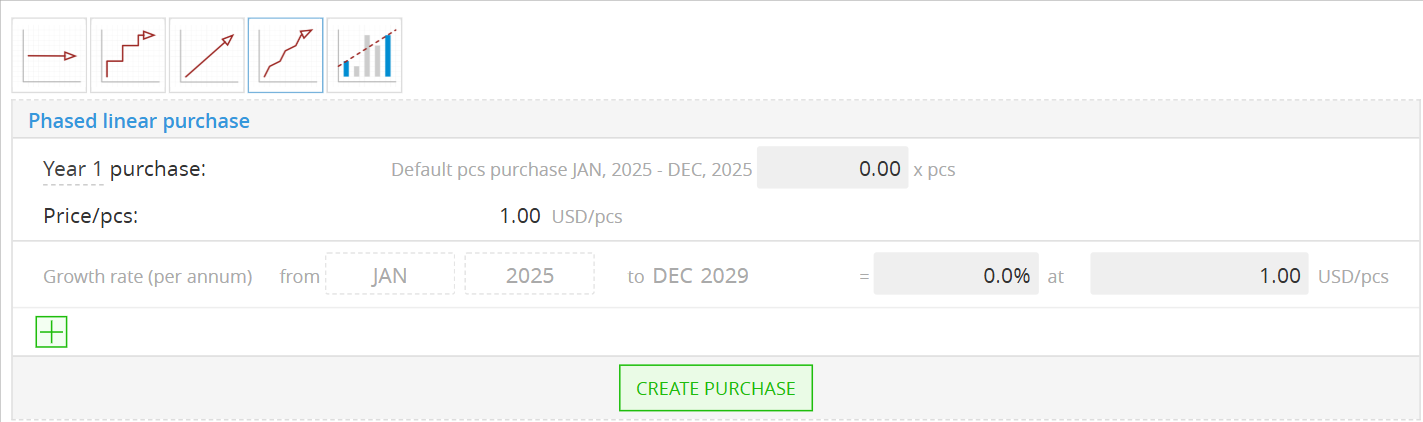
4. Phased Linear Purchase
This is a more advanced version of linear growth, allowing you to change your "scaling speed" over different years.
Input: You set a baseline for Year 1, then add specific Growth rates for different date ranges.
Result: The graph shows a line that might start steep (aggressive growth) and then level off (maturity) later in the forecast.
Best for: Startups that expect hyper-growth early on before stabilizing.
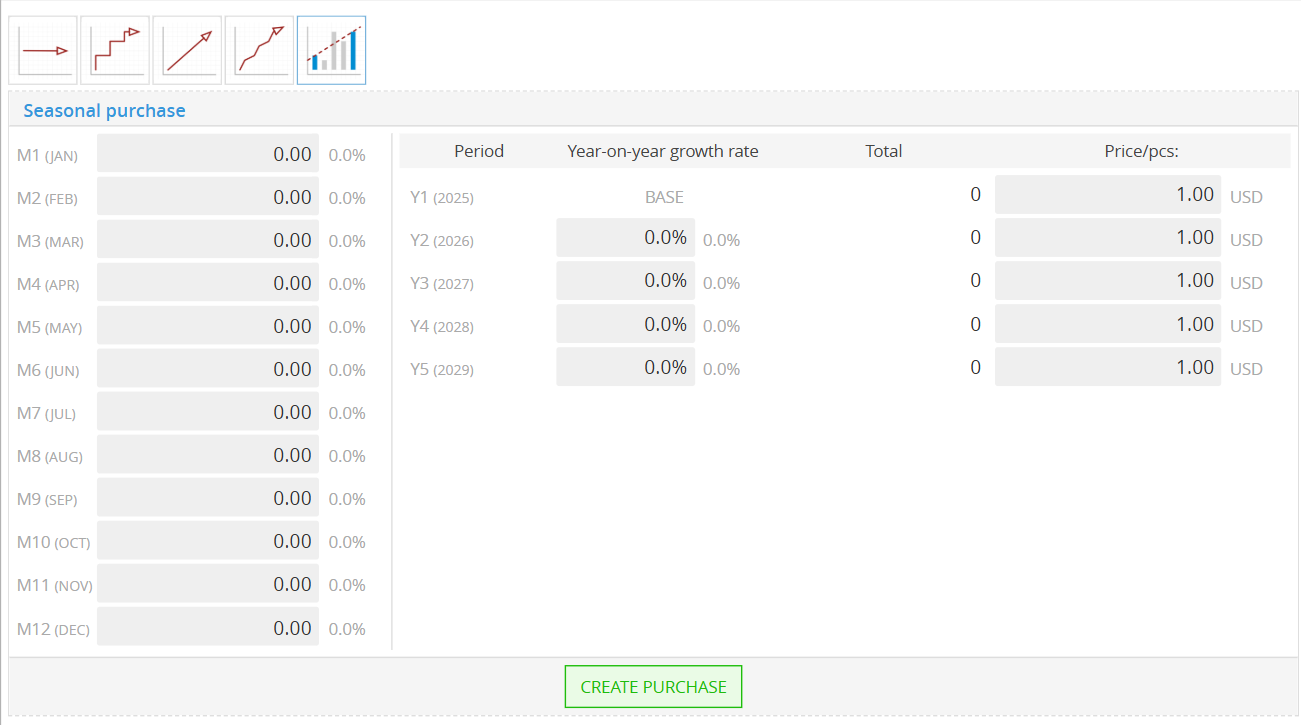
5. Seasonal Purchase
Use this if your business is dictated by the calendar—like a brewery selling more in the summer or a retailer preparing for the holidays.
Input: You provide a month-by-month breakdown (M1-M12) as a percentage of your annual total. You can also add a Year-on-year growth rate so the "peaks" get higher every year.
Result: A fluctuating bar chart that accurately reflects your high-volume and low-volume months.
Best for: Anything tied to weather, holidays, or specific industry cycles.


Once you done filling growth details, click Create Purchase
2. Product Payment Terms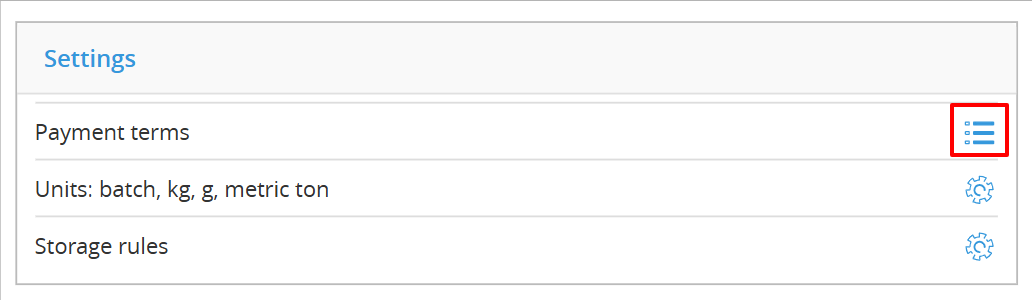
The Payment Terms section of the Product Card controls the timing of your cash outflows. By default, your material will be set to the "Default channel for purchases," but you can customize this to match your actual vendor agreements.
2.1 Selecting Your Payment Type

Click the underlined payment term (e.g., "On delivery") to open the selection menu. You have three primary options:
-
On Delivery: Cash leaves your account the moment the materials arrive at your facility.
-
On Account: Use this for standard credit terms (e.g., Net 30). You must set the specific duration in Months or Days after delivery.
-
Prepayment: Use this for vendors who require a deposit or full payment before shipping. You must set the duration in Months or Days before delivery.
2.2 Managing Multiple Purchase Channels (if any)
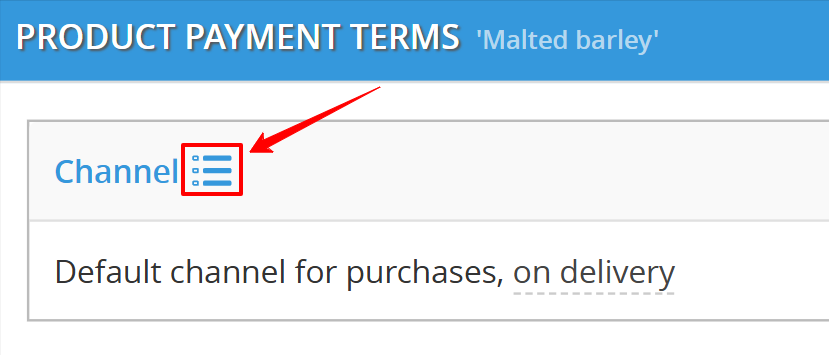
If you buy the same material from different vendors with different terms, you need to add more channels.
-
Access Channel Settings: Click the List Button next to the Channel header.
-
Add New Channel: Click + Add purchase channel to create a new vendor profile.
-
Customize: You can now set unique payment terms for this new channel, allowing you to model complex supply chains where some vendors give you credit and others require cash upfront.
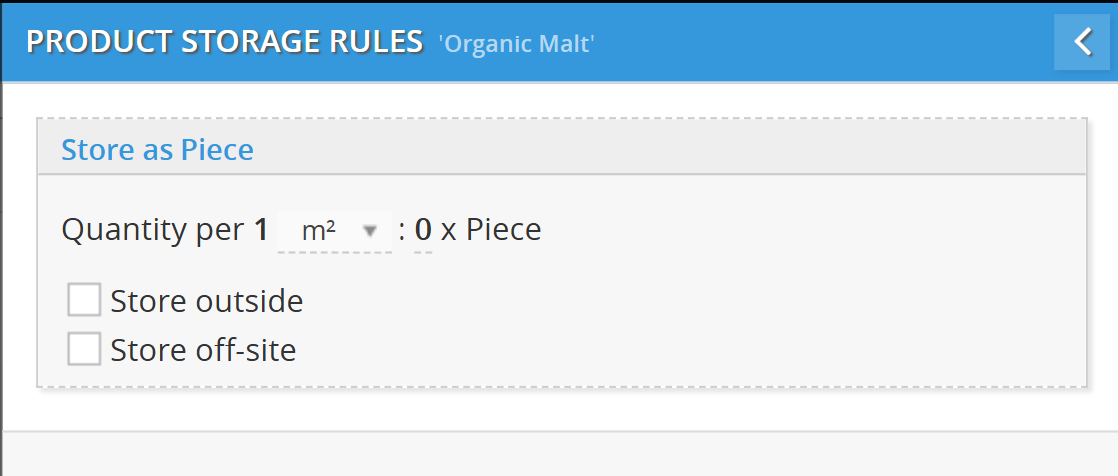
3. Product Storage Rules
In Decision Critical, Storage Rules prevent the "invisible" costs of inventory—like renting extra warehouse space—from surprising you later in your growth cycle.
1. Defining Storage Density
The core of this setting is the "Quantity per $1$ $m^2$" rule.
-
The Logic: You must define how many units of a product can physically fit into one square meter of your facility.
-
Example: If you can stack $50$ bags of "Organic Malt" in $1$ $m^2$, enter 50.
-
-
The Causal Chain: As your production demand rises and you buy more raw materials, DC uses this number to calculate exactly how much floor space you are consuming.
2. Location Settings
You can further refine where the system "places" this inventory:
-
Store Outside: Check this if the material doesn't require indoor climate-controlled space.
-
Store Off-site: Check this if the inventory is kept at a third-party logistics (3PL) provider or a separate warehouse.
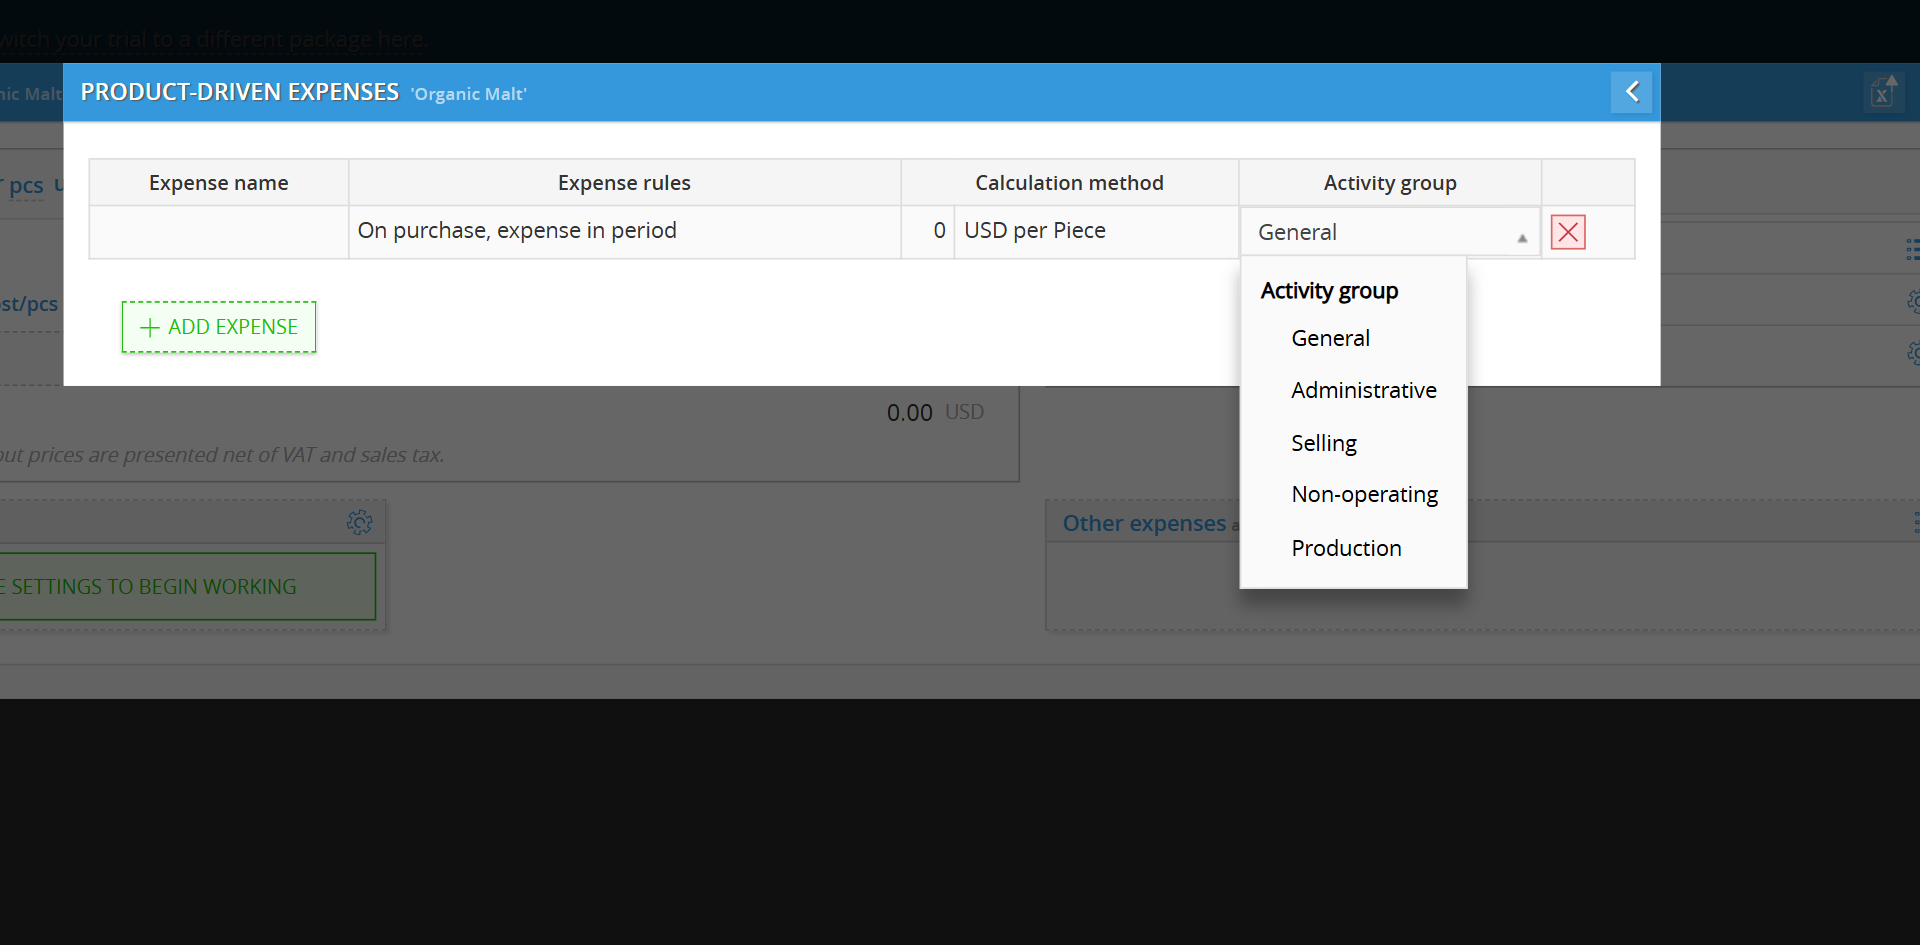
4. Product-Driven Expenses

The Other Expenses section on the Product Card allows you to link extra costs directly to the purchase or use of a specific material.
1. Adding an Expense
-
On the Product Card, find the Other expenses all channels section and click the List Button.
-
In the pop-up window, click + ADD EXPENSE.
-
Enter a clear Expense name (e.g., "Freight" or "Import Duty").
2. Setting the Rules
Once added, you need to tell DC how this expense behaves:
-
Expense Rules: Choose how the cost is handled:
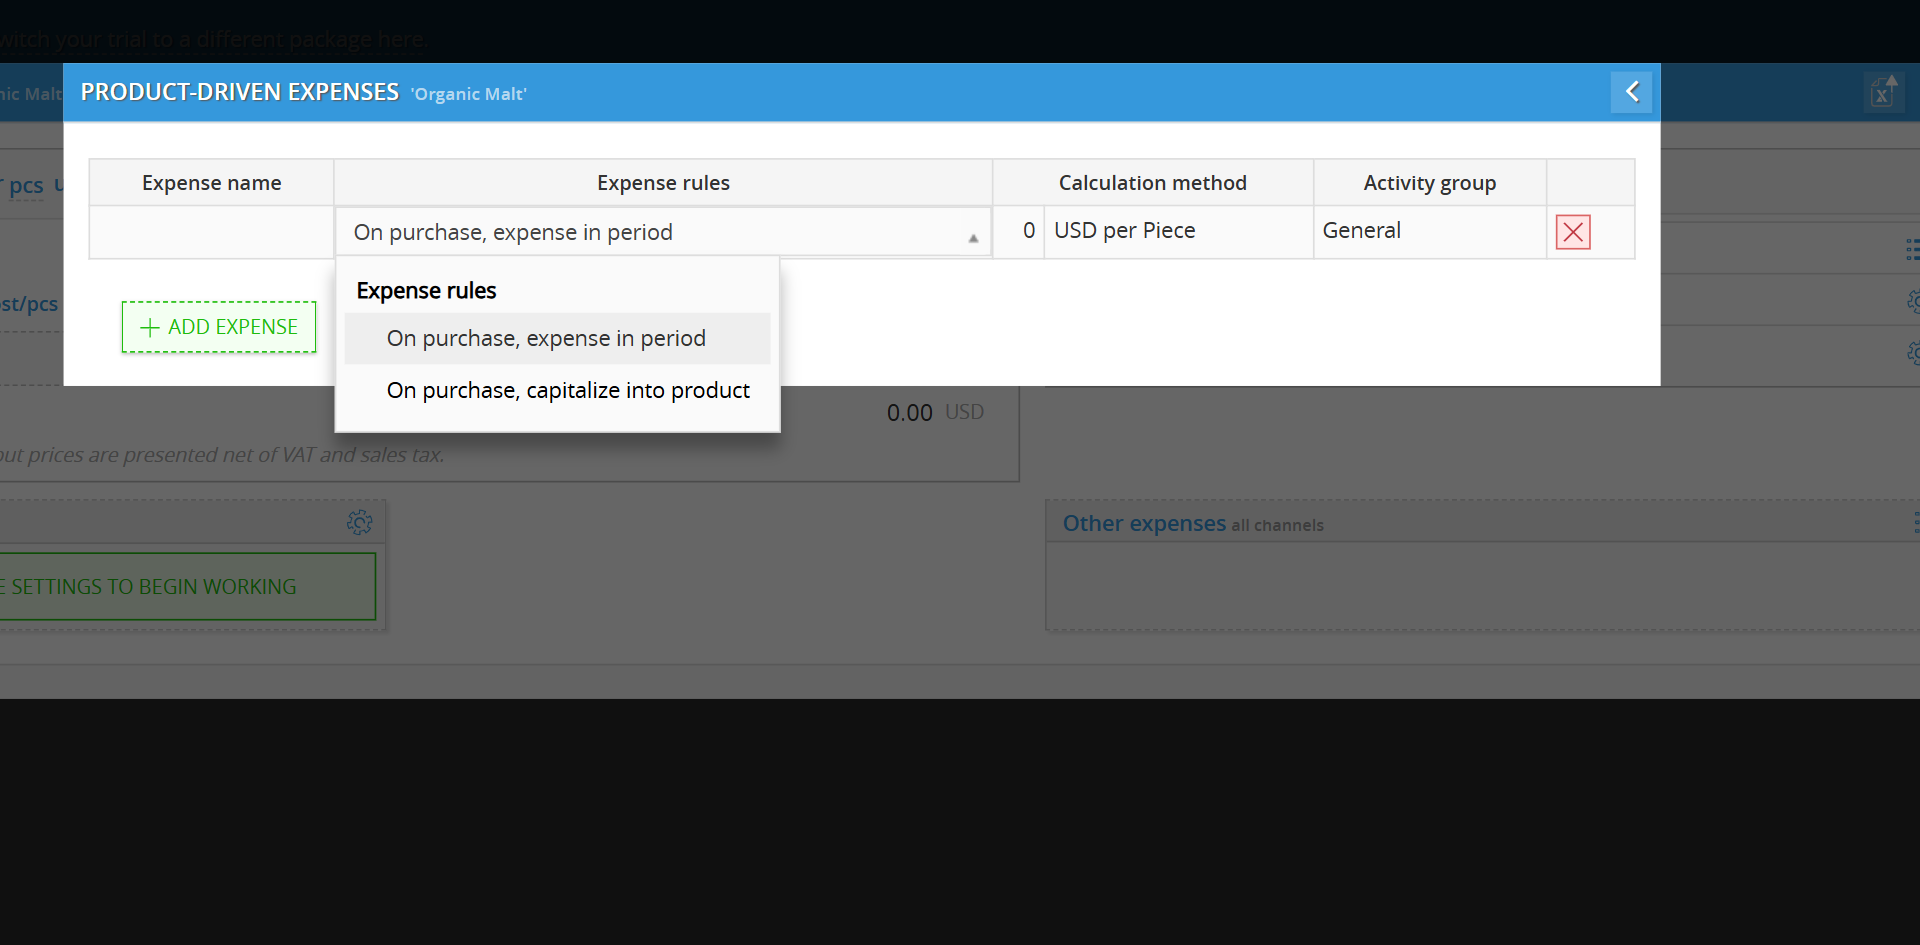
-
On purchase, expense in period: The cost hits your P&L immediately when you buy the material.
-
On purchase, capitalize into product: The cost is added to the value of the inventory and only hits your P&L when the product is eventually sold (COGS).
-
-
Calculation Method: Define how the amount is calculated:
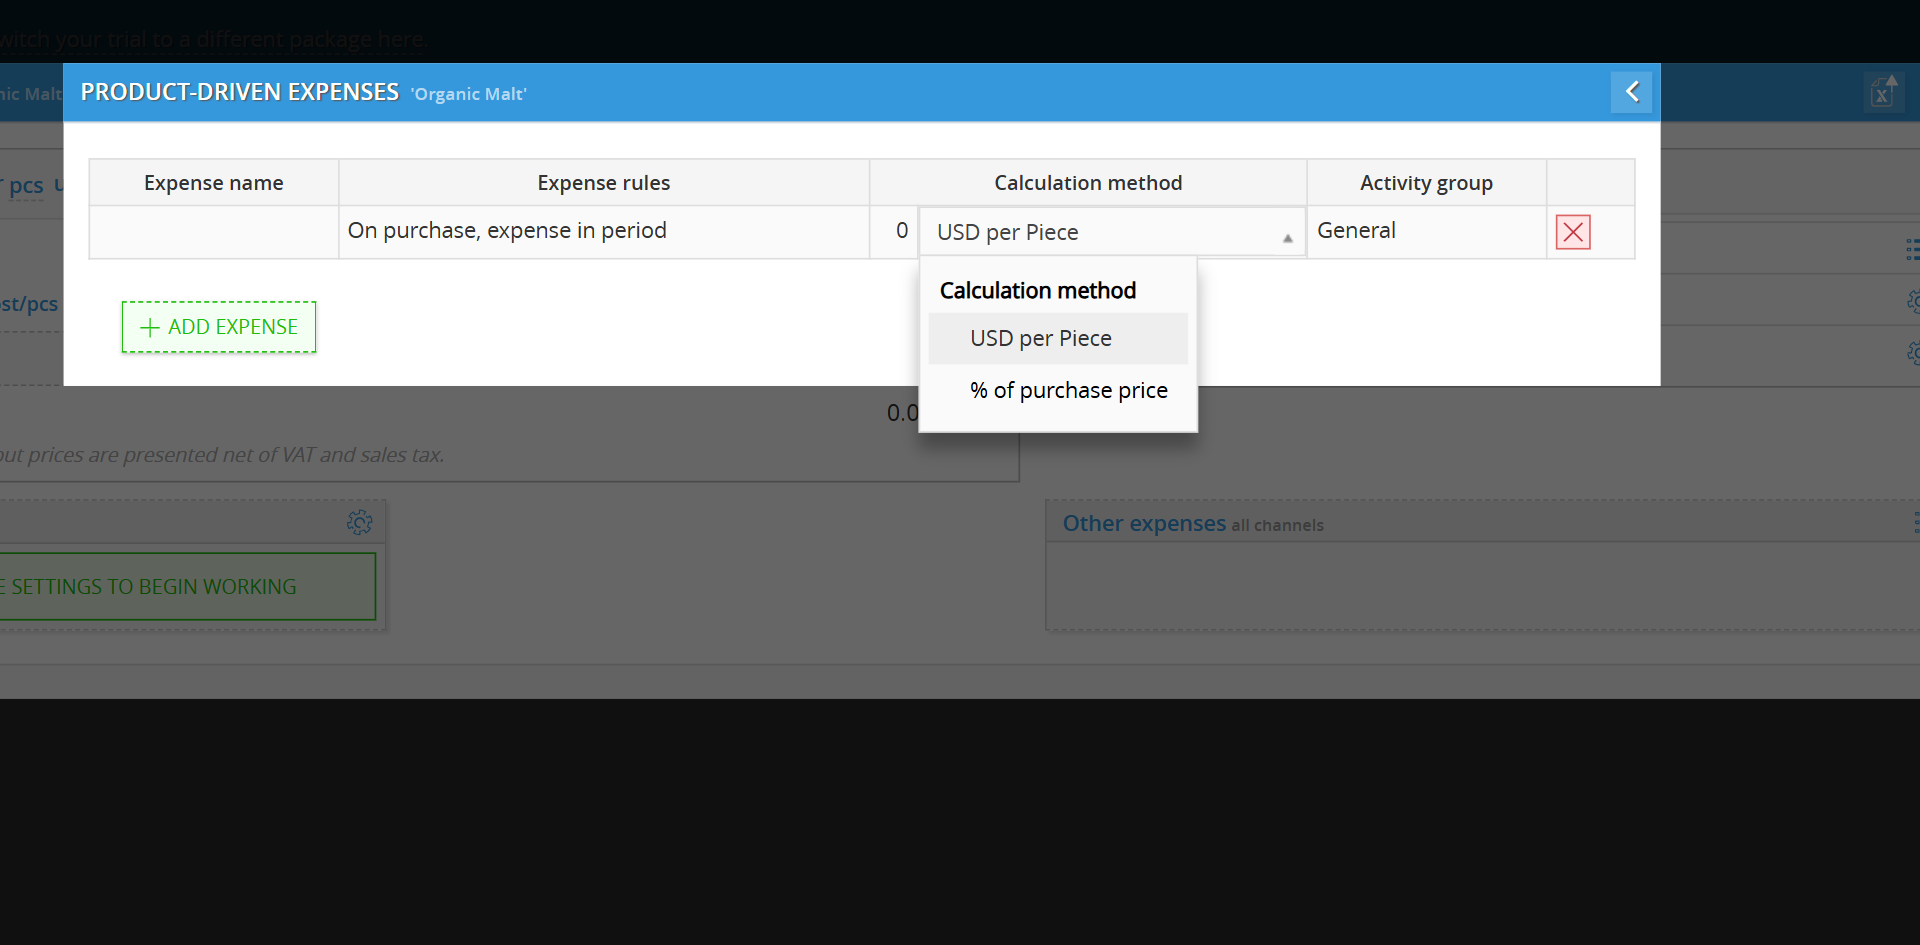
-
USD per Piece: A flat fee for every unit purchased.
-
% of purchase price: A variable cost based on the total invoice value.
-
-
Activity Group: Select the correct cost center (e.g., Production, Selling, or Administrative) to ensure it's categorized right in your financial reports.
💡 If this doesn’t solve your issue or you have more questions, feel free to reach out through our [contact form]. We’ll get back to you within 2–3 business days.