How to Add Equity Investments to Your Financial Scenario
Setting up your financing assumptions is a critical step in building an accurate business model. This guide will walk you through how to record Equity Investments (Paid-in Capital) within the Decision Critical platform to ensure your cash flow and valuation reflect your actual funding.
Getting Started
By following these steps, you will successfully document the capital injections your business has received or expects to receive from investors.
Step-by-Step: Adding Equity Investment
-
Navigate to Financing: In your Scenario. Under the Resource Allocation section, click on Financing.
-
Select Investment Type: You will see two primary options: Equity Investment and Debt. Click on the EQUITY INVESTMENT (Paid-in Capital) box.
-
Initiate New Entry: Click the green + ADD INVESTMENT button located at the bottom left of the table.
-
Enter Investment Details:
-
Investment Name: Enter a descriptive name for the funding source (e.g., "Angel Round," "Series A," or the specific name of the investor).
-
Amount (USD): Input the total dollar amount received.
-
Received on: Select the month and year the funds were (or will be) deposited.
-
-
Review and Save: The system automatically saves your entries. If you need to remove an entry, click the red 'X' icon at the end of the row.
Note on Timing: All investment capital is considered received at the beginning of the selected month. For business valuation purposes, this capital will default to showing up in the previous month's closing balance.
Troubleshooting & FAQs
-
Where do I see the impact of this investment? The equity you add here will appear in your Cash Flow Statement as a cash inflow and on your Balance Sheet under Equity/Paid-in Capital.
-
What if I have multiple investors in one round? You can either group them as a single line item (e.g., "Seed Round") or list them individually by clicking + ADD INVESTMENT for each person or firm.
-
I made a mistake in the amount. How do I fix it? Simply click into the "Amount (USD)" cell for that specific row and type over the existing value.
Managing Debt and Loans
In this section, we will cover how to record liabilities and loan repayments to ensure your scenario accurately reflects your debt obligations and interest expenses.
Step-by-Step: Adding a New Debt
-
Open the Debt List: From the primary Financing menu, click the DEBT (Loans) box.
-
Add Entry: Click the green + ADD DEBT button at the bottom left.
-
Select Loan Type: Choose the appropriate debt structure.
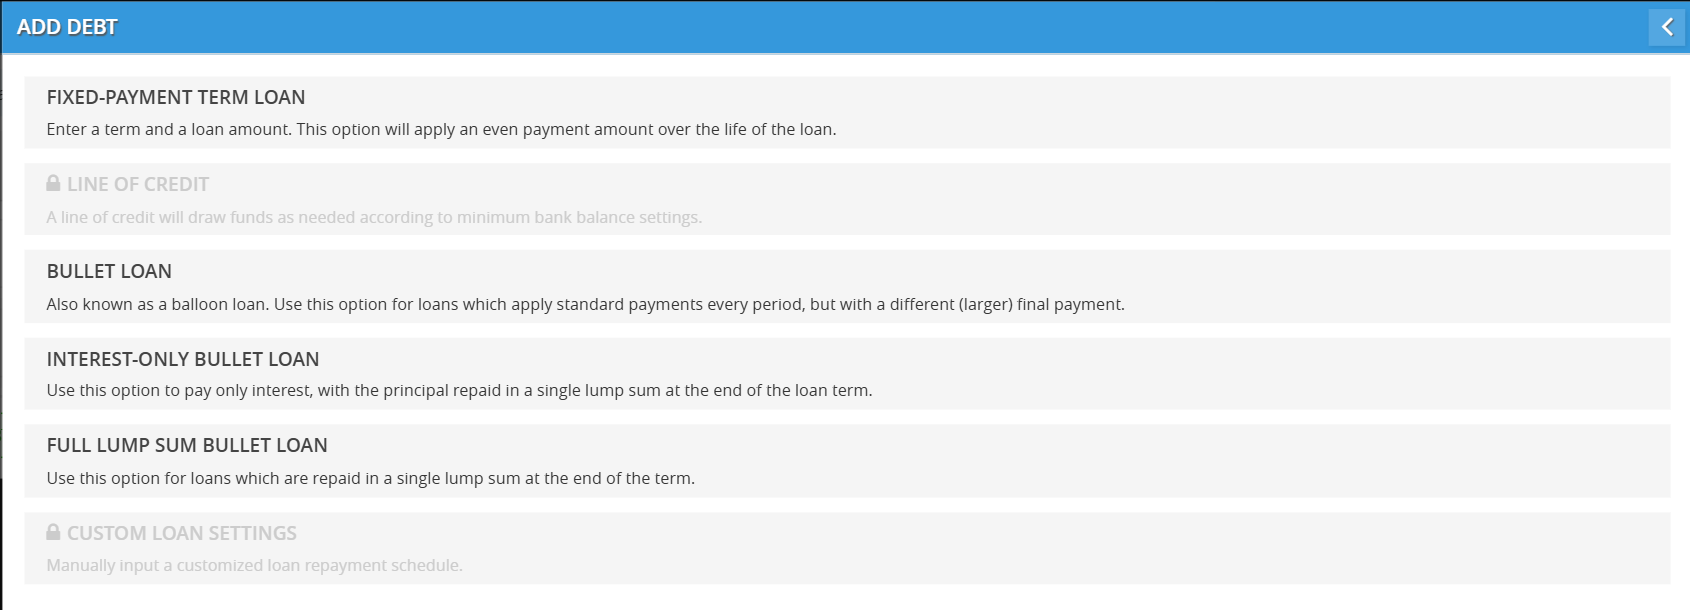
Understanding Loan Types in Decision Critical

Choosing the right loan structure is essential for accurate cash flow forecasting. The platform offers several debt models to match your real-world financing agreements. Below is an explanation of each loan type available in the Add Debt menu.
1. Fixed-Payment Term Loan
This is the most common loan type (like a standard mortgage or auto loan).
-
How it works: You pay a consistent, even amount every period (monthly or quarterly) over the life of the loan.
-
Structure: Each payment covers the interest for that period, and the remainder goes toward reducing the principal balance. By the end of the term, the loan is fully paid off.
-
Best for: Standard bank loans with predictable repayment schedules.
2. (Coming soon) Line of Credit (LOC)
-
How it works: This is a flexible revolving credit facility.
-
Structure: Instead of receiving a lump sum, the business draws funds only as needed to maintain a minimum bank balance (based on your settings). You only pay interest on the amount actually borrowed.
-
Best for: Managing short-term working capital fluctuations and covering temporary cash gaps.
3. Bullet Loan
Also known as a Balloon Loan.
-
How it works: You make standard, regular payments every period, but those payments do not fully pay off the loan.
-
Structure: At the end of the term, you make one final, larger "bullet" payment to settle the remaining balance.
-
Best for: Loans where you want lower monthly payments during the term and plan to refinance or pay off the bulk of the debt at the end.
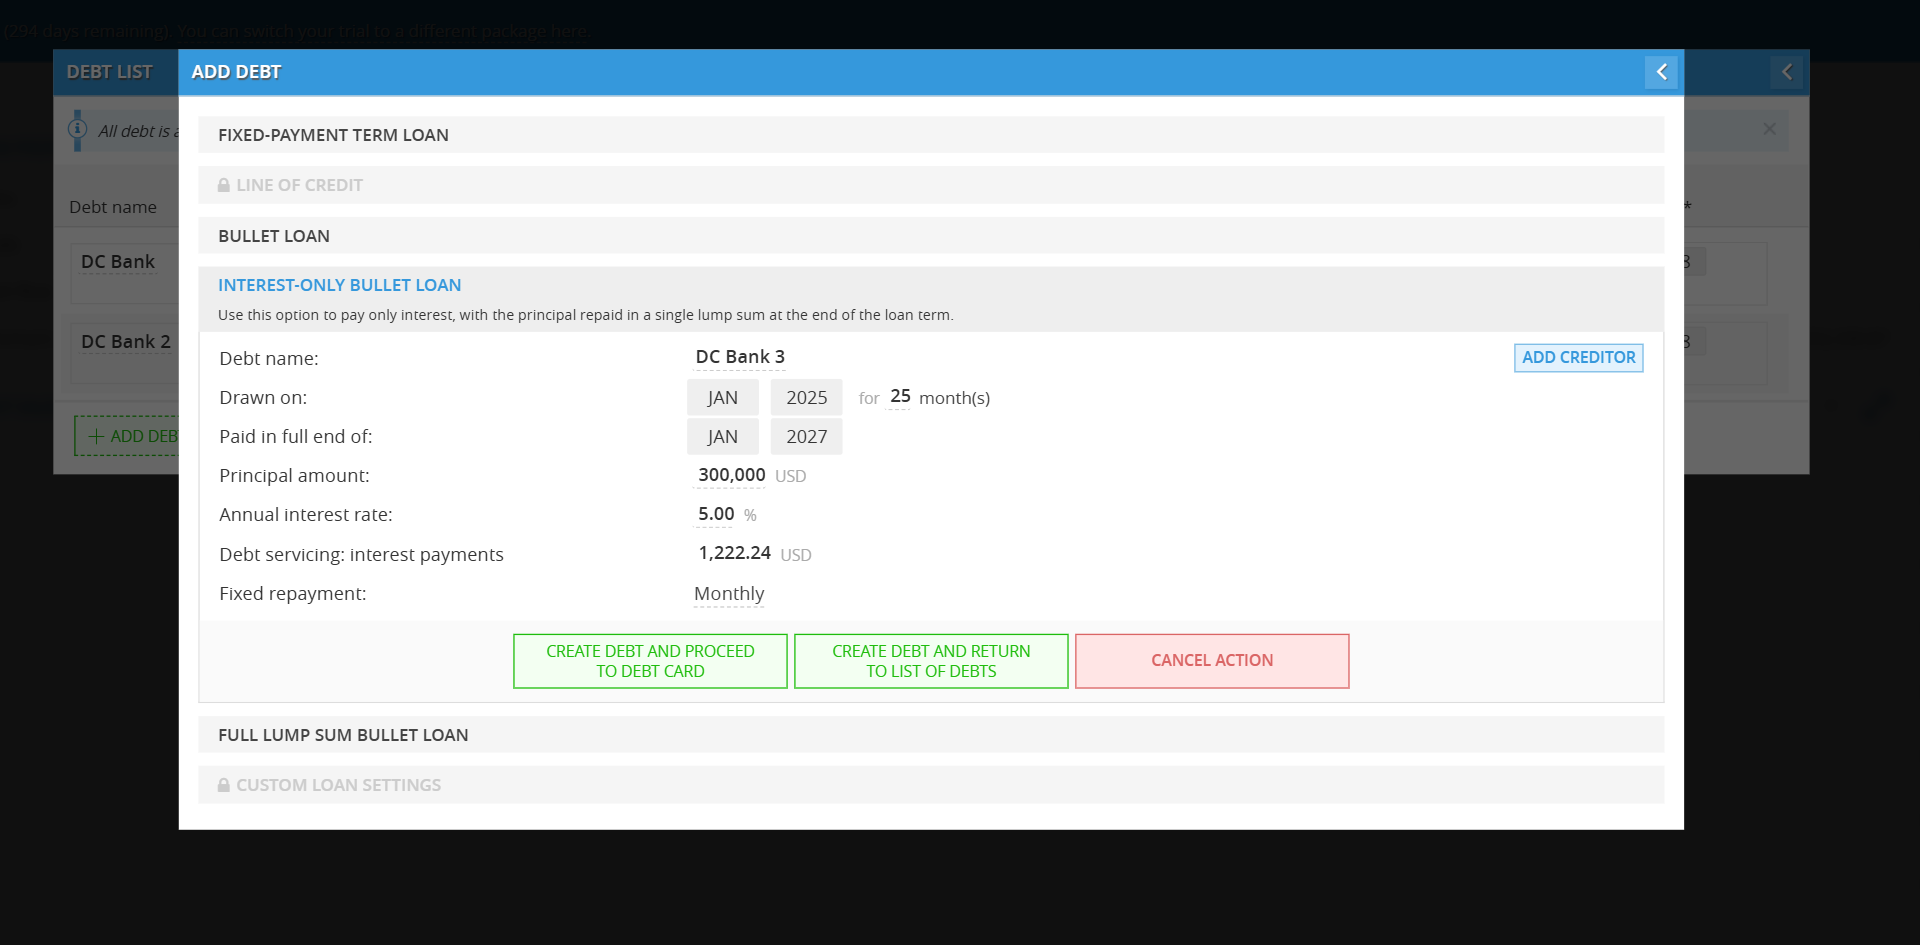
4. Interest-Only Bullet Loan
-
How it works: During the life of the loan, your recurring payments cover only the interest accrued.
-
Structure: The principal balance does not decrease during the term. The entire original principal amount is then repaid in a single lump sum at the very end.
-
Best for: Short-term financing or construction loans where you want to maximize cash flow during the project and repay the principal once the project is complete.
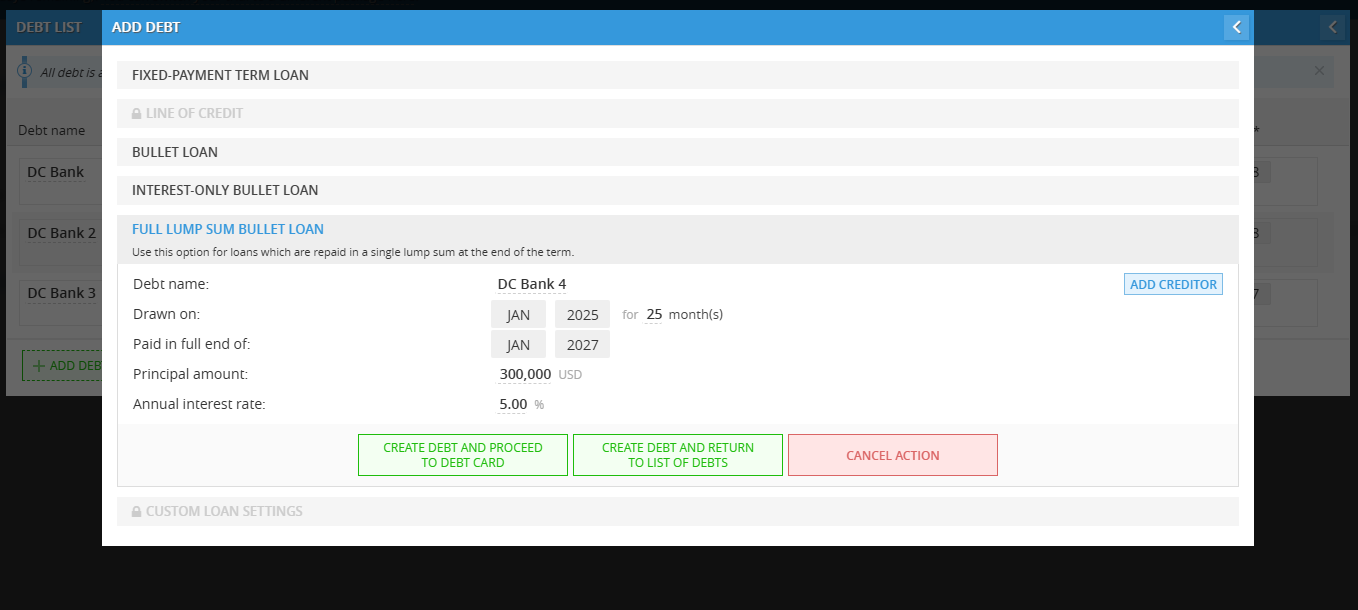
5. Full Lump Sum Bullet Loan
-
How it works: No payments are made during the term of the loan.
-
Structure: Both the principal and all accumulated interest are repaid together in one single, large payment at the end of the term.
-
Best for: Short-term bridge loans or "accrual" loans where no cash is expected to leave the business until the maturity date.
6. (Coming soon) Custom Loan Settings
-
How it works: This option allows for total flexibility.
-
Structure: You can manually input a customized repayment schedule that doesn't fit the standard mathematical models above (e.g., seasonal payments or irregular principal reductions).
-
Best for: Complex private lending agreements or non-standard financing structures.
Comparison Table
| Loan Type | Regular Payments? | Reduces Principal? | Final Large Payment? |
| Fixed-Payment | Yes (Even) | Yes | No |
| Bullet Loan | Yes (Even) | Partially | Yes |
| Interest-Only | Yes (Interest only) | No | Yes (Full Principal) |
| Full Lump Sum | No | No | Yes (Principal + Interest) |
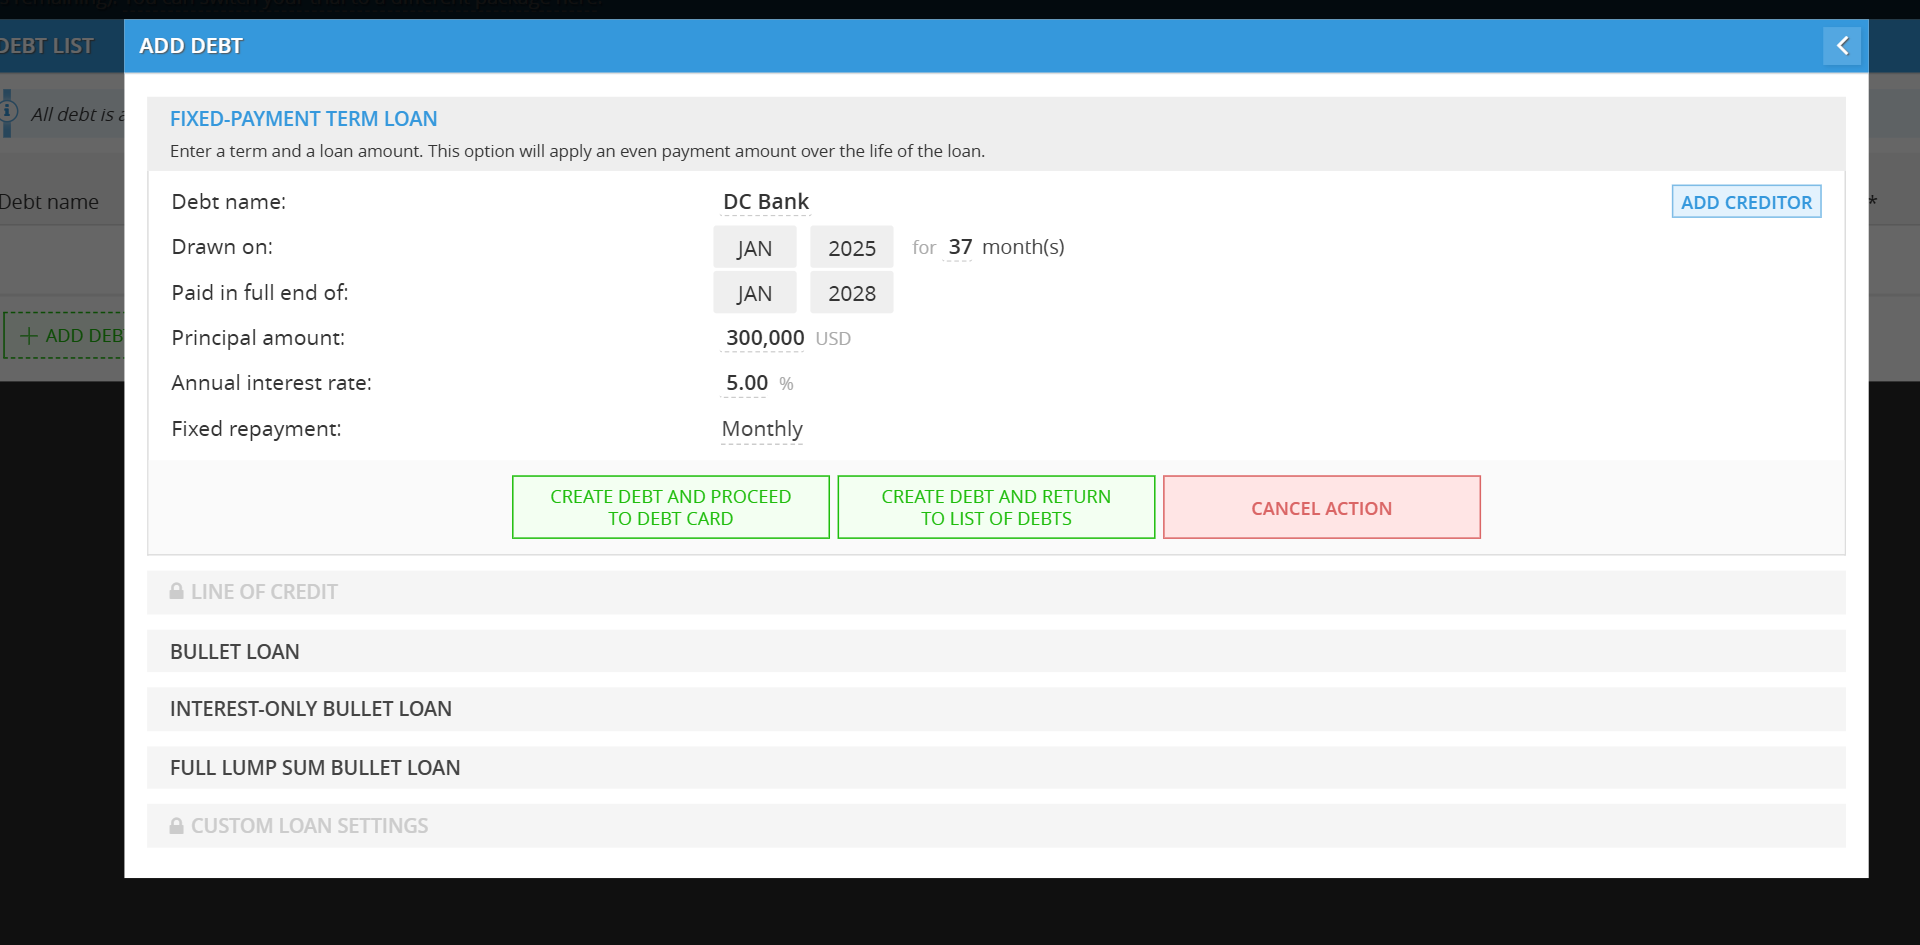
1. Fixed-Payment Term Loan
Configure Loan Details:
Debt Name: Enter the name of the loan or lender
Add Creditor (Optional): Click the ADD CREDITOR button to add a field to add creditor.
Drawn On: Select the month and year you will receive the funds. Note that months are represented numerically (e.g., 1 for January).
Principal Amount: Enter the total amount of the loan.
Annual Interest Rate: Enter the interest percentage.
Fixed Repayment: Choose the payment frequency—either Monthly or Quarterly.
Finalize: Click CREATE DEBT AND PROCEED TO DEBT CARD.
Navigating the Debt Card & Amortization Schedule
Once the debt is created, you will be taken to the Loan Settings (Debt Card). This view provides a detailed breakdown of your repayment schedule:
Switching Views: At the top right of the schedule table, use the M (Month), Q (Quarter), or Y (Year) buttons to toggle the level of detail displayed.
Exporting Data: Click the Excel icon in the top right corner of the modal to download the full amortization schedule for your records.
Detailed Breakdown: The schedule clearly shows the Payment amount, and how much of that payment is allocated toward Interest vs. Principal, along with the remaining Balance for each period.


2. Line of Credit (LOC) - Coming soon
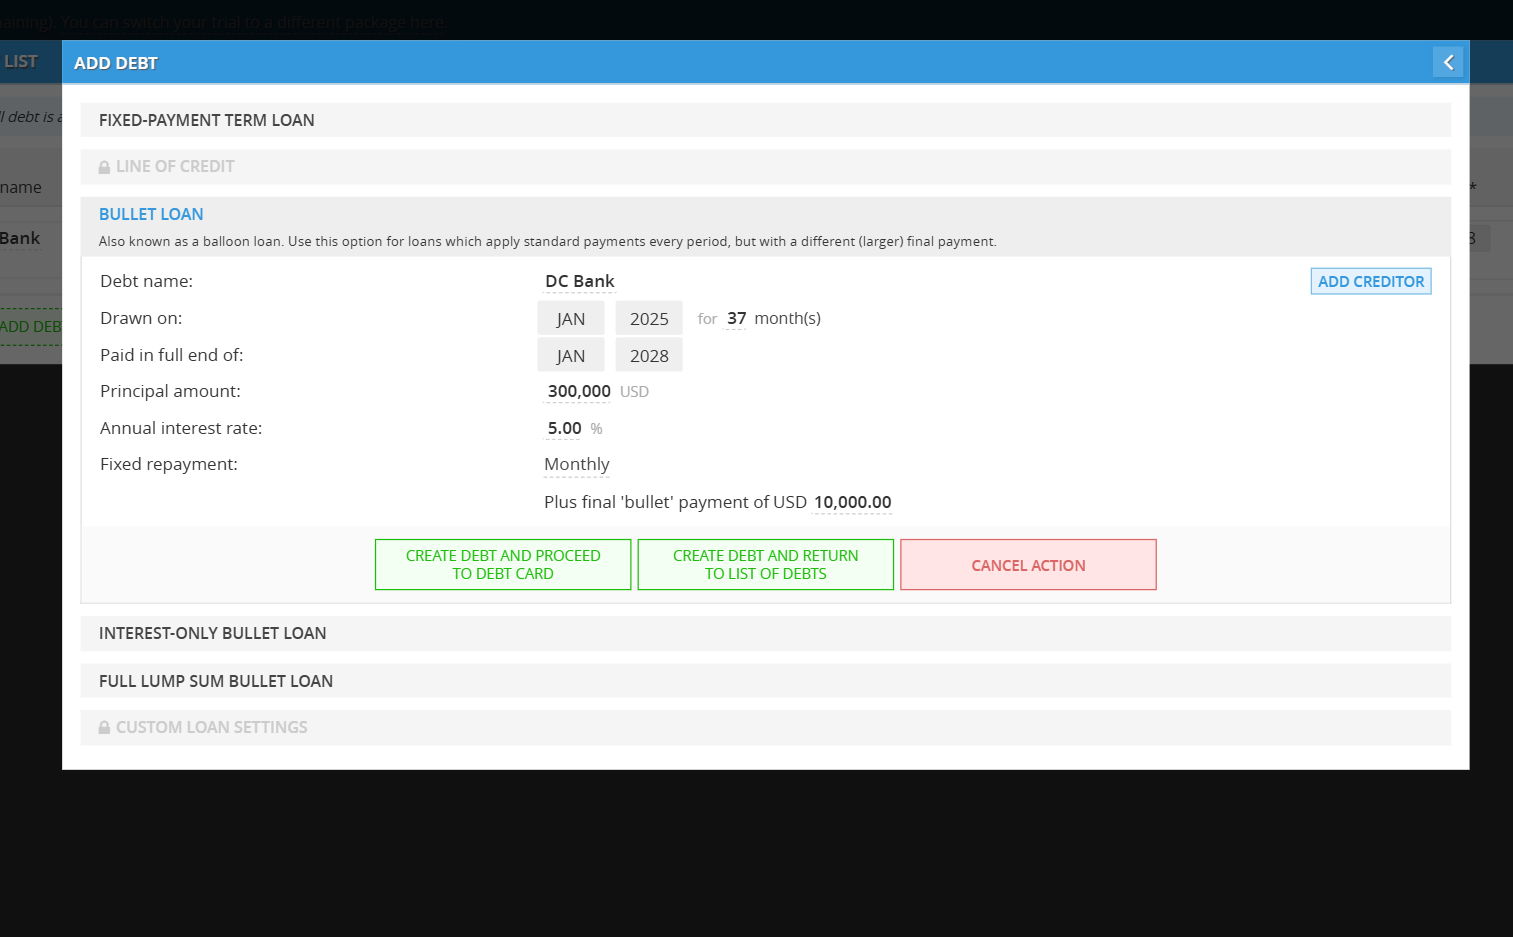
3. Bullet Loan
- Configure Loan Details:
Debt Name: Provide a name for the loan
- Add Creditor (Optional): Click the ADD CREDITOR button to add a field to add creditor
Drawn on: Select the month and year the loan starts
Paid in full end of: Select the final maturity date. The system will automatically calculate the total duration in months
Principal Amount: Enter the total borrowed amount
Annual Interest Rate: Input the percentage for yearly interest
Fixed Repayment: Choose Monthly or Quarterly for the recurring installments
- Finalize: Click CREATE DEBT AND PROCEED TO DEBT CARD.
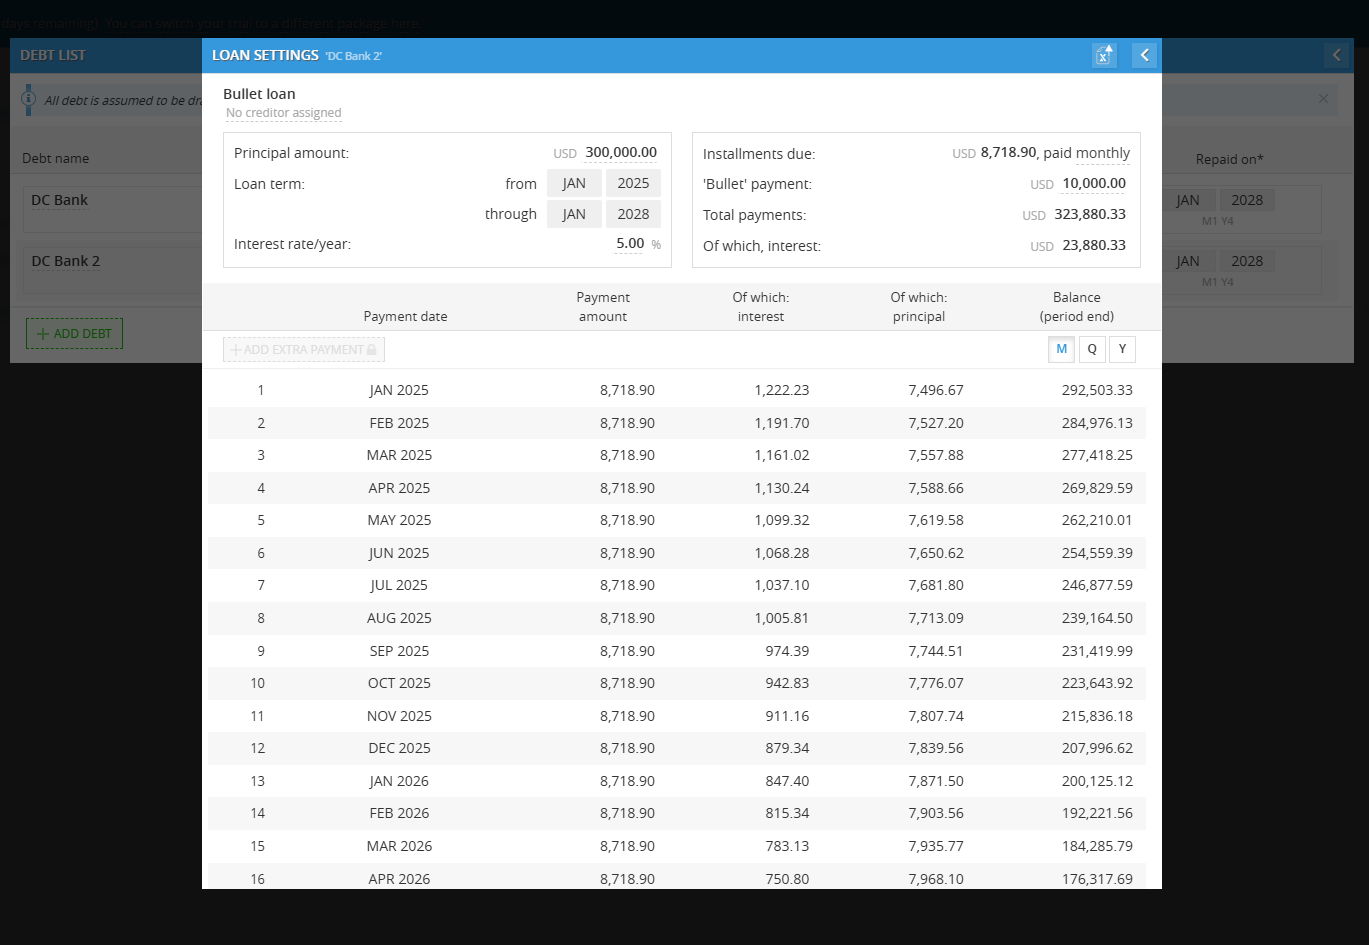
Navigating the Debt Card & Amortization Schedule
Once created, you will see the Loan Settings card. This provides a clear visualization of how the "Bullet" affects your cash flow:
Installments Due: Displays the regular recurring payment amount.
'Bullet' Payment: Highlights the large lump sum due at the end of the term.
Amortization Table: Scroll to the bottom of the table to see how the final payment brings the Balance (period end) to zero.
Visualization: You can toggle the view between Month (M), Quarter (Q), and Year (Y) or export the data to Excel.
4. Interest-Only Bullet Loan
Enter Loan Details:
Debt Name: Give your loan a specific name.
- Add Creditor (Optional): Click the ADD CREDITOR button to add a field to add creditor
Drawn on: Select the month and year you receive the loan.
Paid in full end of: Select the maturity date.
Principal Amount: Enter the total amount borrowed.
Annual Interest Rate: Input the interest percentage.
Fixed Repayment: Choose Monthly or Quarterly. Note that these payments will consist only of interest.
Finalize: Click CREATE DEBT AND PROCEED TO DEBT CARD.
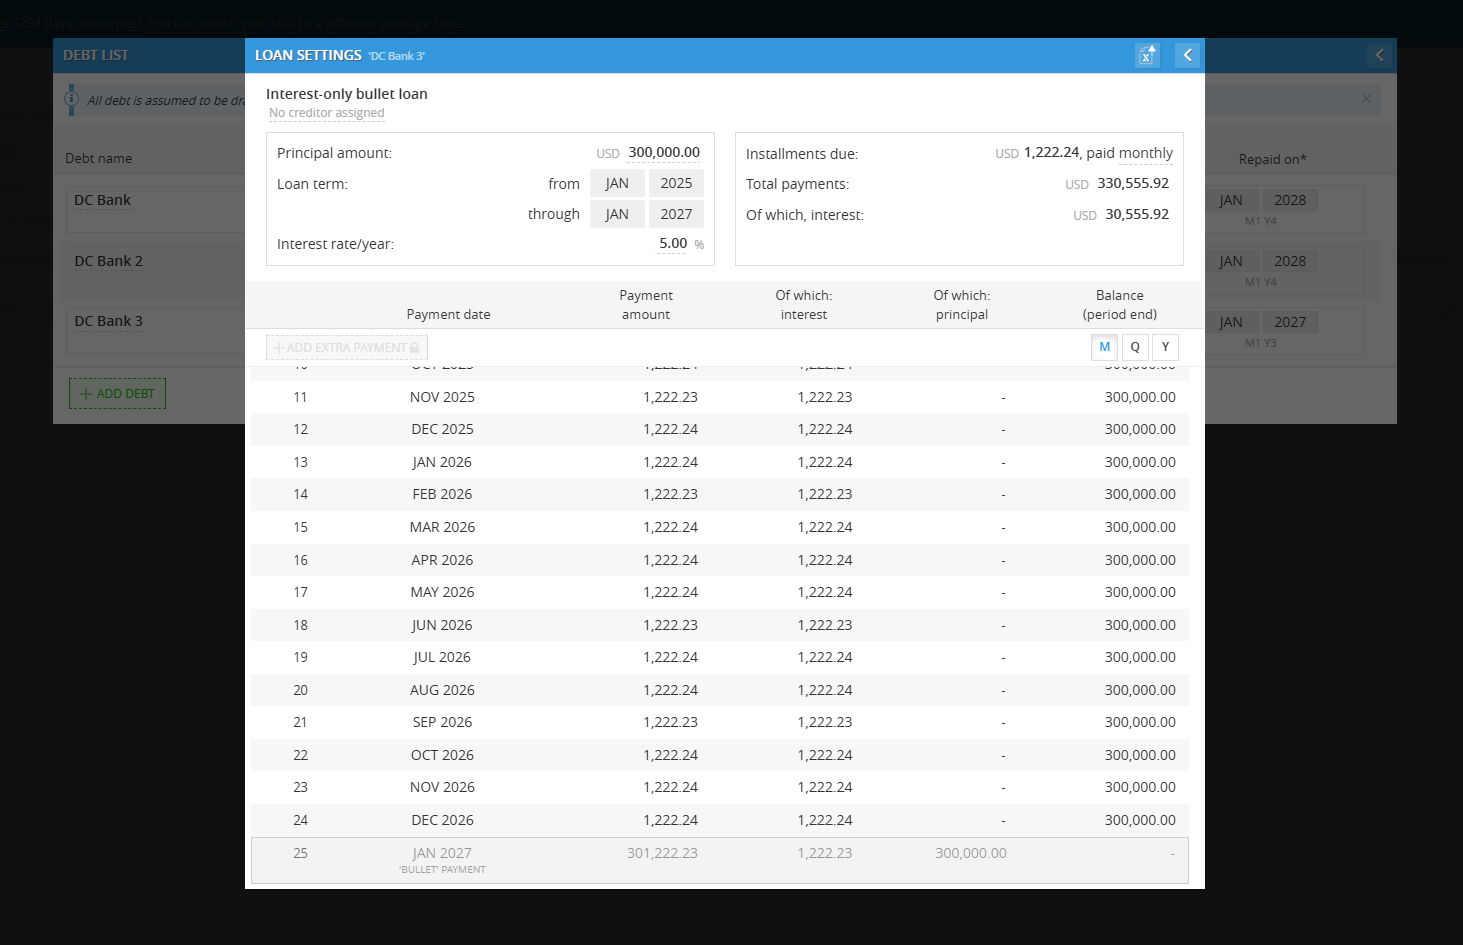
Understanding the Interest-Only Schedule
When you view the Loan Settings (Debt Card) for this loan type, notice how the math differs from a standard loan:
Installments Due: This amount represents only the interest accrued for the period.
Balance (period end): Notice that the balance remains exactly the same as the Principal Amount throughout the entire life of the loan. No principal is being "chipped away" during the term.
The 'Bullet' Payment: In the very last row of the table (the maturity date), the Payment amount will spike. This row shows the final interest payment plus the full original principal being repaid at once
5. Full Lump Sum Bullet Loan
Enter Loan Details:
Debt Name: Give your loan a specific name.
- Add Creditor (Optional): Click the ADD CREDITOR button to add a field to add creditor
Drawn on: Select the month and year you receive the loan.
Principal Amount: Enter the total amount borrowed.
Annual Interest Rate: Input the interest percentage.
- Finalize: Click CREATE DEBT AND PROCEED TO DEBT CARD.
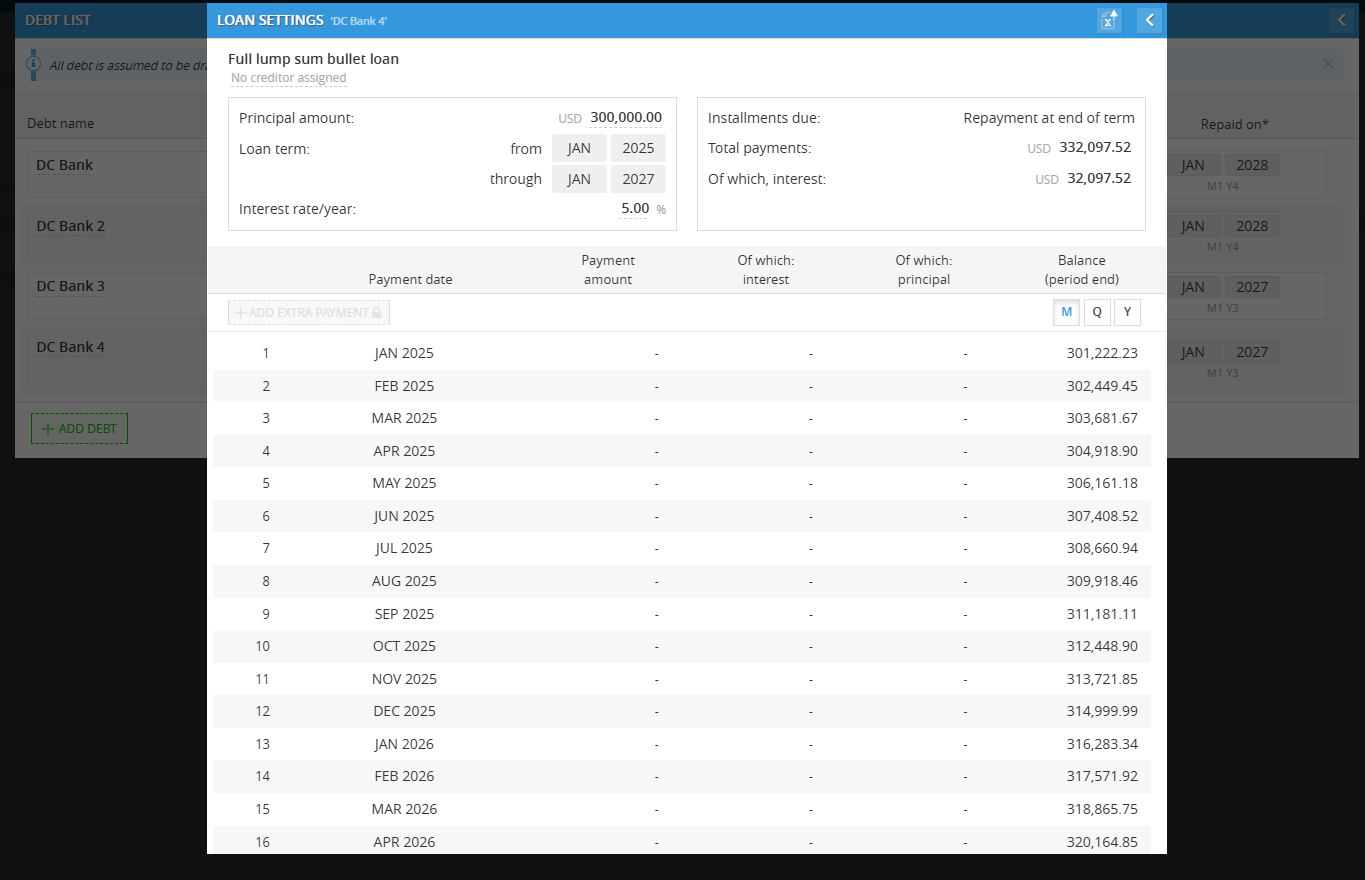
Understanding the Full Lump Sum Bullet Loan
When you view the Loan Settings (Debt Card) for this loan type, notice how the math differs fundamentally from a standard amortizing loan:
Installments Due: Unlike a standard loan, your monthly "payment" doesn't reduce what you owe; it simply covers the cost of borrowing the money for that month.
Balance (period end): Notice that the balance remains exactly the same as the Principal Amount throughout the entire life of the loan. No principal is being "chipped away" during the term. If you borrowed $300,000, you still owe $300,000 in the final month.
The 'Bullet' Payment: In the very last row of the repayment table (the maturity date), the Payment amount will spike. This row shows the final interest payment plus the full original principal being repaid at once.
6. Custom Loan Settings - Coming soon
Navigating the Debt List & Visualizing Payoffs
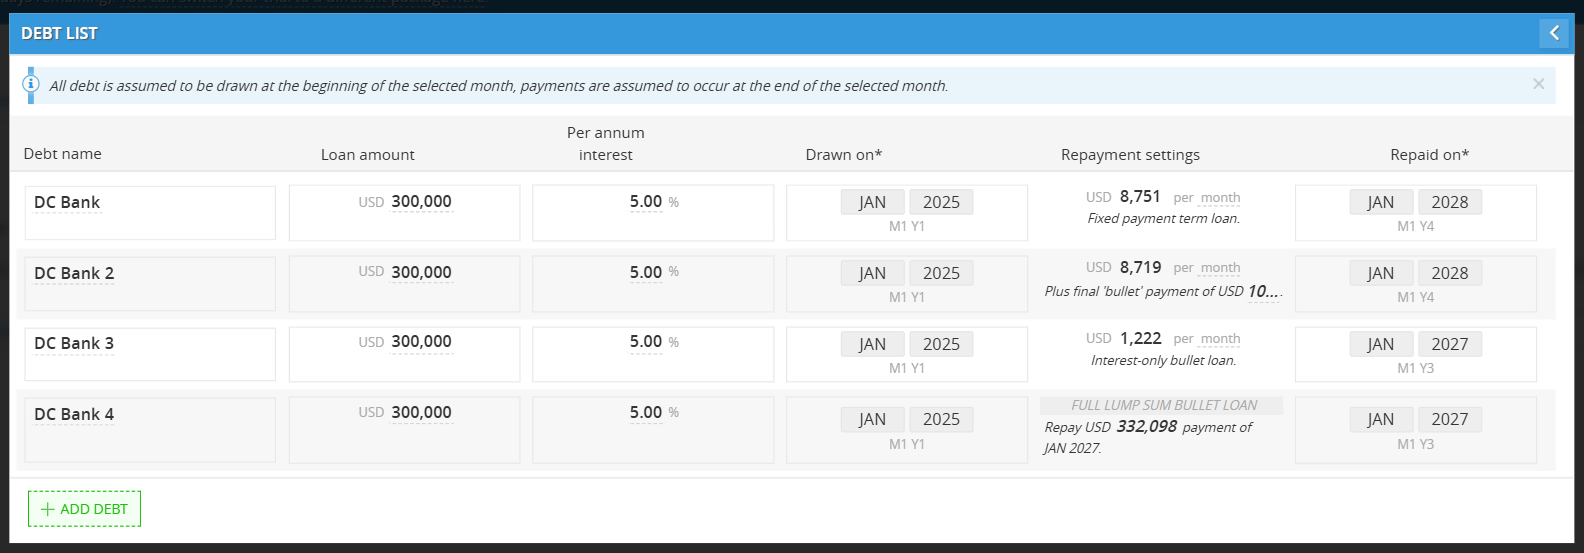
The Debt List is your command center for all company liabilities. From here, you can see a high-level summary of every loan, including the amount, interest rate, and specific repayment settings.
1. Accessing Detailed Data
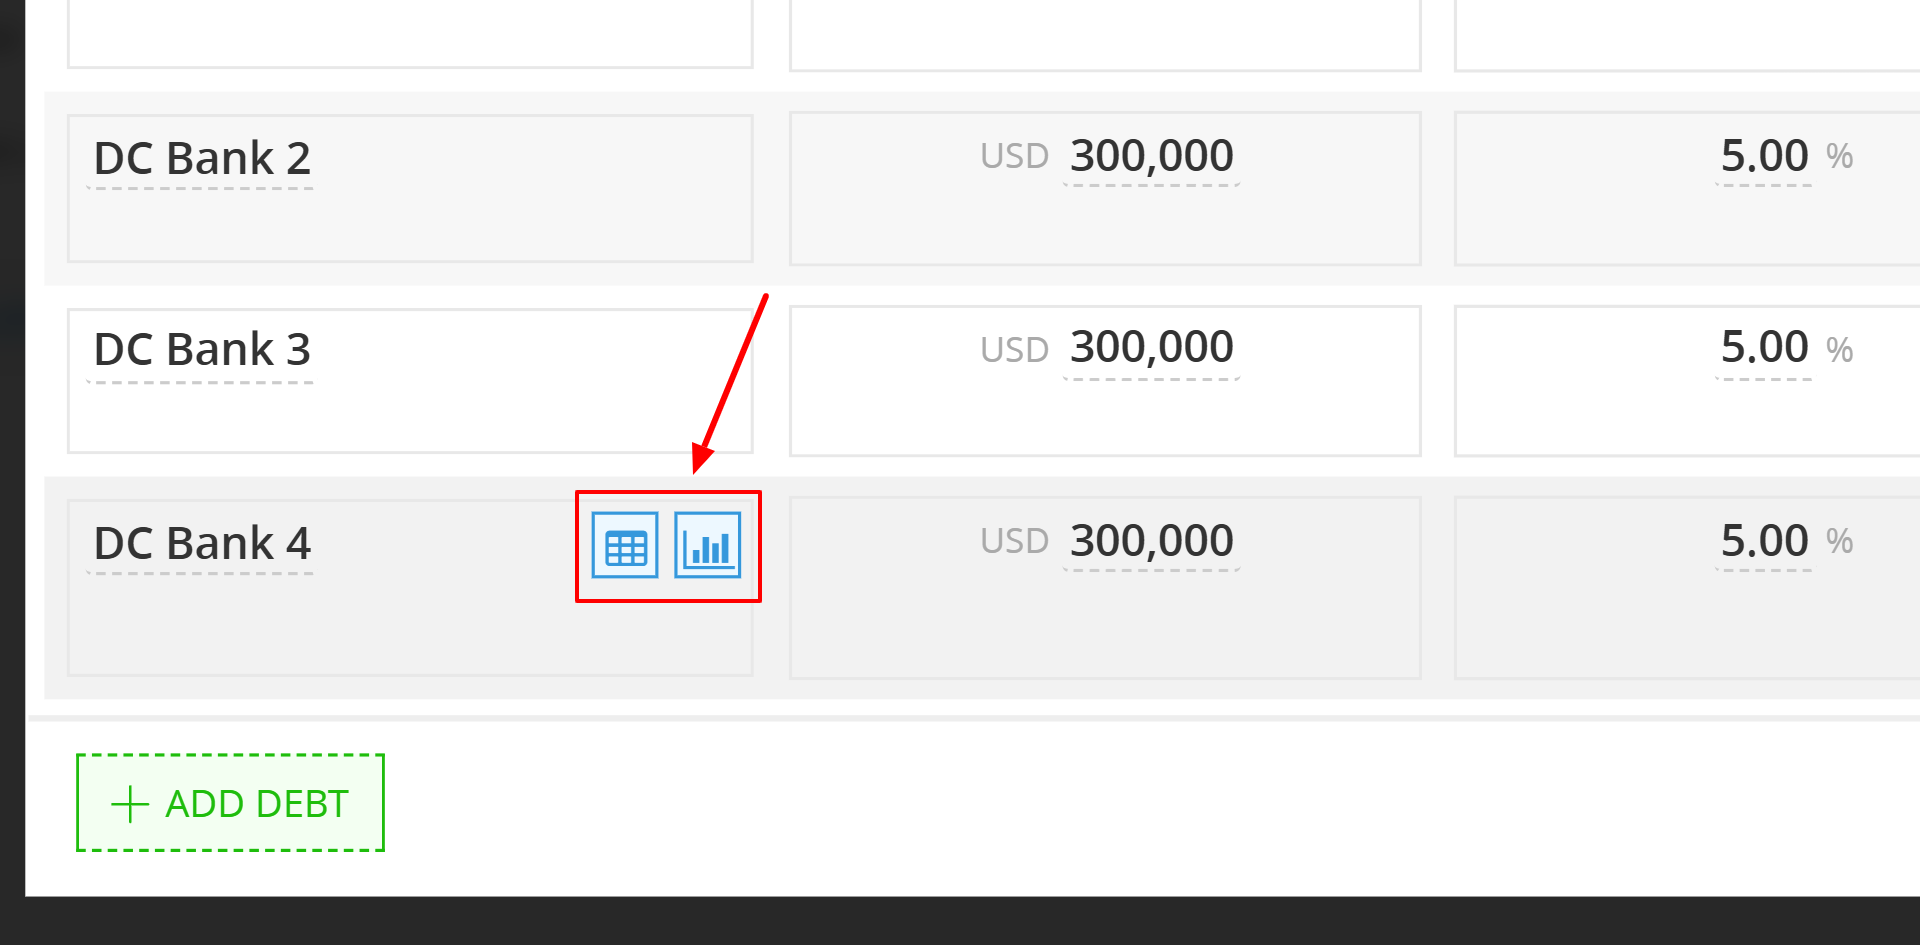
To go beyond the summary, hover your mouse over any loan in the Debt List (like "DC Bank 4"). Two icons will appear:
-
The Table Icon (🗓️): Click this to open the Loan Amortization Schedule. This is a month-by-month breakdown showing exactly how much of your payment is going toward interest versus principal.
-
The Chart Icon (📊): Click this to open the Loan Chart, a visual representation of your debt's lifecycle.
2. Understanding the Loan Chart
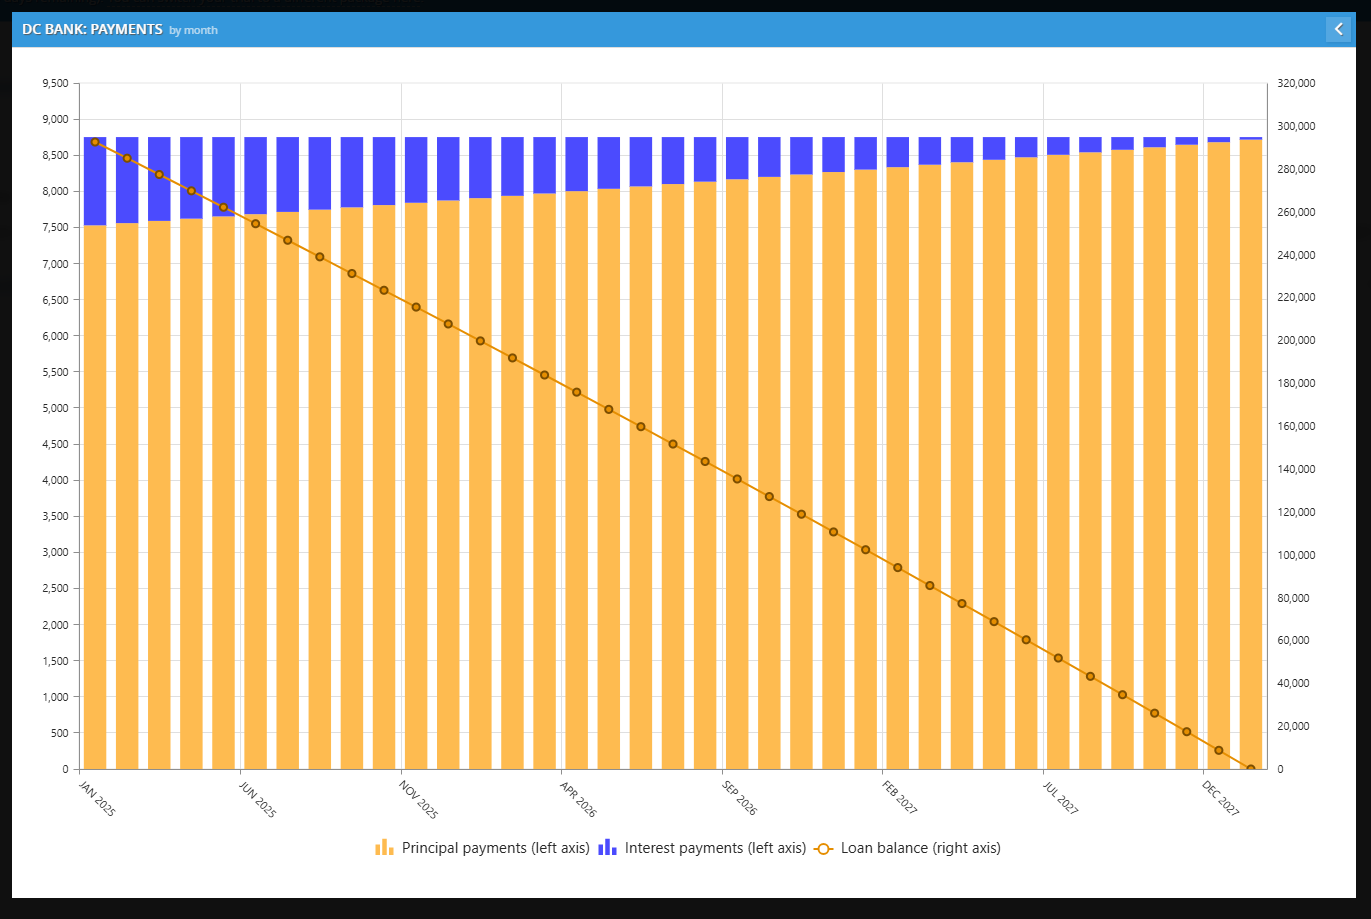
The Loan Chart is the best way to visualize your financial "health" over the term of the debt.
-
The Bars (Left Axis): These show your monthly payments. The blue portion represents interest, and the orange portion represents principal.
-
Notice: In a standard loan, you pay more interest at the start and more principal at the end.
-
-
The Line (Right Axis): This represents your remaining Loan Balance. You want to see this line trending toward zero over time.
3. Comparing Loan Types at a Glance

Your Debt List summary clearly labels the repayment structure for each loan:
-
Fixed payment: A steady, predictable monthly cost.
-
Interest-only bullet: Small monthly payments with a large principal payment at the end.
-
Full lump sum bullet: No monthly payments at all—the entire balance spikes in the final month.
💡 If this doesn’t solve your issue or you have more questions, feel free to reach out through our [contact form]. We’ll get back to you within 2–3 business days.