Understand "tax" assumption in scenario
Setting up 'Corporate Income Tax'
Understand "tax" assumption in scenario

The "Tax" assumption allows you to specify the various tax rates and obligations applicable to your business operations. This reflects the real-world tax environment, covering corporate income taxes, VAT, payroll taxes, and other relevant liabilities.
By adjusting these assumptions, you can assess the impact of different tax scenarios on your financial projections.
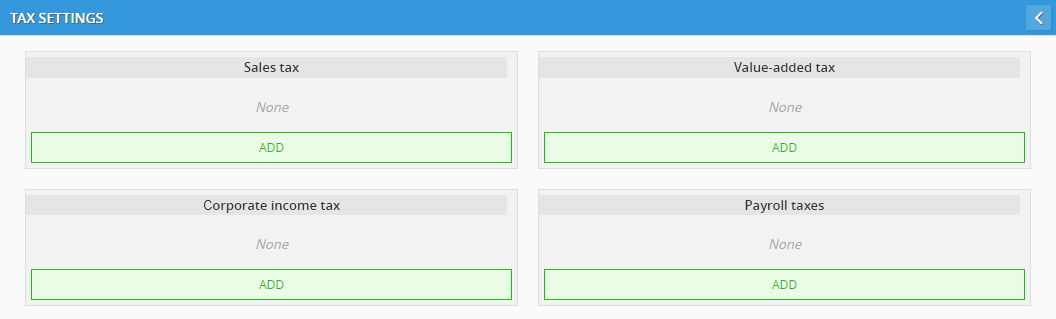
The Tax Settings interface, as shown in the image, provides options to add specific types of taxes such as Sales Tax, Value-Added Tax, Corporate Income Tax, and Payroll Taxes.
Each category can be configured based on the rates applicable to your business, allowing for a tailored approach to meet your financial modeling needs.
How each tax works
Understanding how each tax works is crucial for accurate financial planning and compliance. Here is an overview of how each type of tax in the system functions:
-
Sales Tax: Sales tax is imposed on the sale of goods and services and is collected by the seller at the point of sale. The seller then remits the collected tax to the tax authority, typically on a monthly or quarterly basis.
-
Value-Added Tax (VAT): VAT is applied at each stage of the production and distribution process. Each business collects VAT on sales and can claim a credit for the VAT paid on purchases, ensuring the tax is applied incrementally on the added value.
-
Corporate Income Tax: Corporate income tax is charged on company profits. It is calculated based on net income, which is revenue minus allowable deductions. It is usually accrued periodically and paid annually. Companies can carry forward operating losses to offset future taxable income.
-
Payroll Tax: Payroll tax is based on employee wages and is used to fund social programs like healthcare. Employers withhold this tax from employees' salaries and remit it to the tax authority. The tax rate may vary by salary level, and a tiered system allows for progressive rates for different income brackets.
Set up 'Sales Tax'

To begin configuring the Sales Tax, start by clicking the "Add" button under Sales Tax in the Tax Settings interface. You will be prompted to enter the following details:
-
Rate: Enter the applicable sales tax rate as a percentage. This will be applied based on the selected calculation basis.
-
Calculation Basis: Select the calculation basis for the sales tax, such as gross sales or net sales.
-
Payment Frequency: Choose how often the sales tax should be paid (e.g., monthly, quarterly).
-
Pay in Period: Define the payment role for the period in which the sales tax is due.
-
Payment Day: Specify the day of the month on which the sales tax payment is made (e.g., the last day of the month).
Once you've entered all the details, just close the window to get back to the Tax Settings screen. You'll see the Sales Tax listed there.
Example
Suppose your business is required to collect a 7% sales tax on all goods sold. By setting the sales tax rate to 7%, and selecting "Gross Sales" as the calculation basis, the system will automatically apply this rate to all transactions, ensuring compliance with local tax regulations.
You could set the payment frequency to "Monthly," with payments due on the last day of each month.
-
Ensure you correctly select the Calculation Basis ('Net Sales' or 'Gross Sales'), as this choice directly impacts how the sales tax is applied.
-
Be mindful of the Pay in Period setting. Choosing 'in the month following the end of the period' can delay payment and affect cash flow, which might be crucial for your business's financial health. By setting the sales tax rate to 7%, and selecting "Gross Sales" as the calculation basis, the system will automatically apply this rate to all transactions, ensuring compliance with local tax regulations.
You could set the payment frequency to "Monthly," with payments due on the last day of each month.
Set up 'Value-Added Tax'
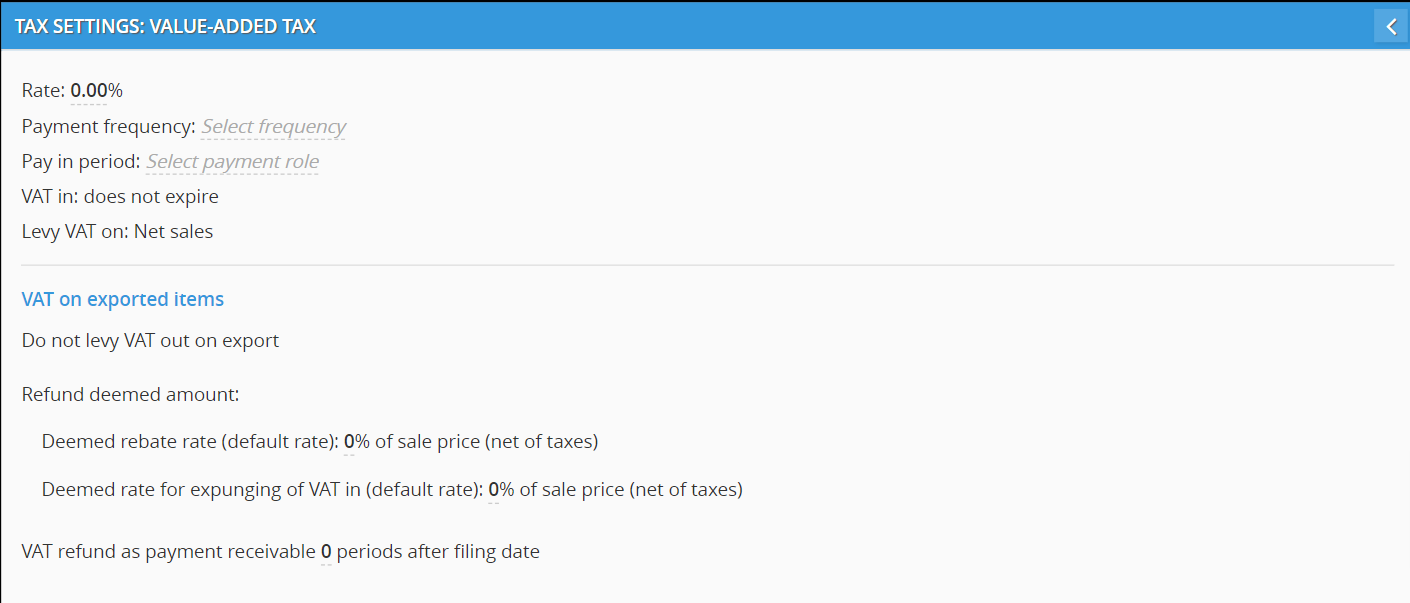
To configure the Value-Added Tax (VAT), click the "Add" button under Value-Added Tax in the Tax Settings interface. You will be prompted to enter the following details:
-
Rate: Enter the applicable VAT rate as a percentage.
-
Payment Frequency: Choose how often the VAT should be paid (e.g., monthly, quarterly).
-
Pay in Period: Define when the VAT should be paid, either at the end of the period or in the month following the end of the period.
-
VAT In: Specify whether VAT in expires or does not expire.
-
Levy VAT On: Select if VAT should be levied on 'Net Sales' or 'Gross Sales'.
VAT on Exported Items (Optional)
By default, VAT on exported items is hidden. You can toggle this section to show additional settings if needed:
-
Refund Deemed Amount: Enter details for the deemed rebate rate and deemed rate for expunging VAT in (default rate).
-
Deemed rebate rate (default rate): Specify the percentage of sale price (net of taxes).
-
Deemed rate for expunging of VAT in (default rate): Specify the percentage of sale price (net of taxes).
-
-
VAT Refund as Payment Receivable: Specify the number of periods after the filing date when the VAT refund will be received.
Once you've entered all the necessary details, close the window to return to the Tax Settings screen. The Value-Added Tax will now be visible there.
Example
Suppose your business needs to levy a 10% VAT on goods sold domestically. By setting the VAT rate to 10%, and selecting "Net Sales" as the calculation basis, the system will ensure that the VAT is applied correctly. You could set the payment frequency to "Quarterly," with the VAT due in the month following the end of each quarter.
Setting up 'Corporate Income Tax'

To configure the Corporate Income Tax, click the "Add" button under Corporate Income Tax in the Tax Settings interface. You will be prompted to enter the following details:
-
Rate: Enter the applicable corporate income tax rate as a percentage.
-
Payment Frequency: Choose how often the tax should be paid (e.g., monthly, annually).
-
Pay in Period: Define when the tax should be paid, either at the end of the period or in the month following the end of the period.
-
Payment Day: Specify the day of the month on which the payment should be made.
-
Treatment of Net Operating Loss: Enter details regarding how operating losses are handled:
-
Operating Loss Carry Forward: Specify how many years and months losses can be carried forward.
-
Operating Loss Carry Back: Specify how many years and months losses can be carried back, if applicable.
-
-
Tax Credits: Indicate if tax credits do not expire.
Once you've entered all the necessary details, close the window to return to the Tax Settings screen. The Corporate Income Tax will now be visible there.
The Treatment of Net Operating Loss section is essential for managing how your business handles financial losses over time. It helps you understand how to utilize losses to offset future or past taxable income, thereby reducing tax liability.
-
Operating Loss Carry Forward: This is how long a net operating loss can be carried forward to offset future taxable income. For example, if your business incurs a loss this year, you can carry that loss forward for up to 5 years. This means if you have a taxable profit in any of the next five years, you can use the loss to reduce the taxable income, thereby decreasing the tax owed for that year. For instance, if your business incurs a $100,000 loss in year one and earns a $200,000 profit in year three, you can apply the $100,000 loss to year three's profit, reducing taxable income to $100,000.
-
Operating Loss Carry Back: Carrying back a net operating loss allows you to apply current losses to past profitable years, potentially resulting in tax refunds. For example, if your business incurs a loss this year and had taxable income in the previous two years, you can carry the loss back up to 2 years, reducing past taxable income and possibly receiving a refund. This is useful if your business expects to recover losses quickly, and it can provide immediate cash flow relief.
In real-life scenarios, understanding and configuring the appropriate carry forward and carry back periods can significantly impact cash flow, especially for businesses experiencing fluctuating income. Carrying losses forward provides relief during profitable years, while carrying them back allows for potential refunds from past profitable years.
Always consult with a tax advisor to ensure compliance with current tax laws and to make the most of these provisions.
Example
Suppose your business has a corporate income tax rate of 20%, with the tax accrued monthly on the last day of each month. You also set the payment frequency to annually, with the payment due on the last day of the fiscal year. Additionally, assume that operating losses can be carried forward for up to 5 years, and there is no option for carrying back losses.
By setting these details in the system, all profits will be taxed accordingly, ensuring compliance with corporate tax obligations. You would also need to indicate that tax credits do not expire, if applicable.
Sett up 'Payroll Tax'
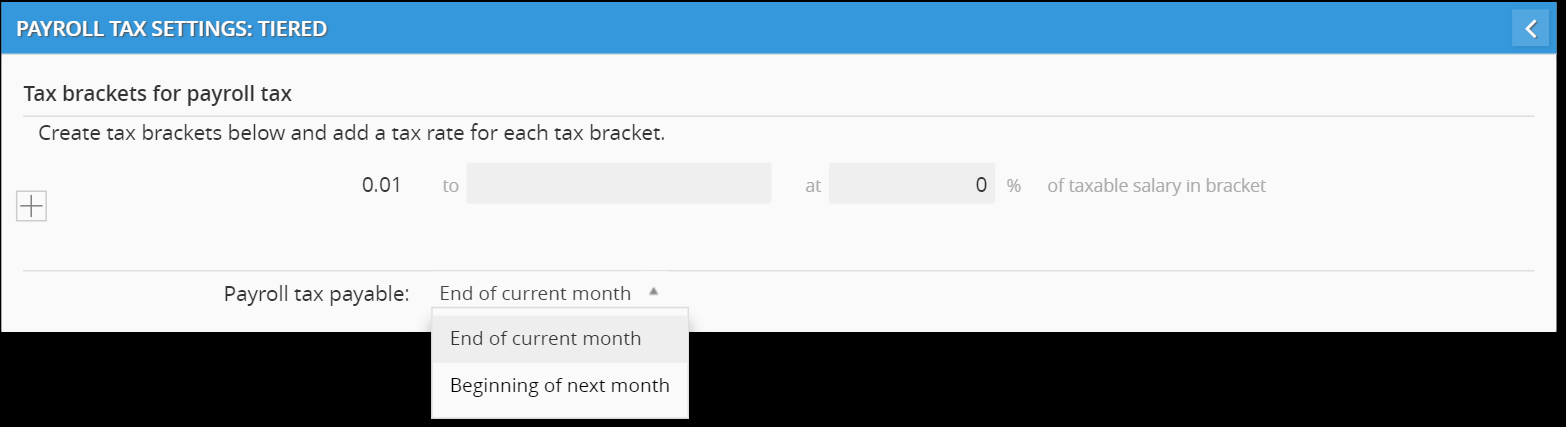
To configure the Payroll Tax Settings, click the "Add" button under Payroll Tax Settings in the Tax Settings interface. The Payroll Tax Settings section allows you to configure tax brackets in a tiered manner and determine when payroll taxes are payable. Here's how you can set it up:
-
Tax Brackets for Payroll Tax: Create tax brackets for different salary ranges and specify the tax rate for each bracket. For example, you could define a tax rate of 5% for salaries between $0.01 and $50,000, and then add more tiers with higher rates for larger salary ranges, such as 10% for salaries above $50,000. This tiered system helps establish a progressive tax structure based on employee income. You can continue adding more tiers as needed to reflect different tax rates for various salary levels.

-
Payroll Tax Payable: Select when payroll taxes should be paid. You have the option to pay at the end of the current month or at the beginning of the next month, depending on your cash flow requirements.
Once you've entered all the necessary details, close the window to save the settings. The Payroll Tax Settings will now be visible in the Tax Settings screen.
Example
Suppose your business implements a tiered payroll tax system with two brackets: 5% for salaries between $0 and $50,000, and 10% for salaries above $50,000. By setting up these brackets, the system will automatically calculate payroll taxes based on each employee's salary, ensuring compliance with payroll tax regulations.
You can also choose to pay the payroll tax at the beginning of the next month, which helps with managing cash flow.
Need help? 💡
If you need additional help, reach out to us at:
support@decisioncritical.pro