Latest updated on 9/14/26
Knowledge Bank: The Central Information Engine
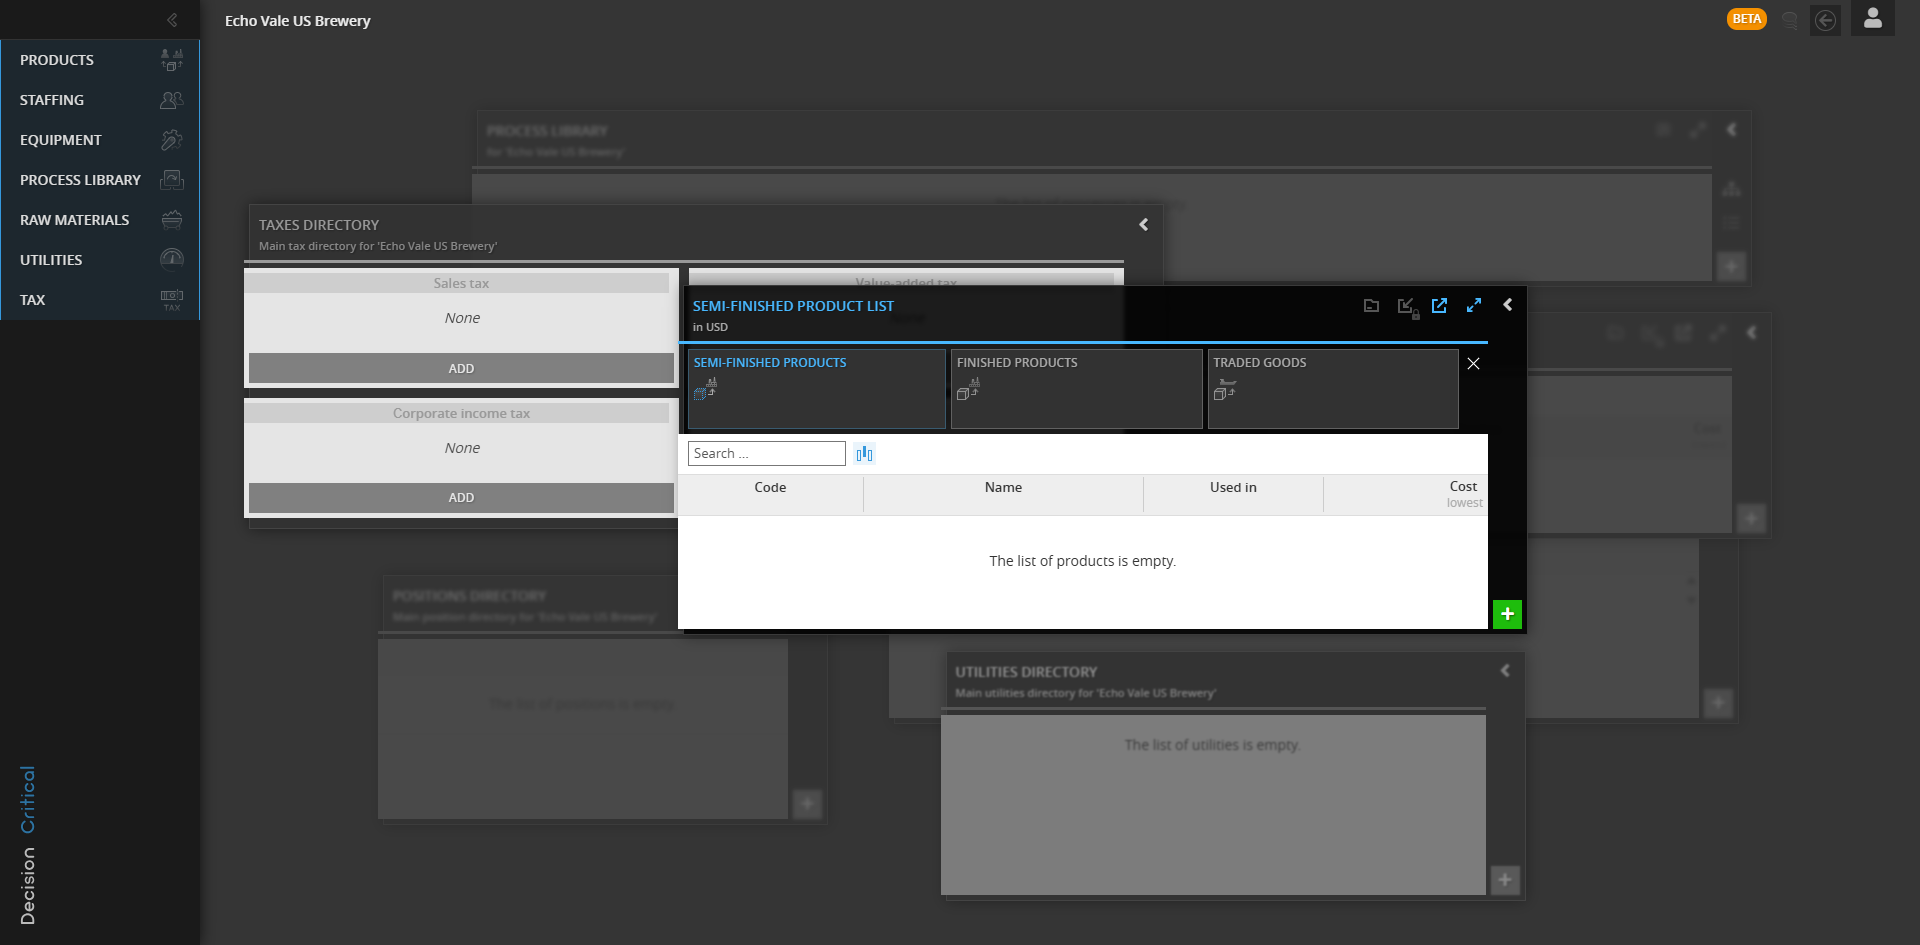
The Knowledge Bank serves as the central operational library for your company. Instead of manually re-entering specs, equipment run-rates, and cost structures every time you build an operational branch, the Knowledge Bank functions as a single source of truth to assemble scenarios and centrally update models using pre-loaded data sets.
Where is Knowledge Bank?
Knowledge Bank is located in your company section (/analytics page).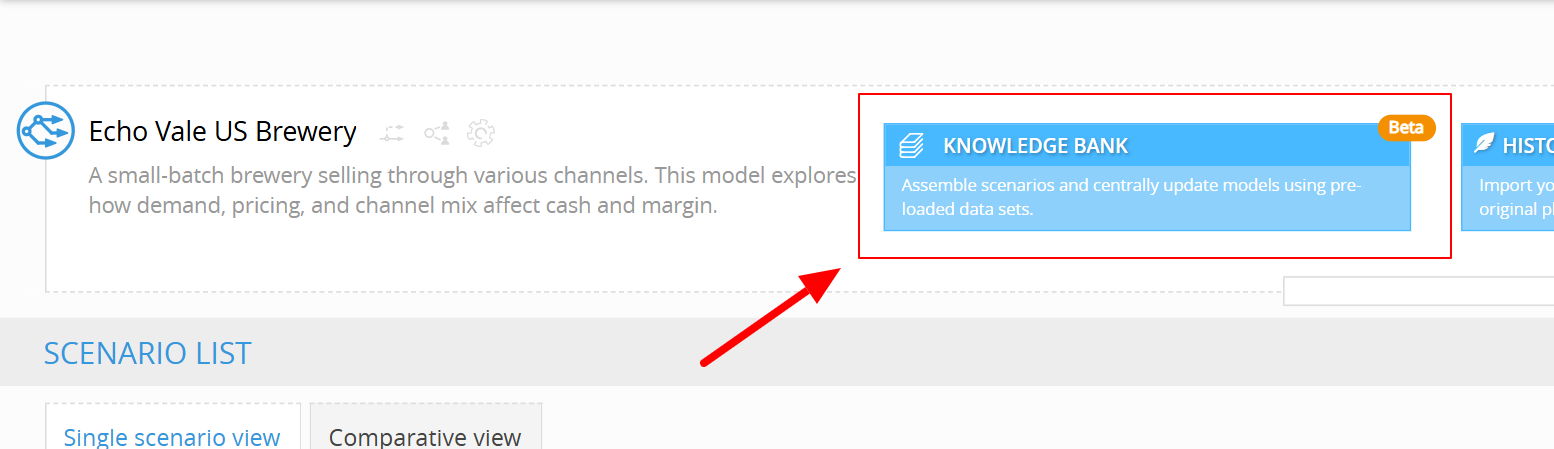
Core Architecture & Navigation
Opening the Knowledge Bank exposes the foundational categories that drive your business logic:
- PRODUCTS: Defines semi-finished/finished/traded goods, packaging variants, unit configurations, and base sales pricing.
- STAFFING: Houses role definitions, base wages, shift schedules, and operational labor capacities.
- EQUIPMENT: Catalogs production machinery, footprint dimensions, depreciation cycles, and recurring maintenance/rigging costs.
- PROCESS LIBRARY: Stores manufacturing/service steps, batch runtimes, routing rules, and equipment assignments.
- RAW MATERIALS: Maintains the bill of materials (BOM), unit purchasing costs, supplier minimum order quantities, and scrap rates.
- UTILITIES: Models resource consumption profiles (power, water, gas, etc,.) per unit.
- TAX: Stores applicable corporate rates, VAT/sales tax rules, and payroll tax.
How It Drives Decision Critical Models
- Global Cascading Updates: Modifying a master specification in the Knowledge Bank (such as bulk grain pricing or utility rates) instantly cascades across all linked scenarios, eliminating the need to update duplicate formulas manually.
- Modular Scenario Assembly: When launching a new test scenario (e.g., comparing Single-Product Wholesale vs. Multi-Channel Retail), models pull building blocks directly from this bank to project sales, profit, and 5-year CAGR without rebuilding operational logic from scratch.
- Standardized Assumptions: Keeps cross-scenario comparisons valid by ensuring that every scenario runs on the identical physical and operational baseline.
Knowledge Bank: Products
The PRODUCTS section defines everything your business outputs or resells. Instead of treating all inventory as generic lines, Decision Critical categorizes products into three distinct operational classifications to govern whether items are manufactured in-house, used as intermediate components, or purchased purely for resale.
The Three Product Classifications
Selecting the right type determines the underlying rules for labor, machinery, bill of materials (BOM), and sales routing:
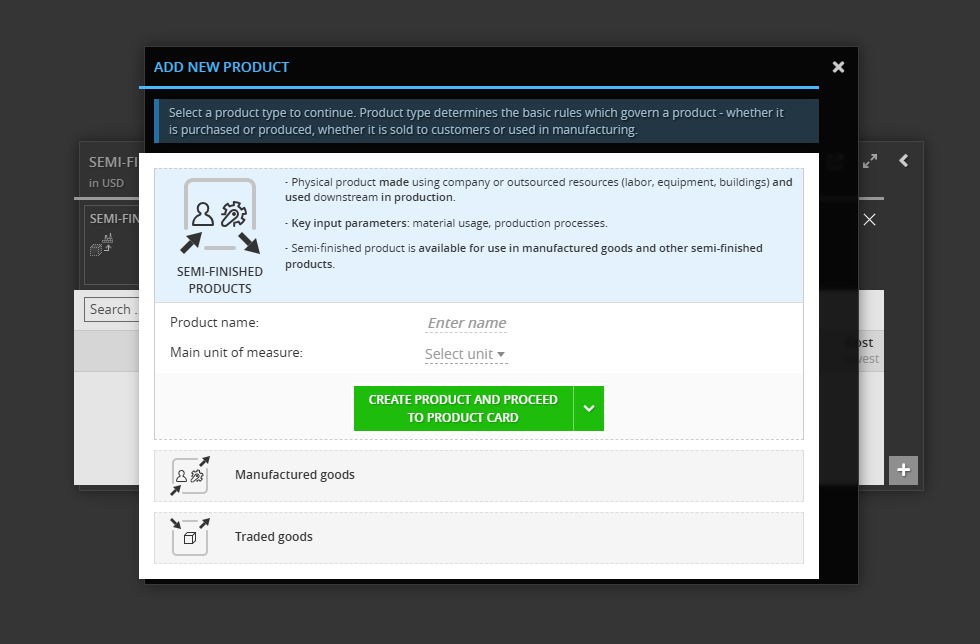
- SEMI-FINISHED PRODUCTS:
- Role: Physical goods produced using company or outsourced resources (labor, equipment, buildings) that are consumed downstream in further production rather than sold directly.
- Key Drivers: Raw material consumption rates and production process cycles.
- Availability: Available strictly as inputs for finished manufactured goods or other complex semi-finished steps.
- Brewery Example: "Unfermented Wort" or "Base Green Beer" before filtration and kegging.
- FINISHED PRODUCTS (Manufactured Goods):
- Role: Completed products manufactured through internal or outsourced processes, ready for direct distribution and sale.
- Key Drivers: Full routing through equipment, direct labor touch-time, BOM raw materials, and packaging configurations.
- Brewery Example: "Golden Ale 16oz 4-Pack" or "Seasonal Stout 50L Keg."
- TRADED GOODS:
- Role: Finished inventory purchased directly from an external supplier and resold without undergoing physical transformation.
- Key Drivers: Purchase wholesale unit cost, freight/lead time, minimum order quantities (MOQs), and retail markup.
- Brewery Example: Branded glassware, brewery T-shirts, or imported non-alcoholic beverages.
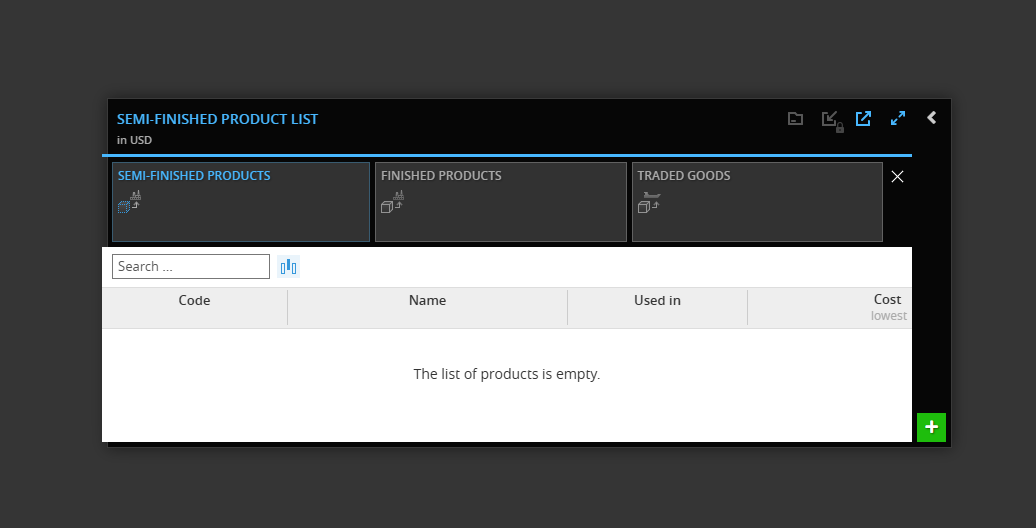
Product List Management
The catalog interface provides high-level tracking across all items:
- Code: Unique internal SKU or inventory reference code.
- Name: Clear operational title of the product.
- Used in: Displays downstream parent assemblies or finished goods that consume this specific item.
- Cost: Automatically calculates the unit manufacturing cost (COGS) or lowest procurement cost.
Creating a New Product
Click the green [+] button in the bottom-right corner of the table to open the modal:
- Select Type: Choose between SEMI-FINISHED PRODUCTS, Manufactured goods, or Traded goods.
- Product Name: Enter the identifying name.
- Main Unit of Measure: Select the primary base unit (e.g., liter, barrel, unit, kg).
- Action: Click CREATE PRODUCT AND PROCEED TO PRODUCT CARD to open the deep configuration sheet (BOM, labor routing, and packaging rules).
Knowledge Bank: Staffing
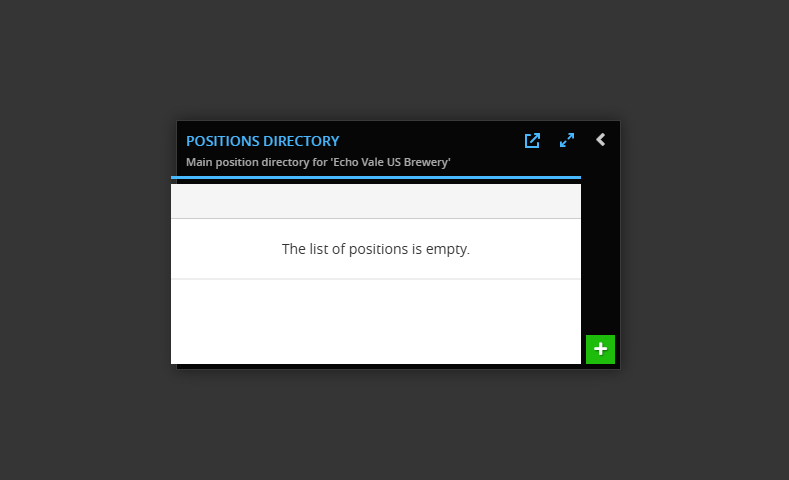
The STAFFING directory defines the organizational roles that supply operational labor, oversight, and administration across your facilities. Rather than modeling payroll as a disconnected total sum, Decision Critical structures staffing by individual positions so labor capacity, hourly rates, and shift schedules link directly to production machinery and process runtimes.
Positions Directory Overview
The main directory window acts as the central catalog for all standardized roles across the enterprise:
- Central Repository: Defines reusable role templates (e.g., Head Brewer, Packaging Line Operator, Quality Assurance Tech, Shift Supervisor).
- Modal Controls: The header includes quick tools to expand to full screen, open in an external view, or collapse back to the navigation bar.
- Creation Trigger: Clicking the green [+] button in the lower right opens the creation modal to set up a new position profile.
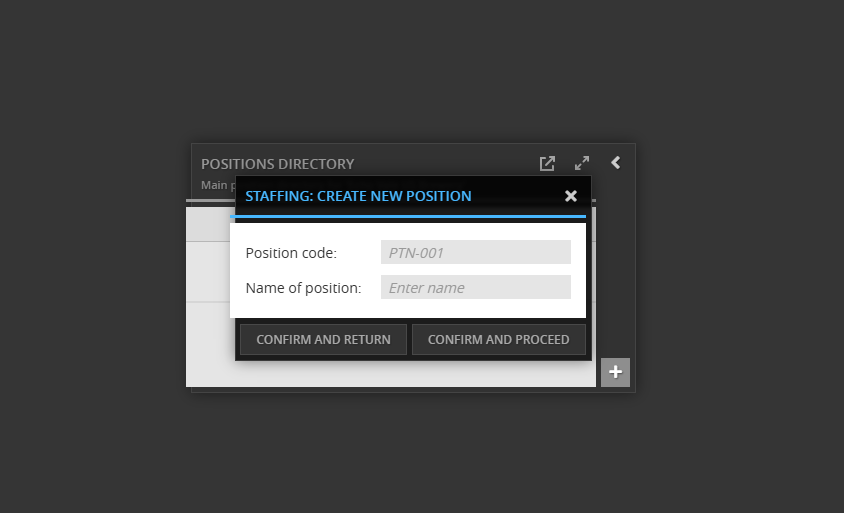
Creating a New Position
The creation dialog establishes the primary identifier and naming conventions before routing to detailed compensation and schedule rules:
- Position code: Auto-generated structured alphanumeric tag (e.g., PTN-001) to maintain clear auditing across scenarios and departments.
- Name of position: Clear descriptive title defining the role's primary responsibility.
- Action Buttons:
- CONFIRM AND RETURN: Saves the position to the directory list without immediate further setup, ideal for bulk role mapping.
- CONFIRM AND PROCEED: Saves the entry and immediately opens the detailed Position Card to configure compensation tiers, hourly burden, working hours, and machine certifications.
Why Centralized Positions Matter
- Direct vs. Indirect Allocation: Standardizing positions centrally allows you to assign specific roles directly to equipment operation or production recipes (driving direct COGS) while keeping managerial and back-office roles under operating expenses (OpEx).
- Cross-Scenario Labor Parity: Updating wage inflation, benefits overhead, or standard shift hours in the Knowledge Bank updates every scenario utilizing that position code without manual recalculation.
Knowledge Bank: Equipment Module
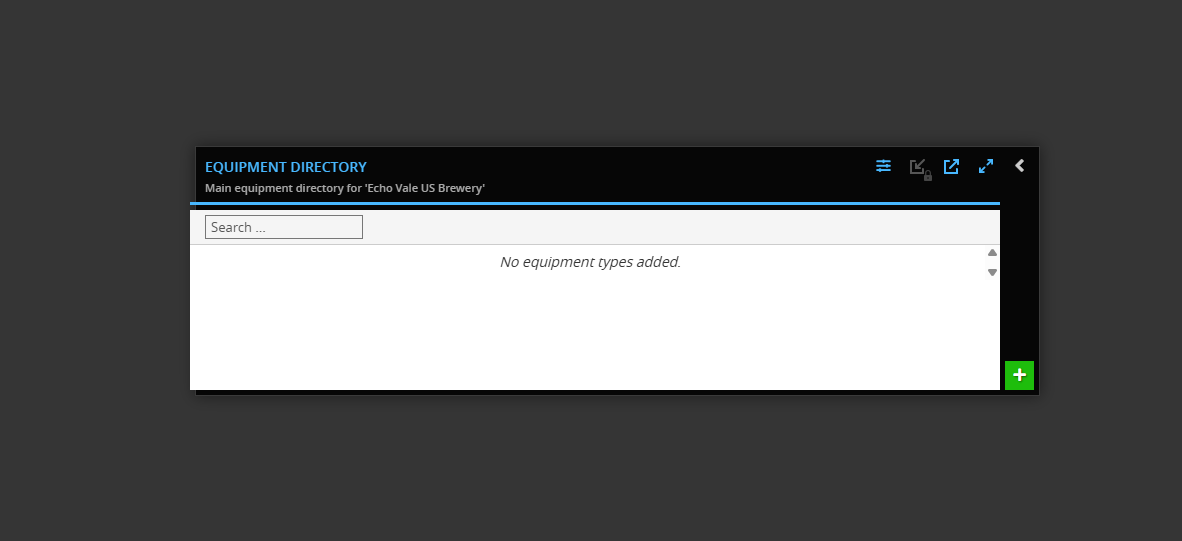
The EQUIPMENT directory catalogs the physical machinery, production lines, and fixed capital assets required to execute your manufacturing processes. Establishing equipment centrally ensures that asset values, depreciation methods, and machine footprints remain uniform across all scenario models.
Equipment Directory Controls
The main directory serves as the centralized repository for all machinery configurations:
- Search Bar: Quickly filters existing machines by name or internal code.
- Window Controls: The top-right icons allow toggling filters, locking/unlocking directory views, popping the window out, expanding to full screen, or closing back to the side menu.
- Add Equipment: Clicking the green [+] button launches the CREATE NEW FIXED ASSETS TYPE creation modal.
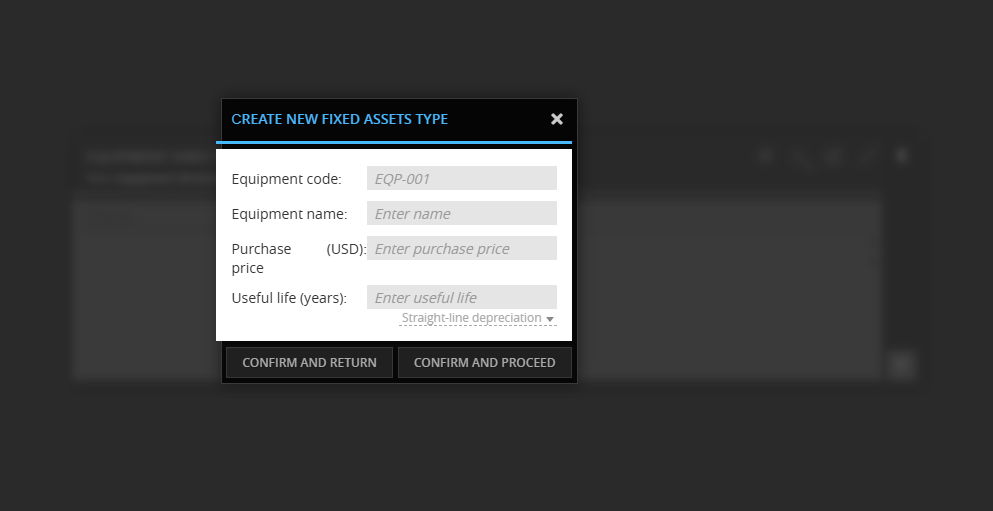
Configuring a New Fixed Asset Type
The setup dialog establishes the foundational financial identity of the equipment:
- Equipment code: Auto-generated unique tag (e.g., EQP-001) used across process maps, maintenance logs, and financial statements.
- Equipment name: Operational descriptive title (e.g., 15-Barrel Mash Lauter, Automated Canning Line, Steam Boiler).
- Purchase price: The baseline capital expense (CapEx) to purchase one unit before custom rigging, installation, or additional fees.
- Useful life (years): The total service duration over which the asset's cost is spread.
- Depreciation Method: Directly beneath useful life, this defaults to Straight-line depreciation, calculating the uniform non-cash expense that hits your P&L each accounting period.
Display Settings
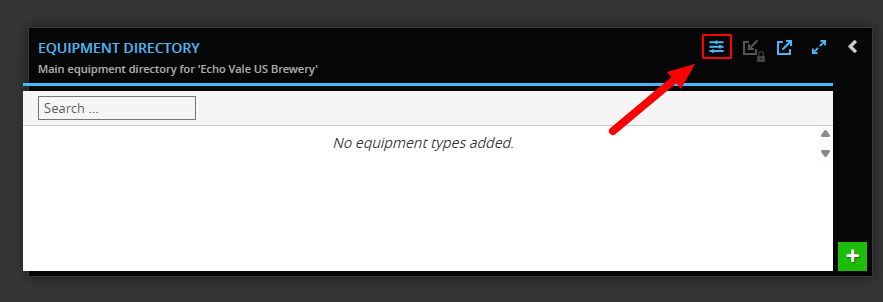
Clicking the slider/filter icon in the top right of the EQUIPMENT DIRECTORY opens the DISPLAY SETTINGS: EQUIPMENT panel. This view lets you customize which operational, spatial, and financial parameters appear in your catalog view.
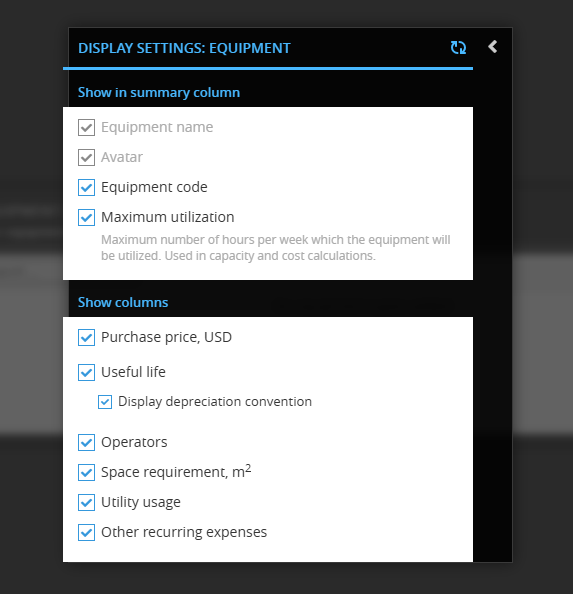
Show in Summary Column
Controls the primary metadata displayed directly beneath or alongside the asset's main identifier:
-
Equipment name: Shows the full operational label (locked by default).
-
Avatar: Displays a graphical icon representing the machine type (e.g., boiler, kettle, tank).
-
Equipment code: Shows the unique alphanumeric identifier (e.g., EQP-001).
-
Maximum utilization: Displays the maximum planned operational hours per week. This ceiling drives plant capacity limits and equipment bottleneck modeling.
Show Columns
Toggles data columns across the directory grid to focus on finance, engineering, or physical site limits:
-
Purchase price, USD: Displays baseline capital acquisition cost (CapEx).
-
Useful life: Shows asset lifespan in years.
-
Display depreciation convention: Toggles an inline breakdown of the selected write-down method (e.g., straight-line).
-
-
Operators: Shows labor headcount required simultaneously to operate the equipment.
-
Space requirement(m2): Displays physical surface footprint reserved inside the facility.
-
Utility usage: Flags active consumption linkages (electricity, gas, water, drainage).
-
Other recurring expenses: Flags custom, quarterly, or annual maintenance schedules attached to the unit.
Action Options
- CONFIRM AND RETURN: Saves the baseline asset to the directory for rapid, high-level equipment list building.
- CONFIRM AND PROCEED: Saves the entry and immediately opens the detailed Equipment Card to set physical footprints, operator requirements, maximum weekly runtime capacity, and recurring materials/expenses schedules.
Knowledge Bank: Raw Material
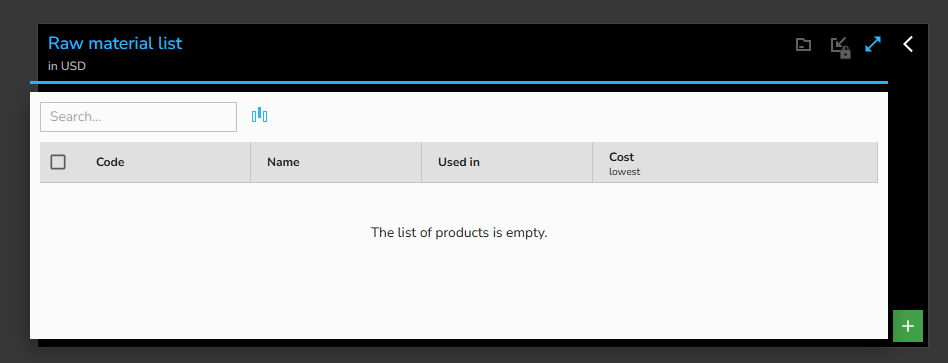
The RAW MATERIAL module in the Knowledge Bank serves as your centralized catalog for all purchased physical inputs, commodities, and packaging components consumed downstream in production. Establishing raw materials centrally standardizes baseline procurement pricing, consumption units, warehouse footprints, and product-driven landed costs across all scenario models.
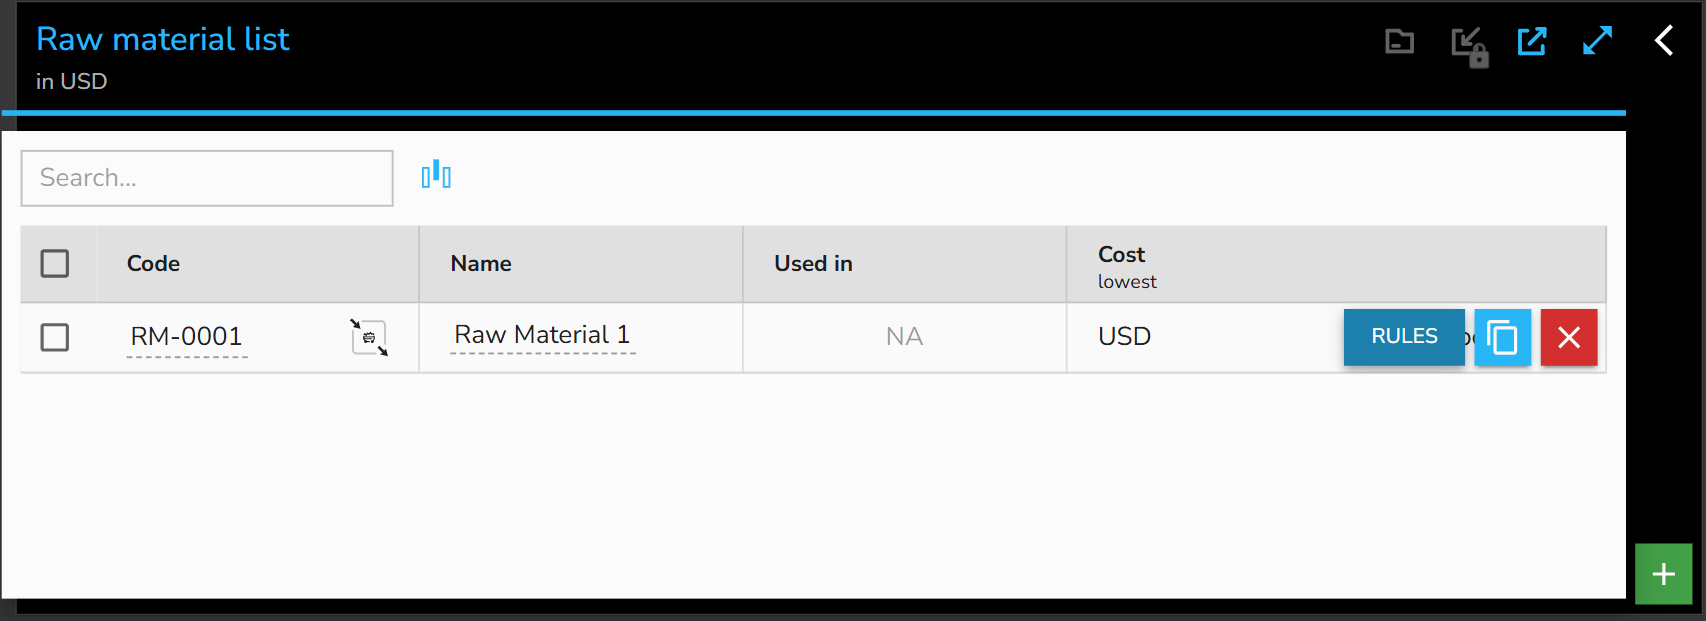
1. Raw Material List Overview
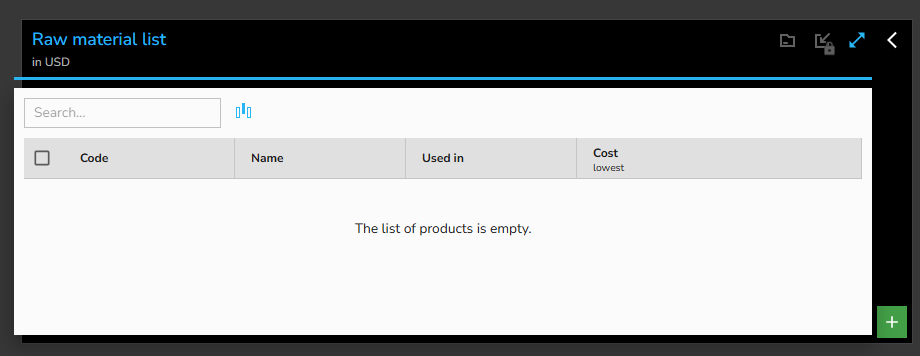
The main Raw material list provides an aggregate view of all registered commodities:
- Code: The unique inventory code or SKU assigned to the material.
- Name: The standard operational title of the commodity.
- Used in: Automatically maps and displays which downstream semi-finished or finished products consume this material.
- Cost (lowest): Displays the benchmark lowest purchasing cost configured in the system.
- Header Controls: Options to organize folders, dock/lock the window view, pop out to full screen, and perform keyword filtering.
- Add Material: The green [+] button in the lower right launches the creation modal.
2. Adding a New Raw Material
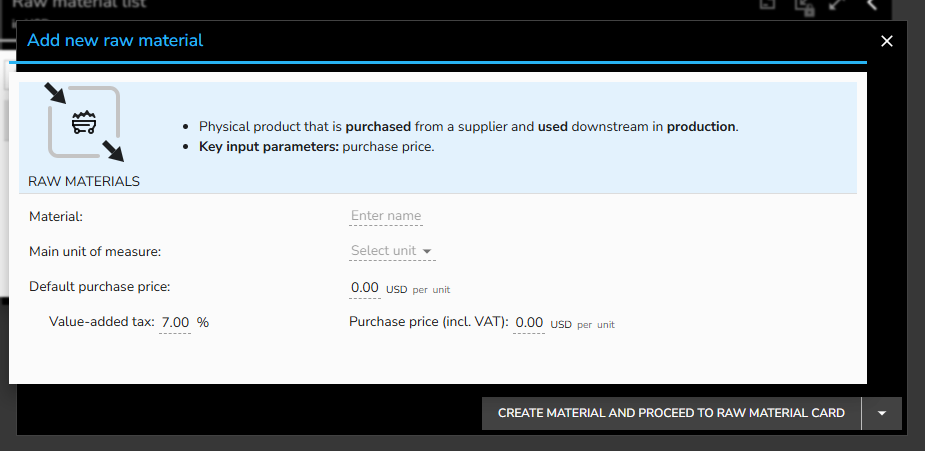
The Add new raw material dialog defines the initial purchasing parameters:
- Material: Enter the official name of the material.
- Main unit of measure: Set the primary consumption and inventory metric (e.g., Piece, kg, liter).
- Default purchase price: Enter the baseline purchase price in USD.
- Value-added tax (VAT): Displays active VAT rules and calculates the Purchase price (incl. VAT) automatically.
- Creation Action Button:
- Primary (Green Button): Click AND PROCEED TO RAW MATERIAL CARD to save and immediately configure advanced settings (units, storage, and expenses).
- Dropdown Option: Click the arrow to choose Create material and return to raw material list for rapid catalog entry without entering details immediately.
Value-added tax (VAT): Displays the default company VAT rate inherited from your tax profile and calculates the Purchase price (incl. VAT) automatically.
-
Custom Override: If a specific raw material qualifies for a different tax bracket (such as exempt agricultural commodities or zero-rated imports), you can edit the rate directly.
-
System Marking: Overriding the default rate prompts the system to flag the entry, indicating that this material uses a non-standard tax convention rather than the inherited global baseline
3. Raw Material Card Configuration
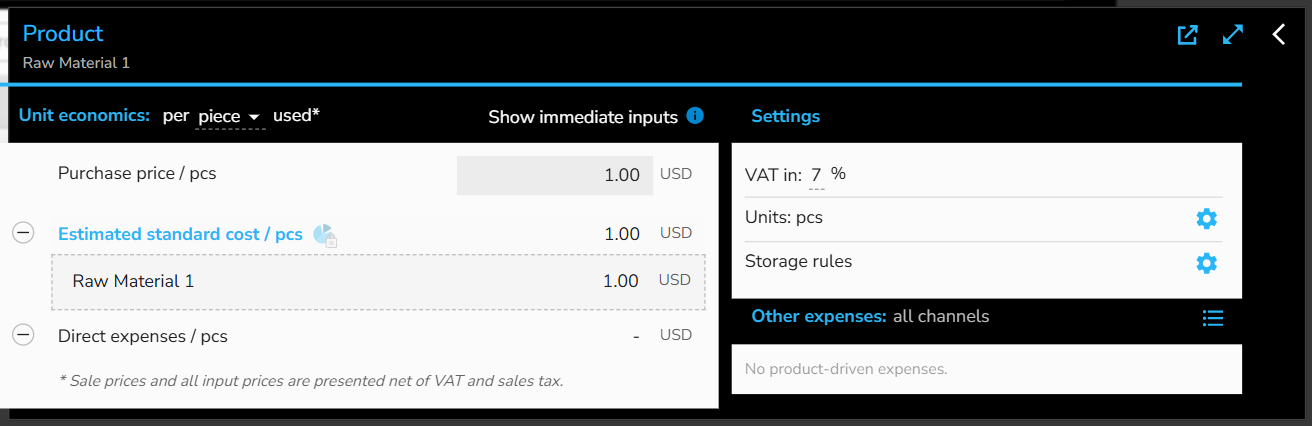
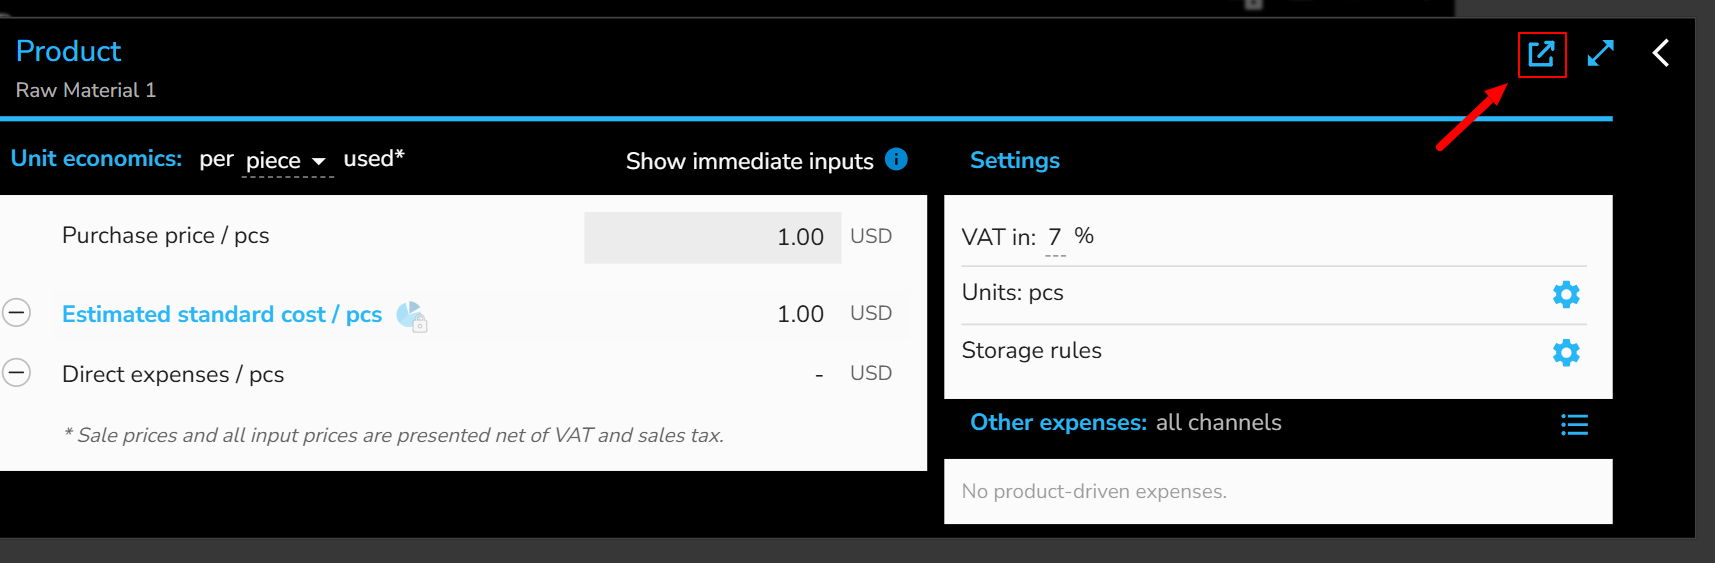
Opening the detailed Product / Raw Material Card provides deep operational and cost controls:
A. Unit Economics & Pricing Display
- Purchase price / pcs: Net purchasing rate per unit.
- Estimated standard cost / pcs: Total landed cost including capitalized procurement overhead.
- Direct expenses / pcs: Any per-unit fees tied directly to purchasing.
Note: All base input prices are presented net of VAT and sales tax.
B. Unit Conversion Rates
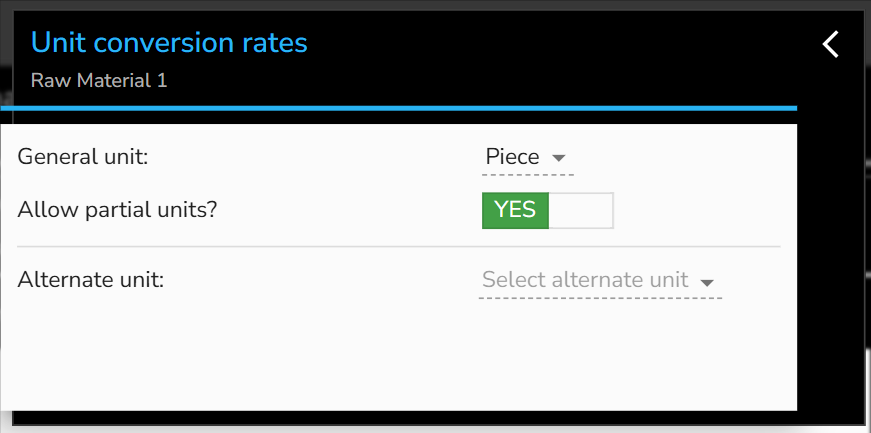
Clicking the gear icon next to Units opens the Unit conversion rates modal:
- General unit: Displays the master inventory unit (e.g., Piece).
- Allow partial units?: Toggle between YES and NO to define whether production recipes can consume fractional units or must consume whole discrete pieces.
- Alternate unit: Configures secondary reporting or procurement units (e.g., converting cases to individual bottles or pallets to pieces).
C. Product Storage Rules
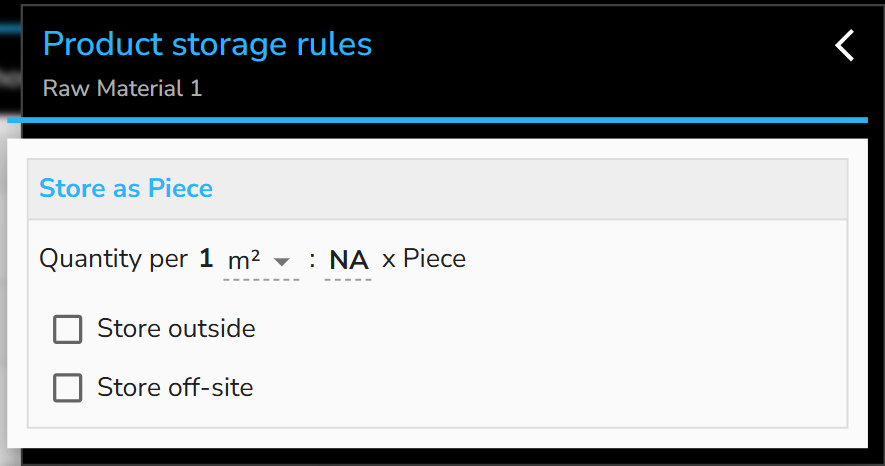
Clicking the gear icon next to Storage rules opens the physical footprint configuration:
- Quantity per one square meter: Defines physical warehouse density (how many units fit within one square meter of storage area).
- Store outside: Flags whether the material can be stored in exterior yards without consuming indoor warehouse space.
- Store off-site: Flags whether inventory sits at third-party logistics (3PL) warehouses rather than the primary facility.
4. Product-Driven Expenses
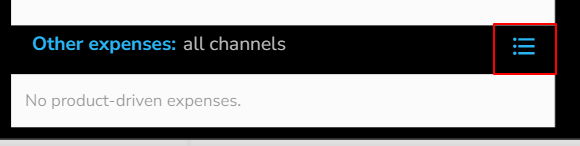
Under the Other expenses: all channels card on the right, clicking the list icon (☰) opens the Product-driven expenses configuration. This tool attaches real landed costs (such as inbound freight, customs, handling, or specialized insurance) directly to procurement.
- Expense Name: Enter the descriptive label for the line item (e.g., Inbound Freight, Customs Tariff, Pallet Surcharge).
- Accounting Rule (Select rule): Determines how the expense is recognized:
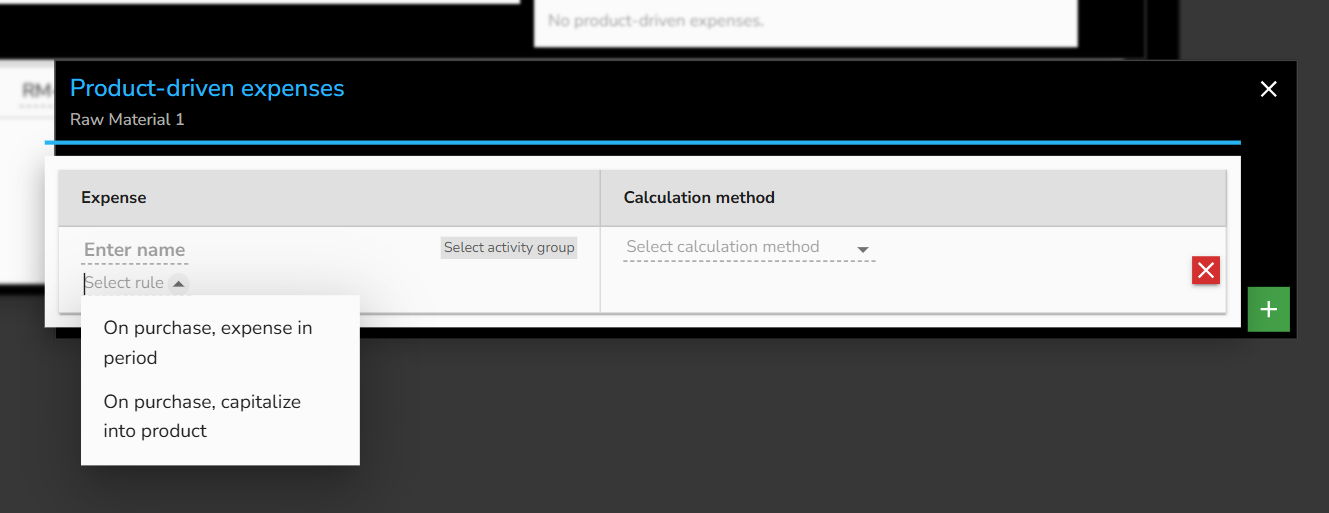
- On purchase, expense in period: Immediately recognizes the cost on the P&L as an operating expense within the purchasing period.
- On purchase, capitalize into product: Absorbs the expense directly into inventory, increasing the Estimated standard cost and holding it on the balance sheet until consumed into finished goods.
- Activity Group (Select activity group): Categorizes the cost bucket for reporting:
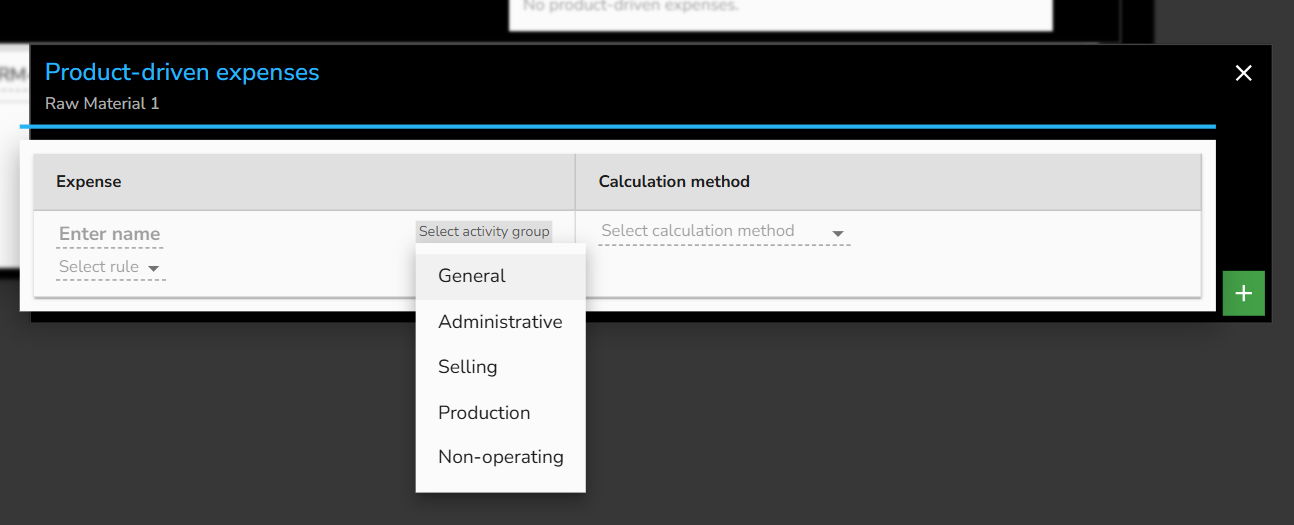
- General
- Administrative
- Selling
- Production
- Non-operating
- Calculation Method: Select how the cost scales:
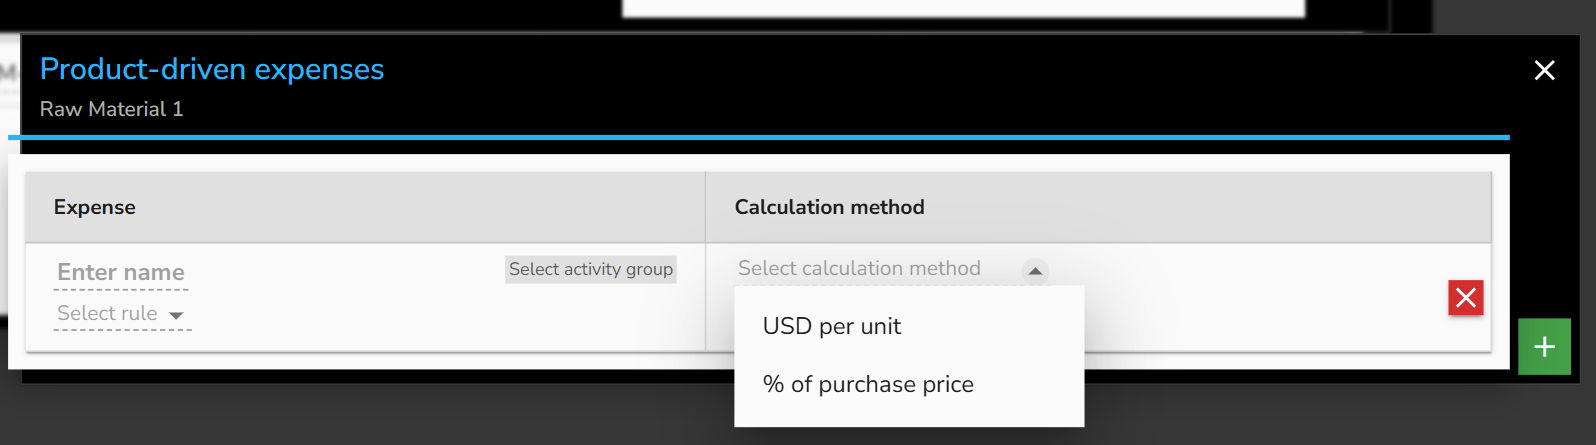
- USD per unit: Applies a fixed dollar surcharge per purchased unit.
- % of purchase price: Calculates the fee as a variable percentage of the base supplier price.
Row Action Buttons
Navigating across an item row (e.g., RM-0001: Raw Material 1) exposes three primary operational controls on the right:
RULES (Blue Button): Opens the detailed Raw Material / Product Card to configure unit economics, landed expenses, units of measure, and storage rules.
Copy (Blue Dual-Square Icon): Clones the material entry along with its assigned unit economics and storage assumptions to speed up duplicate catalog setup.
Delete (Red [X] Button): Permanently deletes the raw material from the Knowledge Bank directory.
Exporting to Excel & Pop-Out Controls
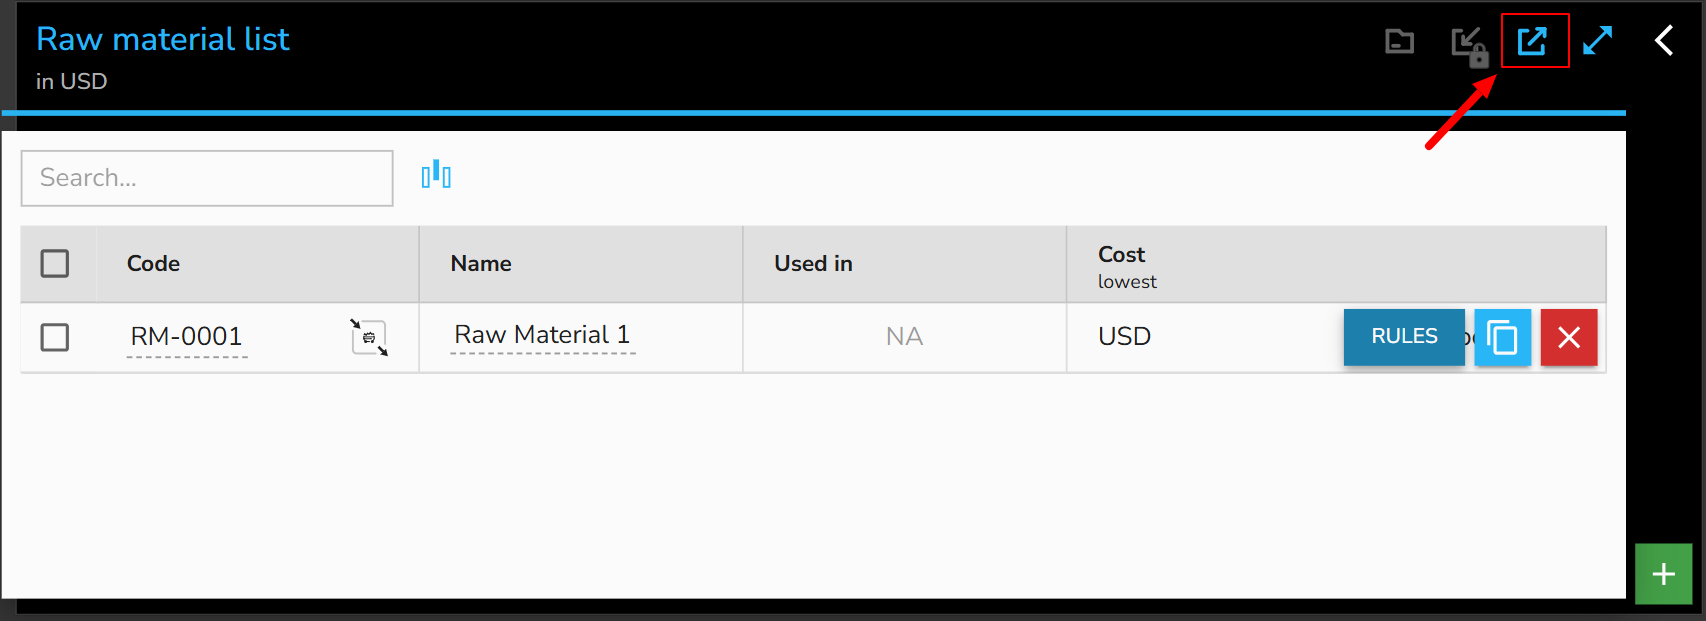
The top-right header tools provide external data handling and multi-window modeling:
-
Export Raw Material List to Excel: You can export the entire raw material catalog—including codes, standard purchase prices, assigned units, and downstream product usage—into an Excel spreadsheet for off-platform procurement reviews or supplier rate audits.
-
Export Product Card to Excel: You can export an individual material's detailed card directly to an Excel file, capturing its specific unit conversion rules, storage densities, and capitalized landed cost calculations.
Knowledge Bank: Process Library
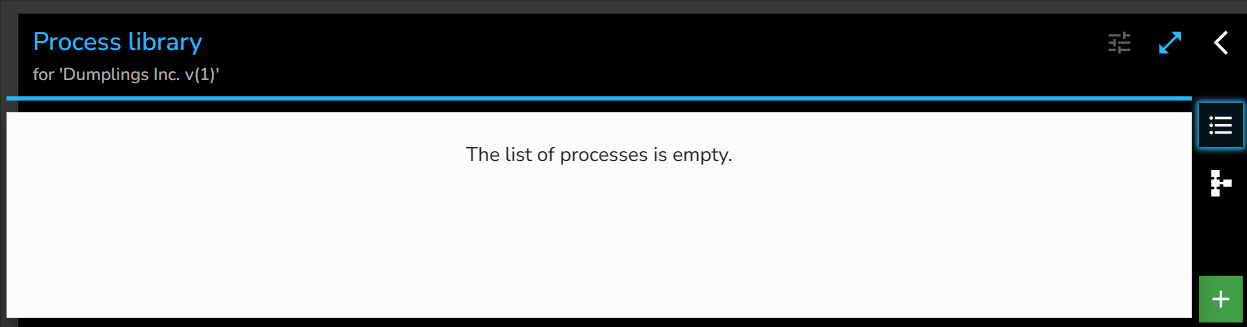
The PROCESS LIBRARY in the Knowledge Bank serves as the central corporate repository for all operational transformation steps, assembly protocols, and service procedures. It acts as the single source of truth for master process naming, global code indexing, and cross-model alignment across your entire enterprise.
[Scenario #1] ──Create Process──> [Product / Service]
                                         │
                                  Upload Process &
                             Automatically Get 'Process Code'
                                         │
                                         ▼
                             ┌───────────────────────┐
                             │    Knowledge Bank     │
                             │  Process Library (KB) │
                             └───────────────────────┘
                                         │
                                       Import
                                         │
                                         ▼
[Scenario #2] ───────────────────> [Product / Service]
Two Workflows to Register Processes in the Knowledge Bank
You can register master processes using either a top-down or bottom-up approach depending on your operational setup:
Method 1: Top-Down (Pre-Define Code & Name in KB First)
Use this method when you want to establish company-wide SOPs, strict coding standards, or naming conventions before anyone begins modeling:
- In the Knowledge Bank, open the Process library and click the green [+] button in the lower-right corner.
- In the Add new process window, enter the Process name (e.g., Cracking / Milling, Mashing, Dumpling Folding).
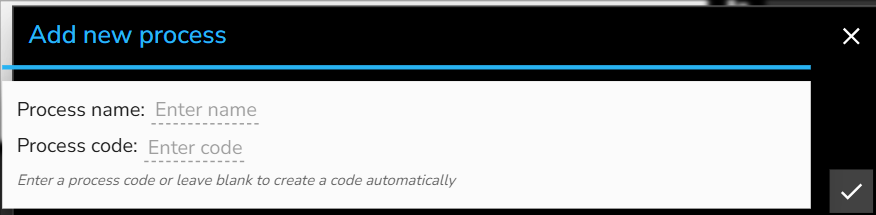
- For the Process code, choose one of two paths:
- Enter a custom identifier manually to match internal company formatting (e.g., PC-0001, T001, SOP-100).
- Leave it blank, and the system will automatically provision an incremental code.
- Click the checkmark button (✓) in the lower right to save the record into the master library.
- Assigning to Operational Scenarios: Once the master shell exists in the Knowledge Bank, working scenarios can import this record and assign actual equipment, labor runtimes, and recipe touchpoints directly to it.
Method 2: Bottom-Up (Upload Directly from a Scenario Model)
Use this method when you develop custom operational recipes directly inside a scenario model and want to promote them into company-wide master standards:
Before importing or uploading, the scenario's process directory must reference the company knowledge base:
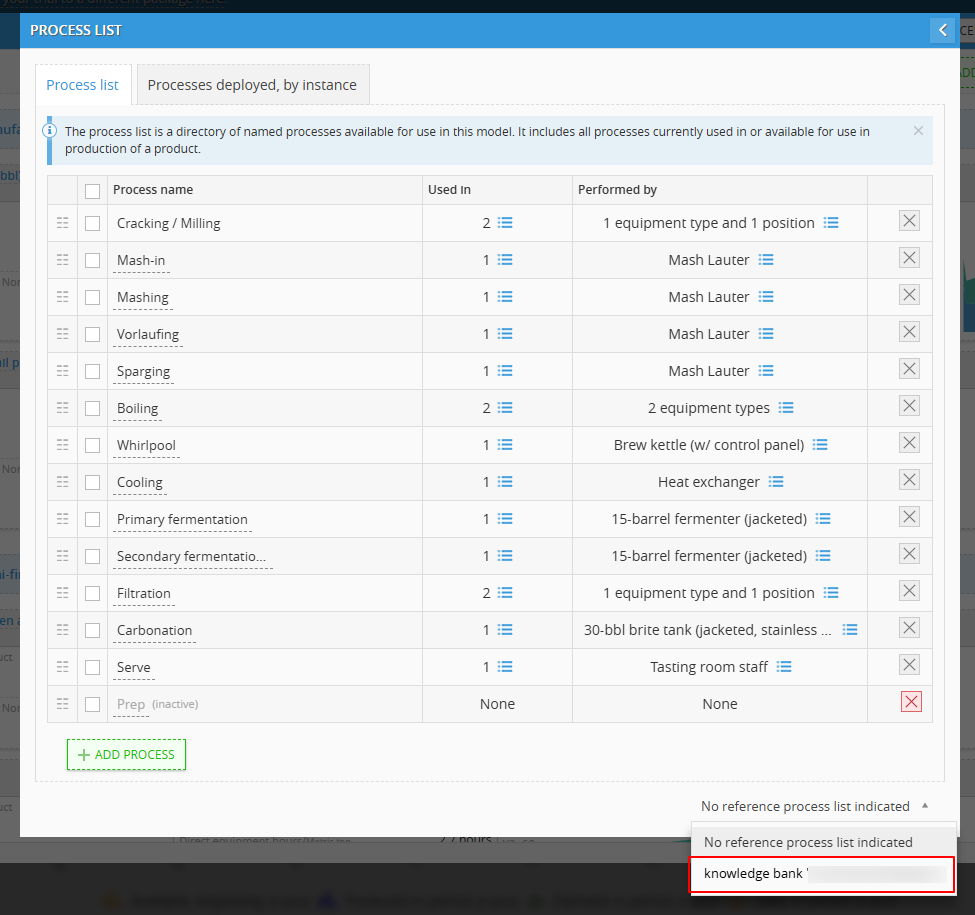
- In the PROCESS LIST modal, navigate to the footer.
- Click the dropdown menu showing "No reference process list indicated".
- Select your company's master repository
- In an active scenario, create and configure your transformation step inside a product card or via the scenario Process List.
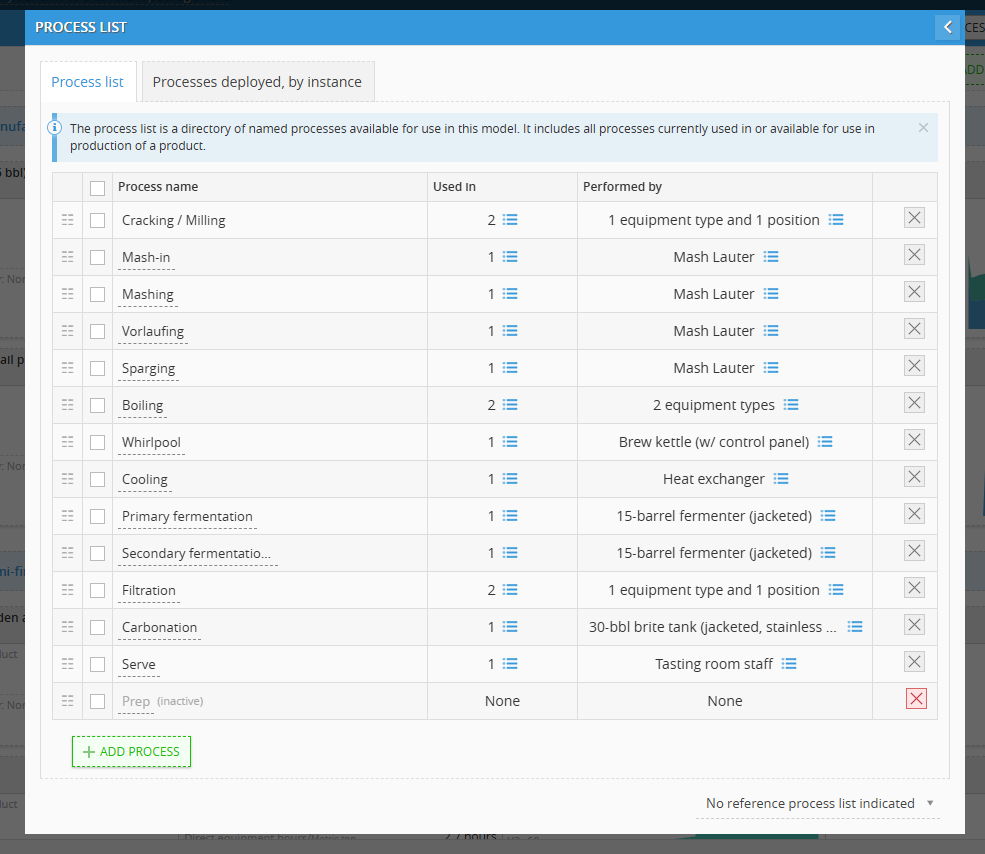
- Click the Upload to Knowledge Bank button (the lightbulb upload icon 💡↑) on the individual step or via the batch actions menu.

- The system pushes the step into the Knowledge Bank Process library, automatically provisions an official Process code, and indexes it for other scenarios to reference.
Managing Processes Inside the KB
The master Process Library table provides a comprehensive overview of your procedural assets:
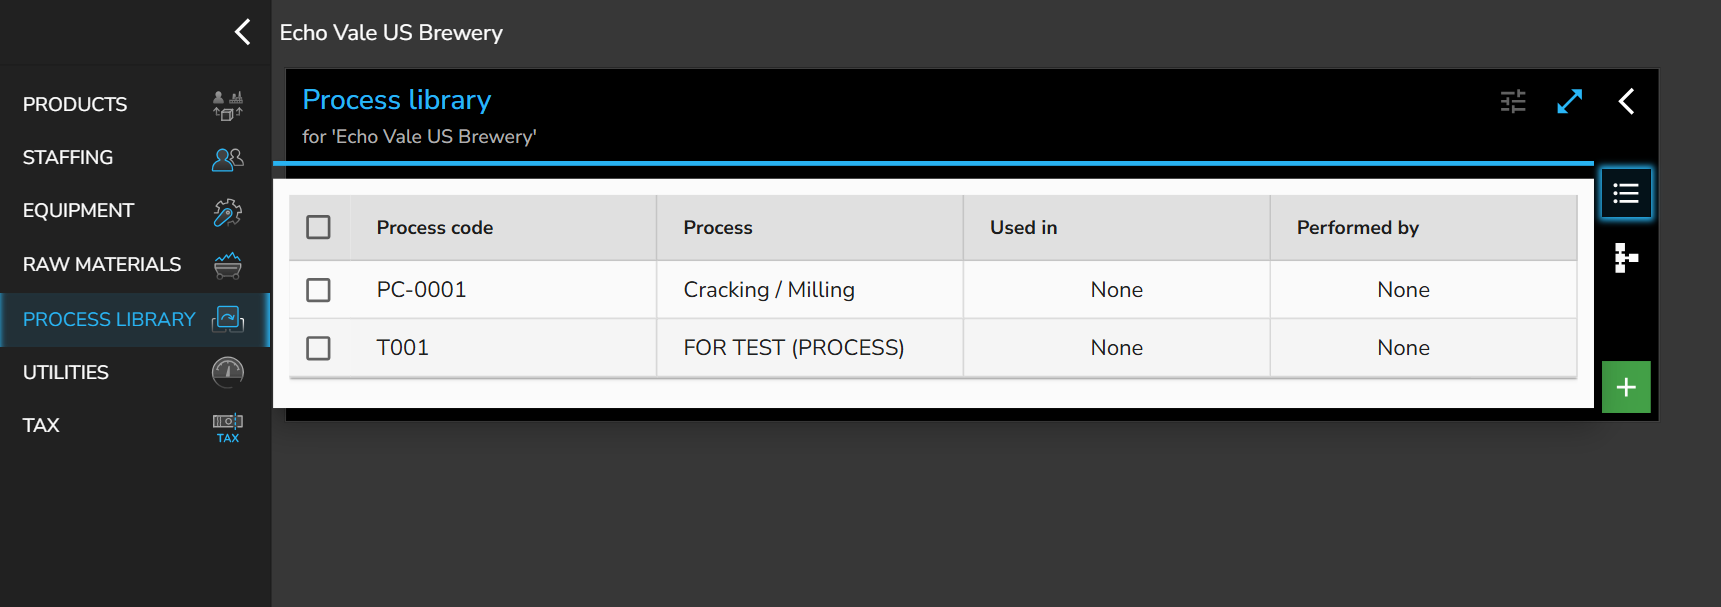
- Process code: The master tracking key assigned to each operation (e.g., PC-0001, T001).
- Process: The standardized title of the step.
- Used in: Displays which downstream products or intermediate stages across models consume this process.
- Performed by: Identifies the machinery or staff positions mapped to execute the step.
- View Toggles (Right Sidebar):
- List View (☰): Displays all operations in a flat tabular format for standard sorting and maintenance.
- Hierarchy / Tree View (⑂): Shows procedural dependencies, upstream stages, and process parentage.
- Header Controls: Dock or pin the panel, expand to full screen (↗), or filter the catalog using the search bar.
The Two-Way Sync Mechanism (Model ⇄ KB)
Connecting an active scenario to the Knowledge Bank enables synchronization controls inside the scenario's Process list:
- Reference Linking: In the scenario Process list footer, set the Reference process list dropdown to point to your company's Knowledge Bank repository.
- Status Indicators:
- Blue Checkmark (✓): The process is linked to the KB, displaying its active master code alongside the name.
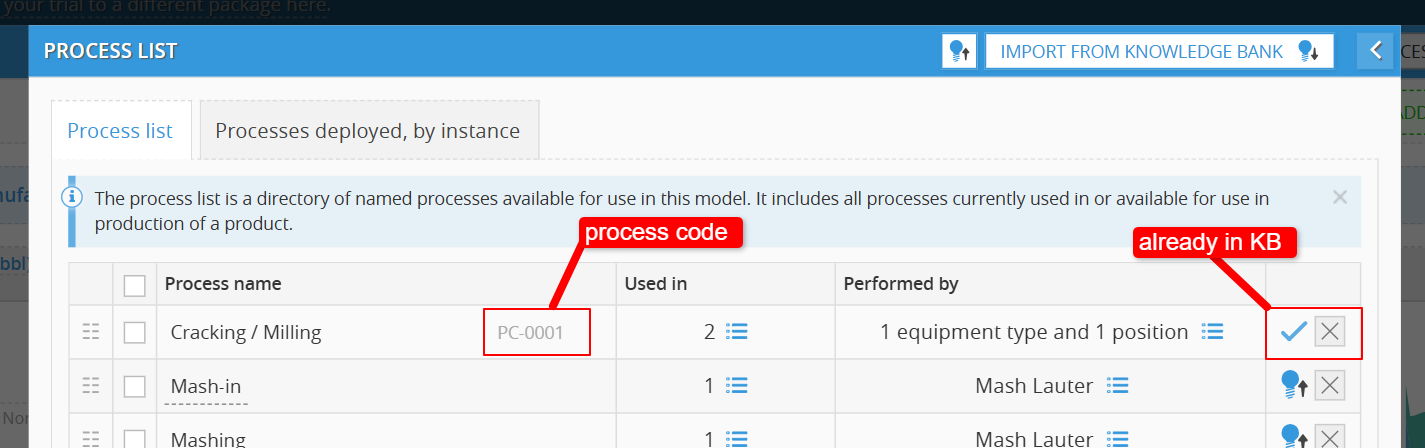
- Upload Lightbulb (💡↑): The process exists only in the local scenario and has not yet been pushed to the master catalog.
- Blue Checkmark (✓): The process is linked to the KB, displaying its active master code alongside the name.
- Importing to Scenarios (KB ➔ Model): Click IMPORT FROM KNOWLEDGE BANK (💡↓) in the scenario header to review available master codes, check target steps, and import them into the active model.

- The KNOWLEDGE BANK PROCESSES dialog displays all available templates with their master codes.
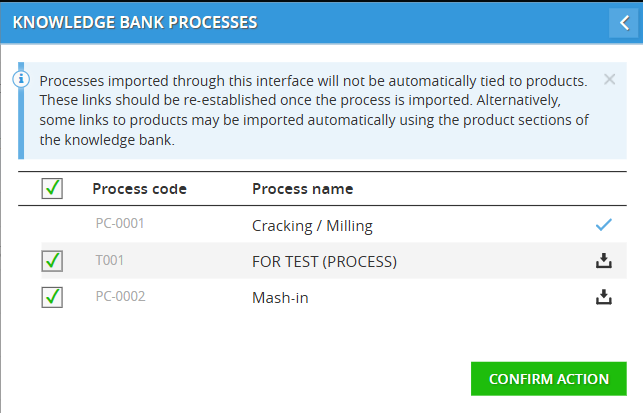
- The KNOWLEDGE BANK PROCESSES dialog displays all available templates with their master codes.
- Uploading to KB (Model ➔ KB): Upload individual steps via their row lightbulb icon (💡↑) or click the master upload button in the scenario header to push all unlinked processes at once.

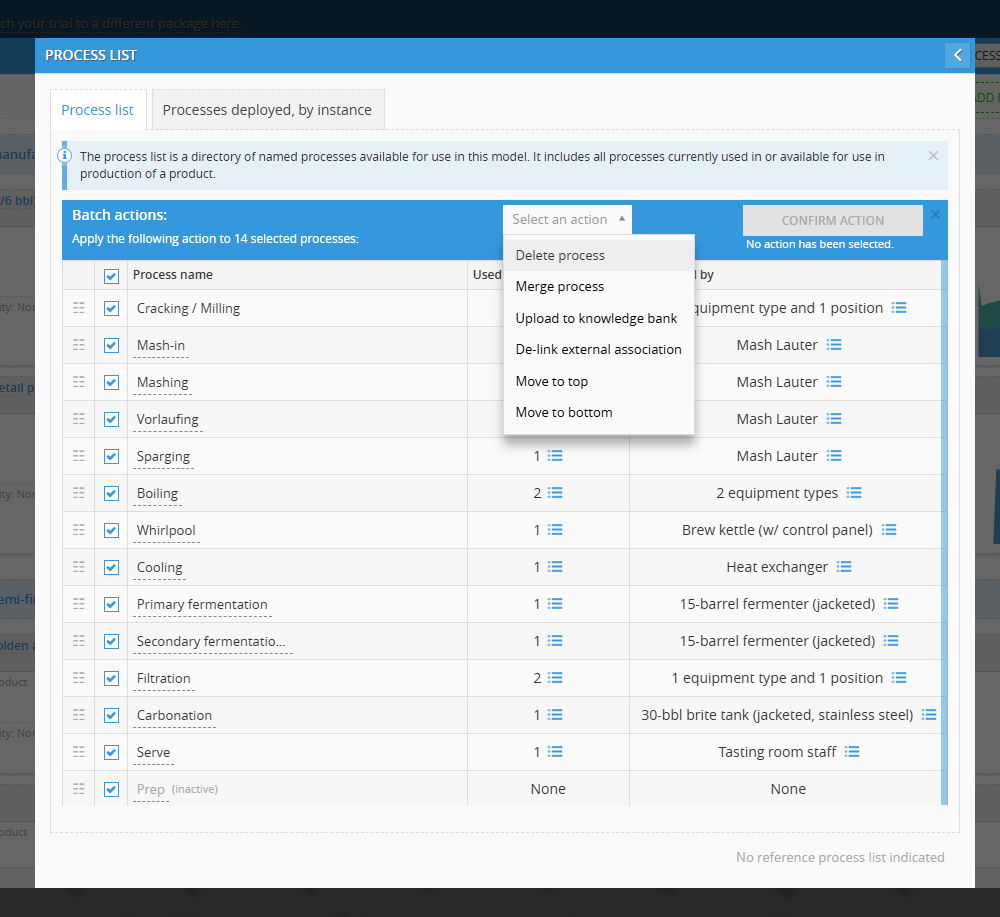
- De-linking: If a scenario requires modifying a process without altering the global company standard, use the batch action De-link external association to convert it into a local, independent instance.
Knowledge Bank: Utilities
The UTILITIES directory defines the resource consumption rates and grid tariffs required to operate your facility and machinery. Instead of treating power and water as a generic lump-sum operational expense, Decision Critical enables causal tracking by linking utility rates directly to equipment operating hours, batch recipes, or facility floor areas.
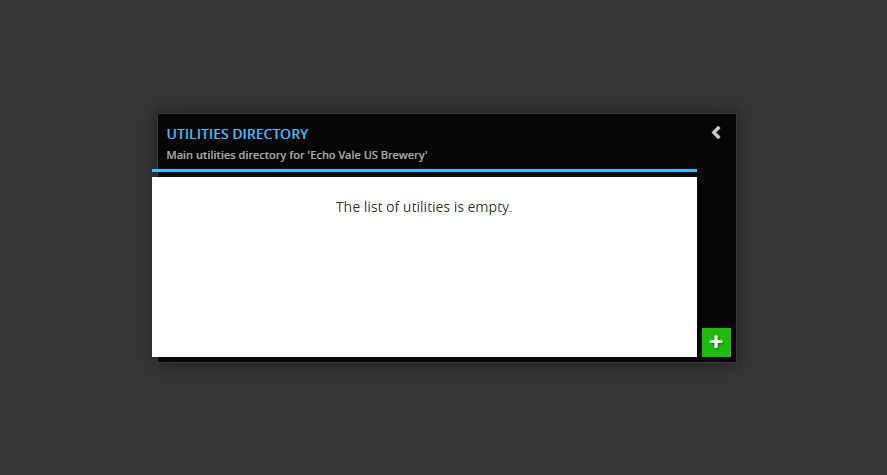
Utilities Directory Overview
The main directory serves as the centralized catalog of energy, water, and waste types available across scenarios:
- Central Catalog: Standardizes tariff structures (cost per unit) to ensure all modeled equipment and facilities use identical utility assumptions.
- Window Controls: The header includes a collapse arrow (<) to return to the global dashboard.
- Add Utility: Clicking the green [+] button adds a new utility row with a dropdown selector.
Supported Utility Types
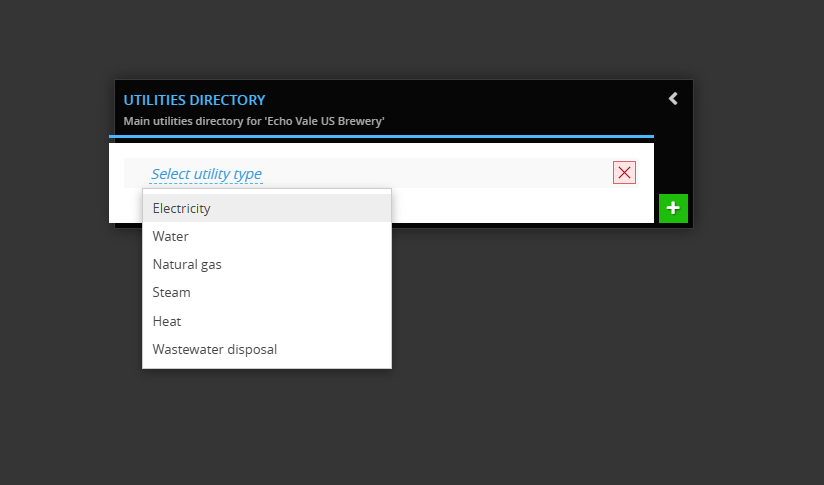
Clicking the Select utility type field opens the resource menu:
- Electricity: Models power draw (kWh) for heavy machinery (e.g., pumps, refrigeration, canning lines) and base building lighting.
- Water: Captures incoming volume (gallons, liters, cubic meters) used both as a direct beverage ingredient and for washdowns/CIP cycles.
- Natural gas: Tracks heating fuel for direct-fired kettles, boilers, and building climate control.
- Steam: Used in industrial facilities utilizing centralized or piped steam generation for boiling and sterilization.
- Heat: Models thermal energy inputs for thermal exchange and facility heating.
- Wastewater disposal: Accounts for sewer surcharges, spent process effluent, and volume-based municipal drainage fees.
Operational Importance
- Direct Equipment Linkage: Once defined here, each machine (e.g., Mash Lauter or Gas-Fired Steam Boiler) can pull from this directory to calculate its hourly utility burn rate.
- Capacity-Driven Spikes: Scaling up production runs automatically multiplies utility expenses based on equipment runtime, exposing energy cost surges during peak production months.
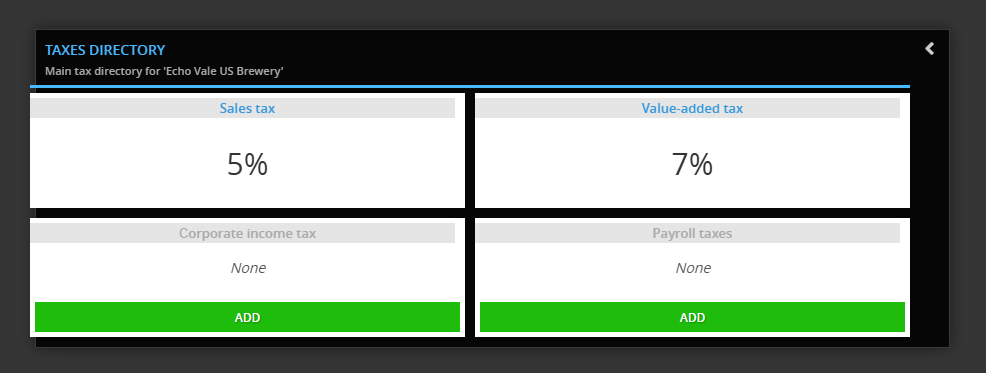
Knowledge Bank: Taxes Module
The TAX directory sets the fiscal and regulatory framework for your entire company. Instead of applying crude, post-model percentage cuts to net profit, Decision Critical separates tax obligations into distinct causal streams so that liabilities hit the balance sheet, payroll, and consumer checkout exactly as required by law.
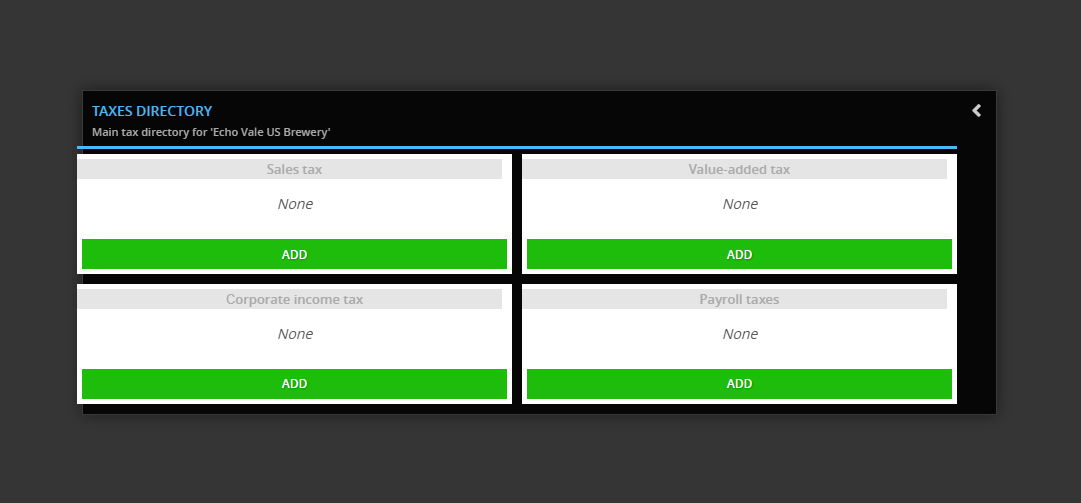
The Four Tax Pillars
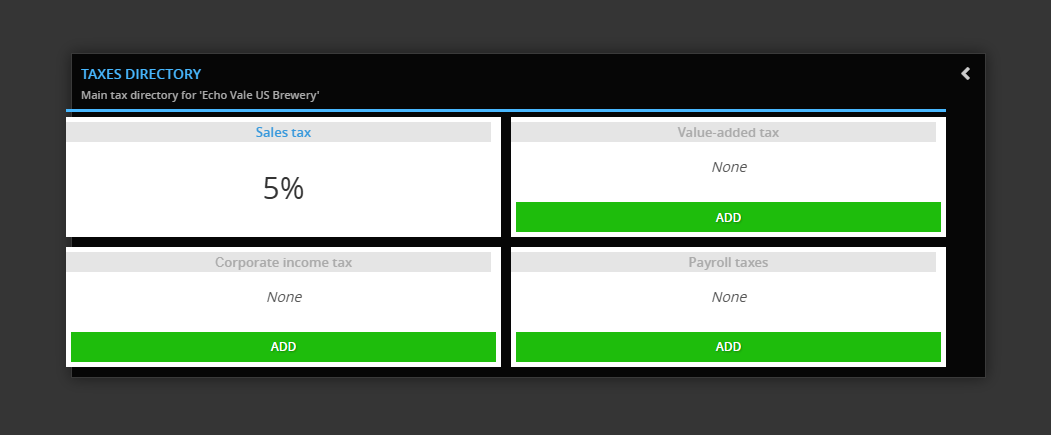
The TAXES DIRECTORY breaks taxation down into four core categories:
- Sales tax:
- Function: Models point-of-sale consumption tax charged directly to the buyer.
- Financial Impact: Collected on behalf of the government; affects cash flow timing and gross checkout price, sitting as a short-term liability rather than an operating expense.
- Action: Click the green ADD button to set state, provincial, or local sales tax rates.
- Value-added tax (VAT):
- Function: Models multi-stage consumption taxation common in international jurisdictions.
- Financial Impact: Tracks input VAT paid on raw materials/equipment versus output VAT collected on finished goods sales, calculating net tax credits or settlements.
- Action: Click the green ADD button to configure standard, reduced, or zero-rated VAT rules.
- Corporate income tax:
- Function: Directly drives the bottom line by taxing net taxable profits at the entity level.
- Financial Impact: Informs your after-tax net margin and year-end tax reserve liabilities.
- Action: Click the green ADD button to define statutory corporate tax rates and brackets.
- Payroll taxes:
-
Function: Models graduated, bracket-based payroll tax obligations applied against employee compensation.
-
Configuration (Tax Brackets):
-
Allows creating custom tiered wage thresholds (e.g., from $0.01$ to an upper dollar limit) with a dedicated percentage rate assigned to each tier.
-
Additional tiers can be stacked using the [+] button to model progressive statutory rates or wage caps.
-
-
Cash Flow Timing (Payroll tax payable): Governs when the accrued tax liability actually leaves your cash account. Defaults to End of current month, with dropdown options to align with local remittance schedules (such as quarterly or following-month filings).
-
Why Centralized Tax Configuration Matters
Setting these rules in the Knowledge Bank guarantees that whenever you model a change in selling price, run an extra shift, or acquire high-value assets, all tax calculations update automatically across every scenario without breaking your cash flow projections.
Knowledge Bank and Scenario intregation
Integration: Knowledge Bank ⇄ Active Model
Staffing
The Staffing module supports full bidirectional synchronization between master corporate templates in the Knowledge Bank (KB) and your operational models.
1. Downloading from KB into an Active Model
Use this workflow to pull a pre-configured role template into your current scenario:
- Step 1: Create and define the role in the Knowledge Bank (e.g., KB Staff, code KBS001, with base gross salary).
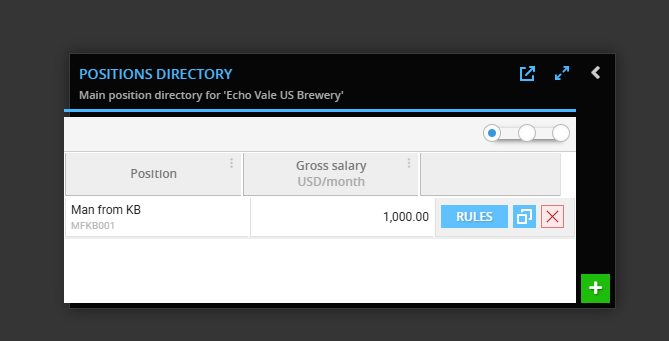
- Step 2: Open your active scenario and navigate to Staffing > POSITION LIST.
- Step 3: Click the lightbulb icon in the top-right toolbar of the modal.
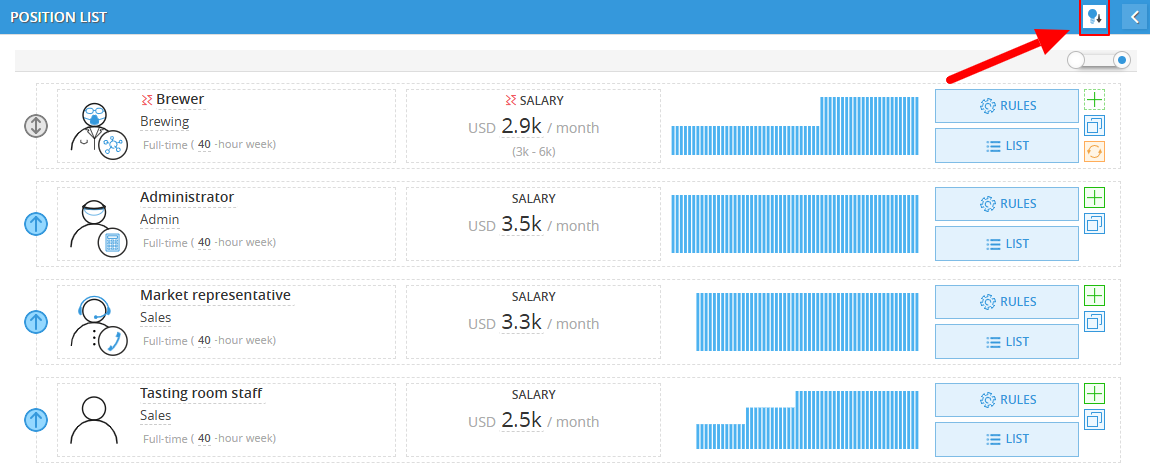
- Step 4: In the KNOWLEDGE BANK POSITIONS window, select the checkbox next to the target role.
- Step 5: Choose the target department via the Select department dropdown (e.g., Brewing, Admin, Sales) and click CONFIRM ACTION.
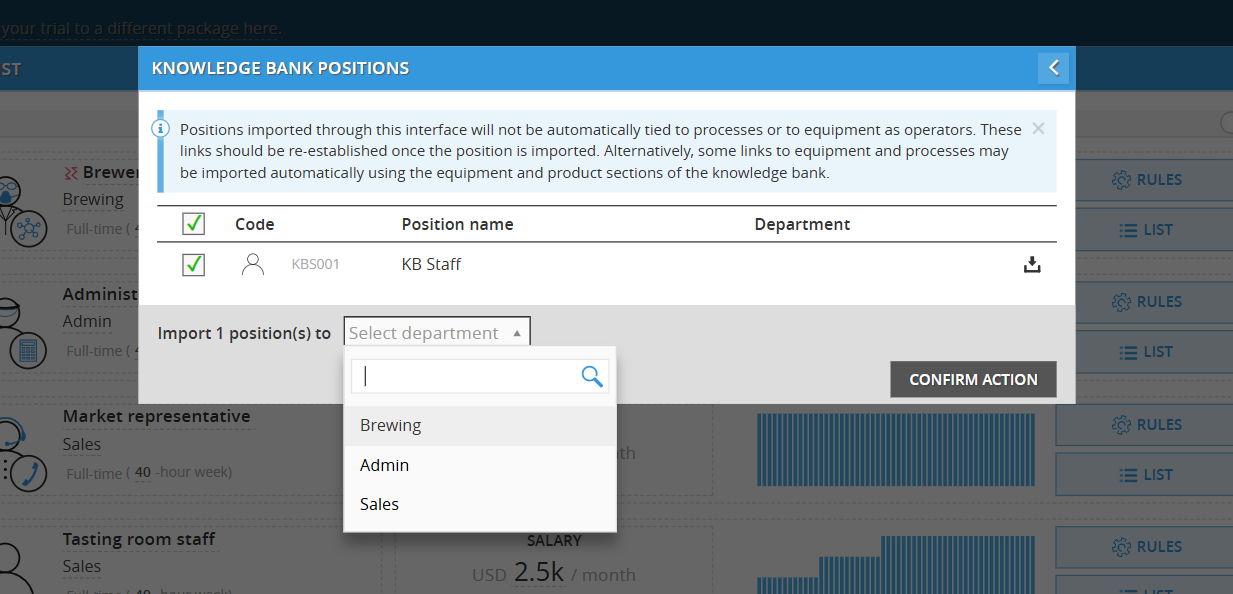
- Result: The position imports into the model's active directory. It appears with an initial status of ADD EMPLOYEES TO ACTIVATE THIS POSITION until specific headcount schedules are linked.
Import Note: Positions imported through this interface are not automatically linked as operators to existing equipment or processes. Re-establish these operational links inside the model or configure them via the Equipment and Product sections of the Knowledge Bank.
2. Uploading from an Active Model into Knowledge Bank
Use this workflow to promote a role created manually within a specific scenario up to the global company library:
- Step 1: In your model's POSITION LIST, find the manually created role (e.g., Brewer) and click its RULES button.
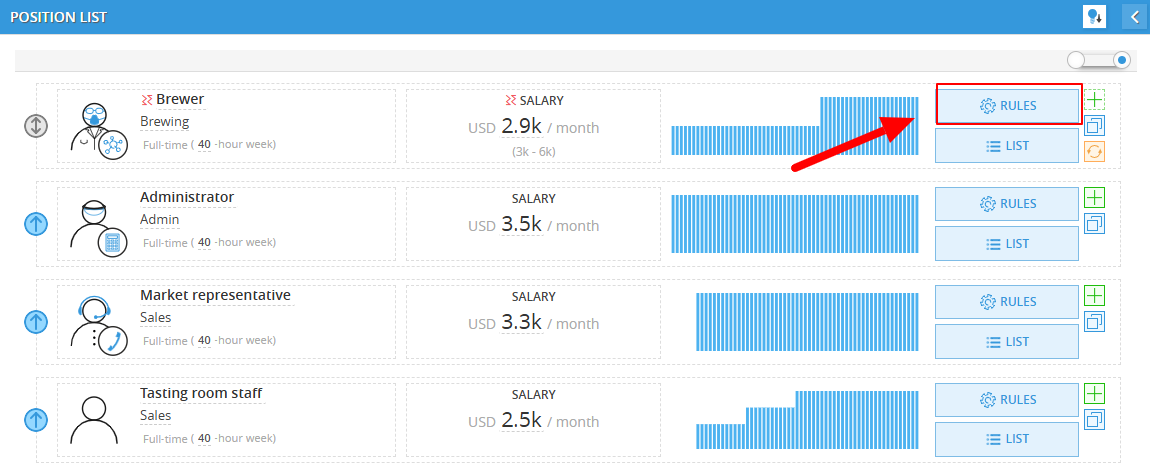
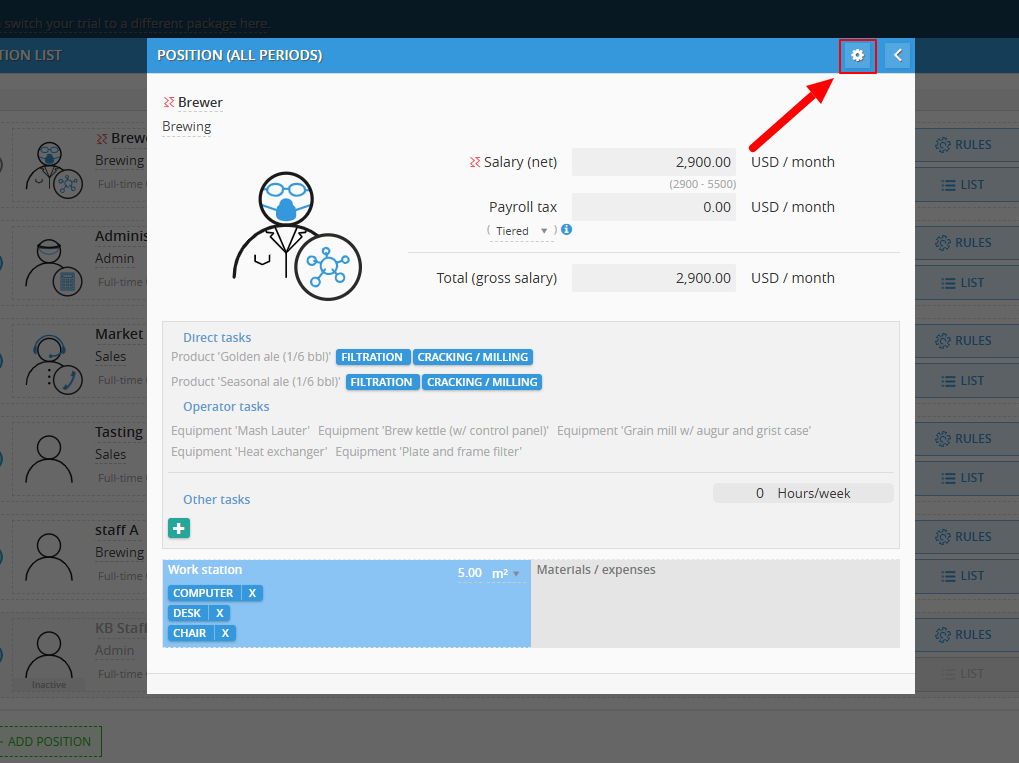
- Step 2: In the top-right corner of the POSITION (ALL PERIODS) window, click the Gear (Settings) icon.
- Step 3: In the POSITION SETTINGS panel, scroll down to the Knowledge bank integration card.
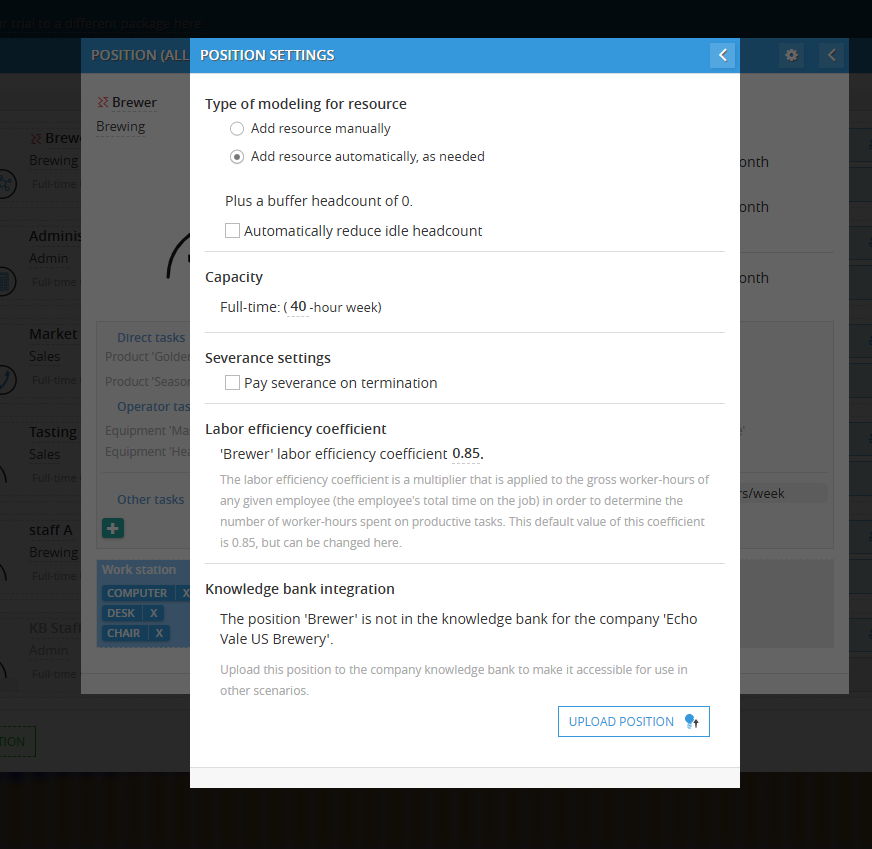
- Step 4: The status will indicate that the position does not currently exist in the Knowledge Bank. Click UPLOAD POSITION.
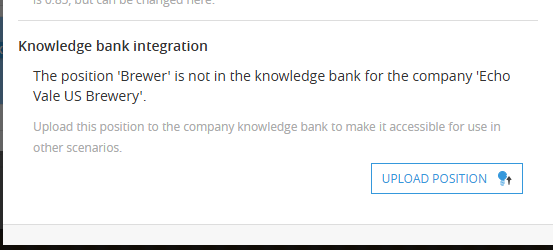
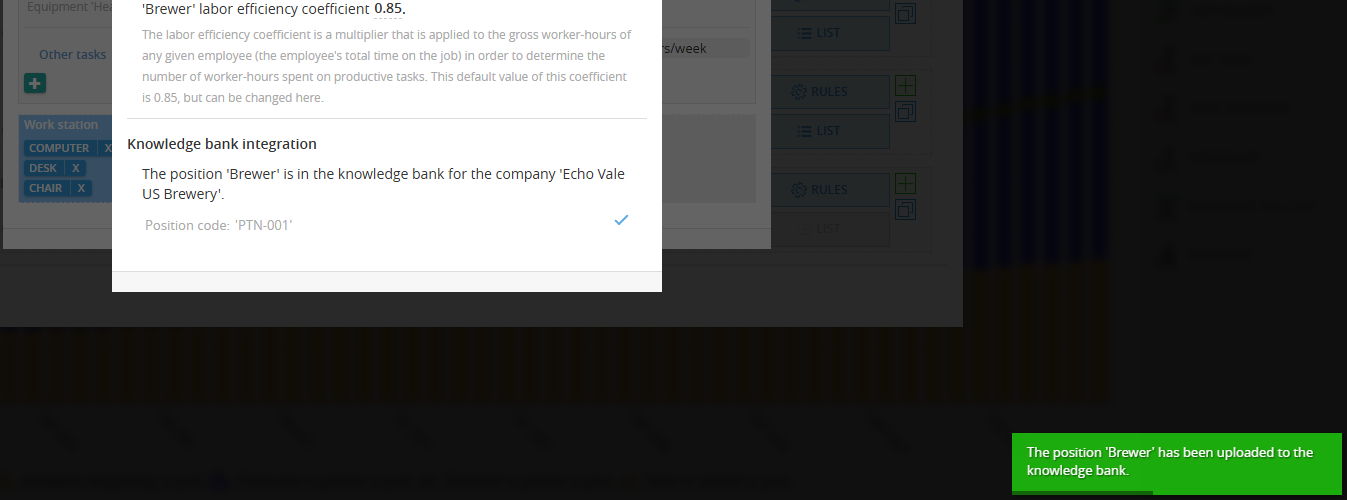
- Result: The system confirms the upload with a success notice, assigns a formal Knowledge Bank code (e.g., PTN-001), and locks the master template into your global directory for use across all other scenarios.
Equipment
The Equipment module utilizes a two-way synchronization bridge between master templates in the Knowledge Bank (KB) and specific operational scenarios.
1. Downloading Equipment from KB into an Active Model
Pull standardized machinery definitions into an active scenario to preserve company-wide cost, footprint, and operating assumptions:
- Step 1: Define the master asset inside the Knowledge Bank EQUIPMENT DIRECTORY.
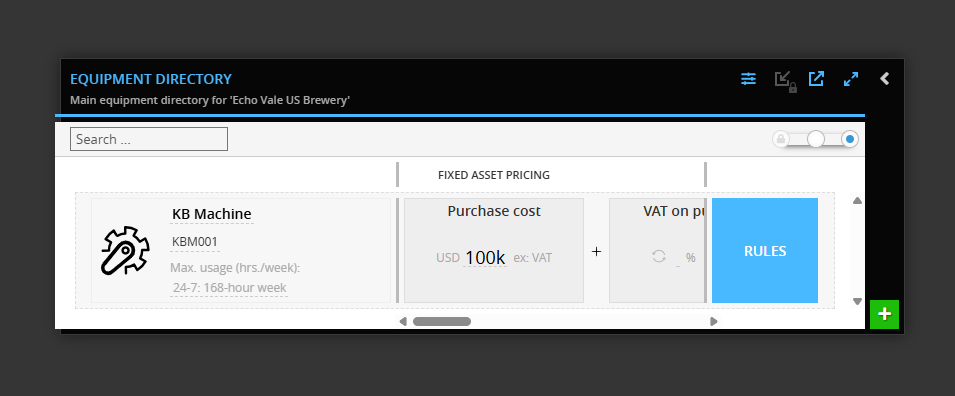
- Step 2: Open your active scenario and navigate to EQUIPMENT LIST.
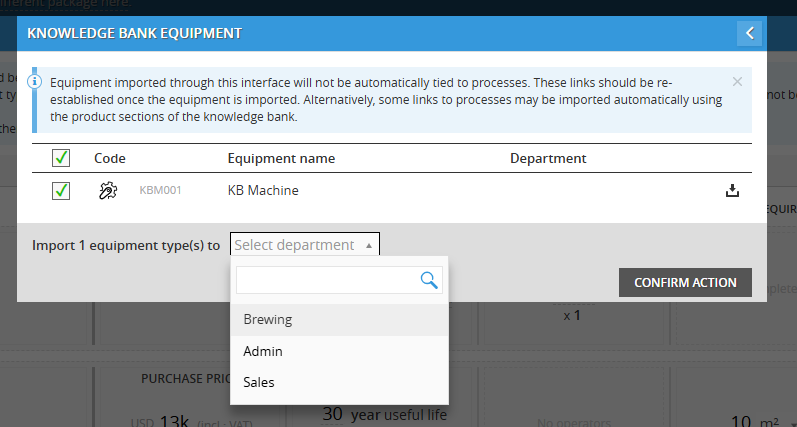
- Step 3: Click the lightbulb icon in the top-right toolbar of the modal window.
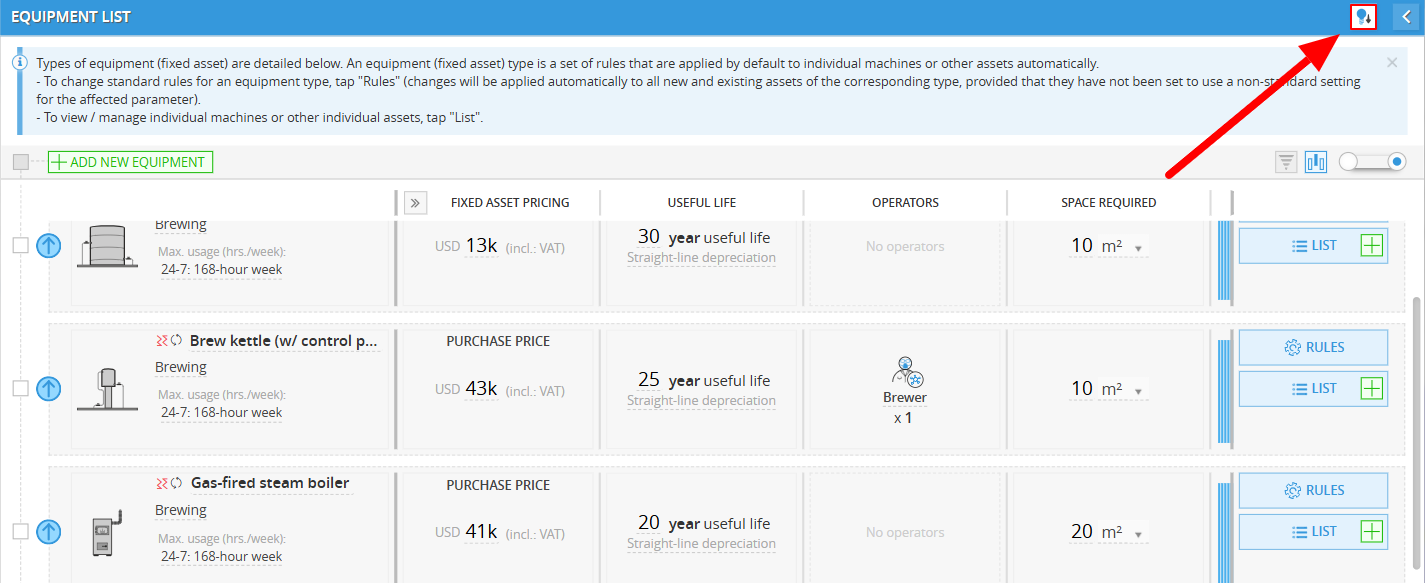
- Step 4: Select the target machine from the Knowledge Bank list to import its specifications directly into the scenario.
2. Uploading or Linking Model Equipment to KB
Promote machinery configured inside an active model up to the master Knowledge Bank or link it to an existing KB record:
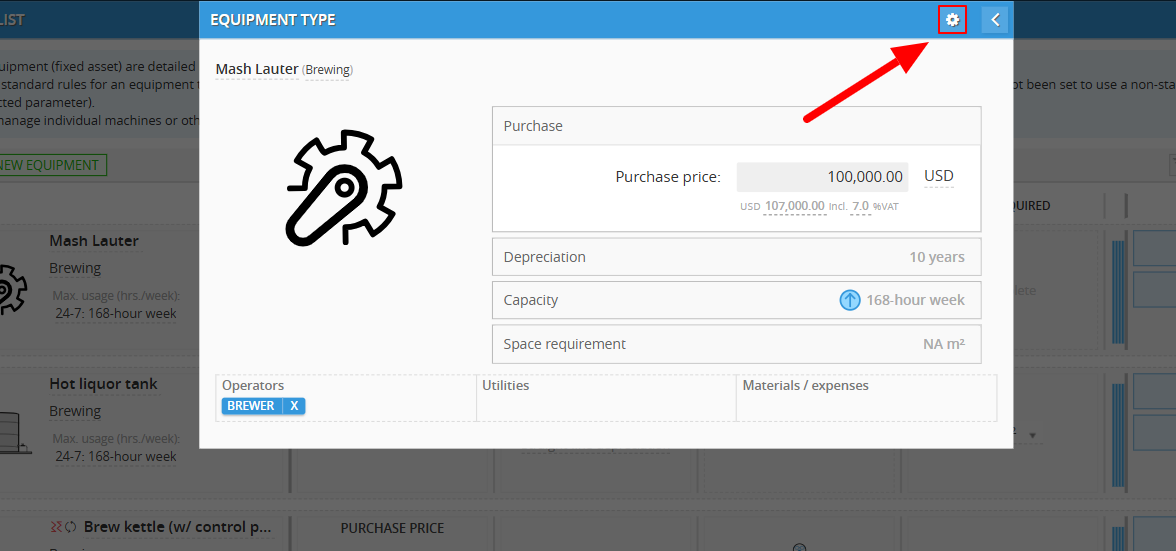
- Step 1: In the scenario EQUIPMENT LIST, locate the asset (e.g., Mash Lauter) and click its RULES button.
- Step 2: Click the Gear (Settings) icon in the top header bar of the EQUIPMENT TYPE window.
- Step 3: Under the Knowledge bank integration section in EQUIPMENT TYPE SETTINGS, choose an action:
- Link to existing KB item: Use the Link to knowledge bank equipment dropdown to map the scenario asset to an existing record.
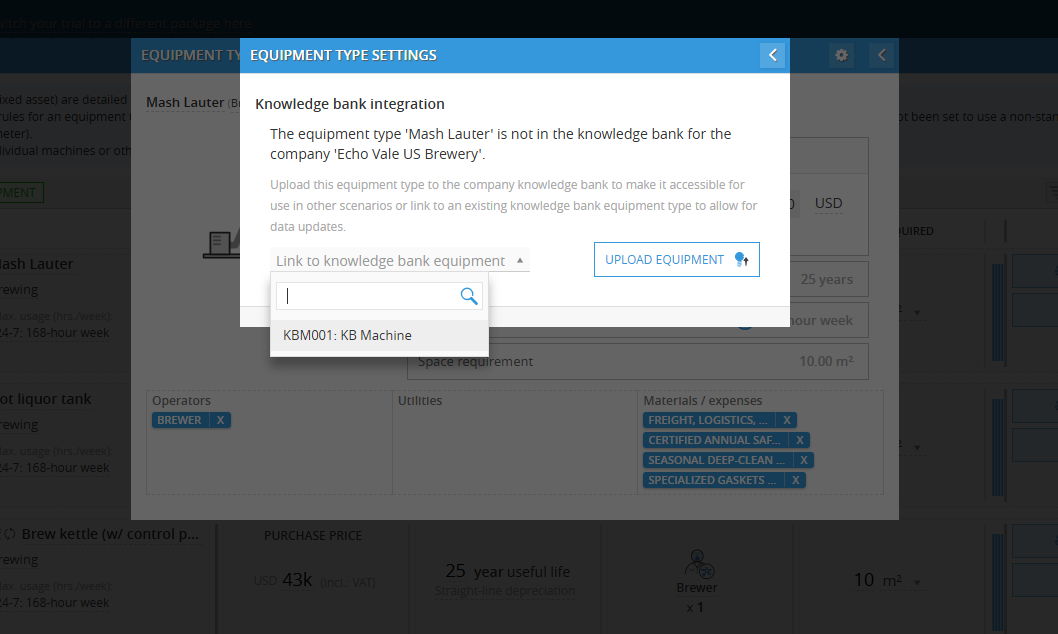
- Upload as new: Click UPLOAD EQUIPMENT to push the local configuration to the global library as a brand-new fixed asset type.
- Link to existing KB item: Use the Link to knowledge bank equipment dropdown to map the scenario asset to an existing record.
3. Resolving Synchronization & Operator Conflicts
When linking an existing model item to a Knowledge Bank template that has diverged, Decision Critical provides resolution controls:
- Sync Actions: When data diverges, the modal displays two directional choices:
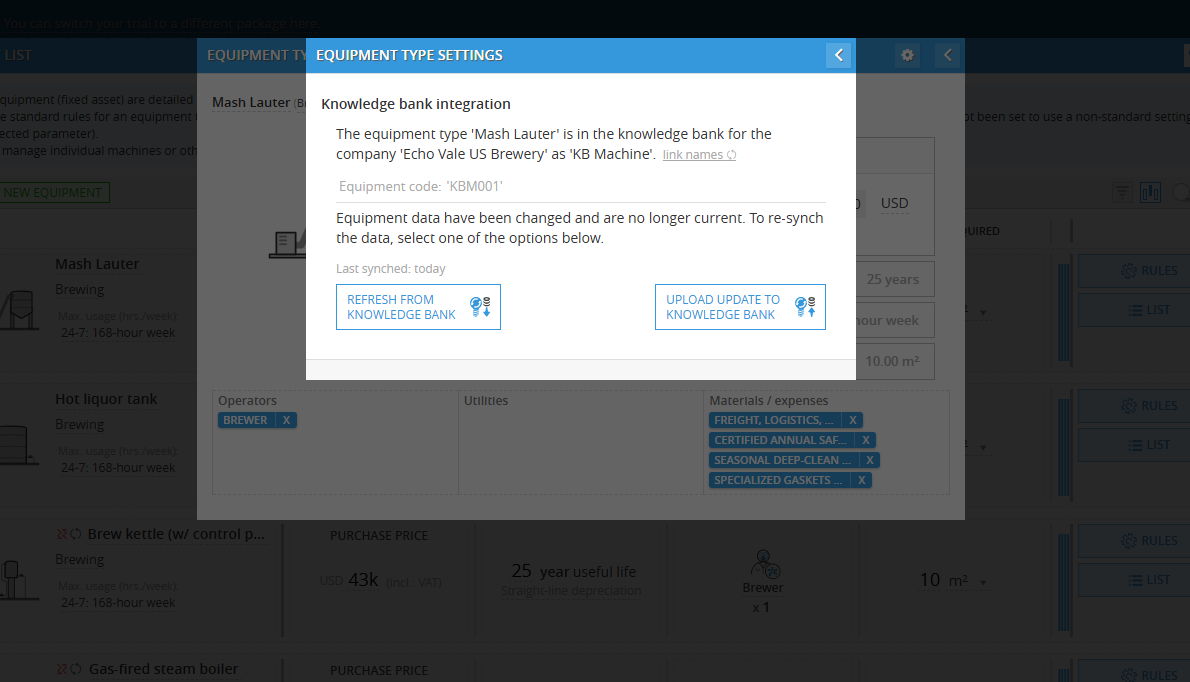
- REFRESH FROM KNOWLEDGE BANK: Overwrites local scenario parameters with master KB data.
- UPLOAD UPDATE TO KNOWLEDGE BANK: Pushes local scenario changes up to overwrite the KB master template.
- Confirm Compatibility Assumptions: If assigned labor differs between systems, a compatibility prompt presents two options:
- Synchronize knowledge bank equipment operators to scenario settings: Overwrites KB operator settings to match the scenario (links or de-links roles like Brewer).
- Ignore (do not synchronize) operators: Updates machine specs while preserving existing operator allocations independently.
- Confirmation: Once applied, the interface confirms that the asset is synced and displays the active Knowledge Bank code (e.g., KBM001) with a green confirmation toast.
TAX
Tax Integration: Knowledge Bank ⇄ Active Model
The Tax module uses a centralized link between your company-wide tax profiles in the Knowledge Bank (KB) and active scenarios. This lets you push updates across models or build locally and upload to the central library.
1. Downloading Tax Settings (KB ➔ Active Model)
Use this workflow to pull pre-set tax rules into an operational model:
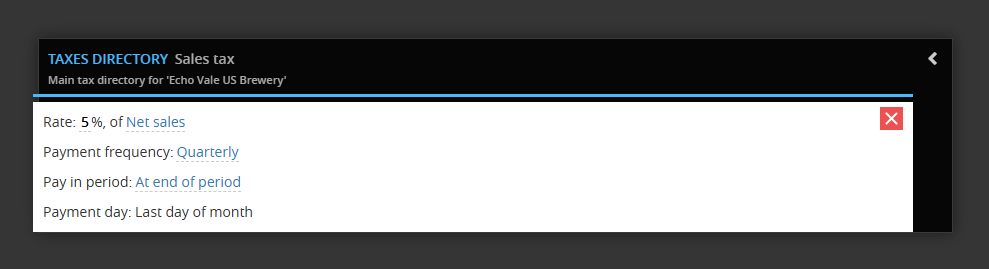
- Step 1: In the Knowledge Bank, set up your target tax profile under the TAXES DIRECTORY.
- Step 2: Open your active scenario model and click TAX.
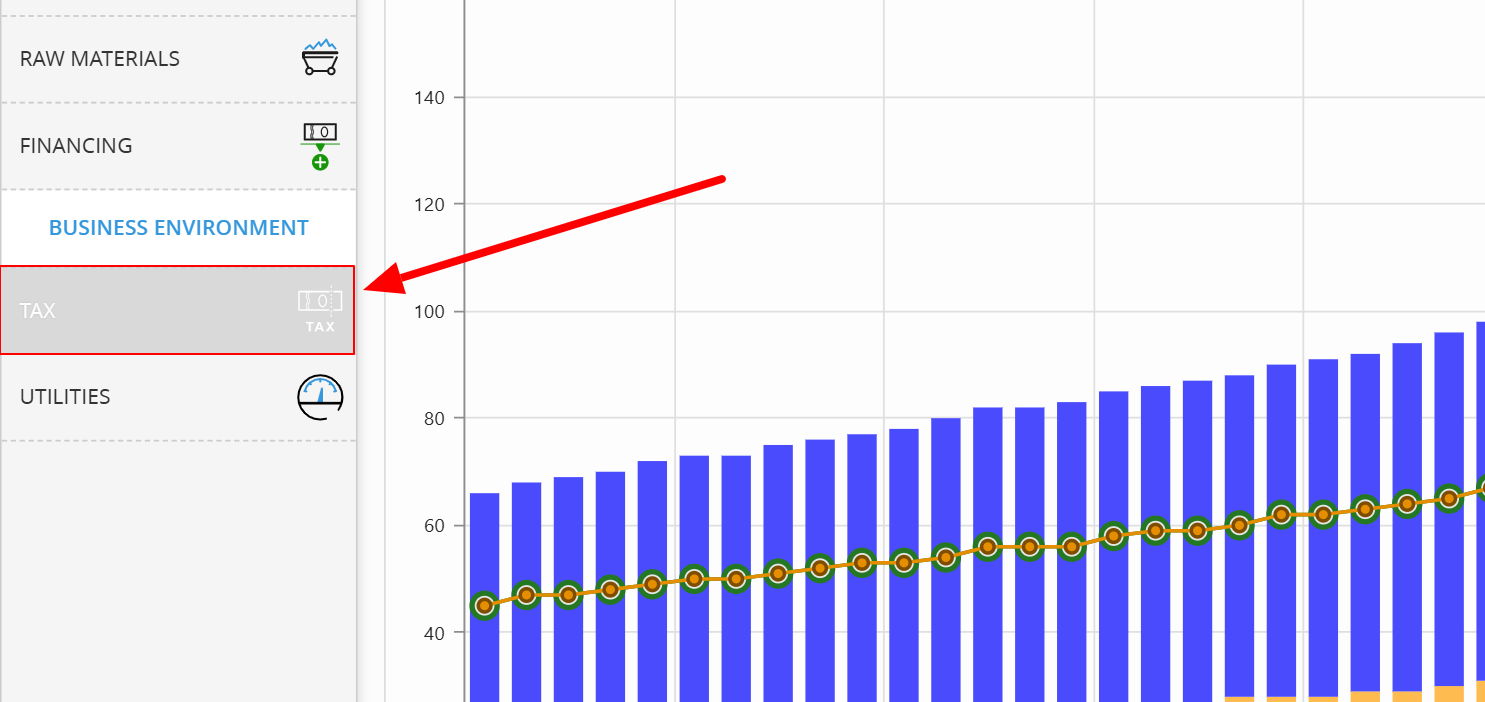
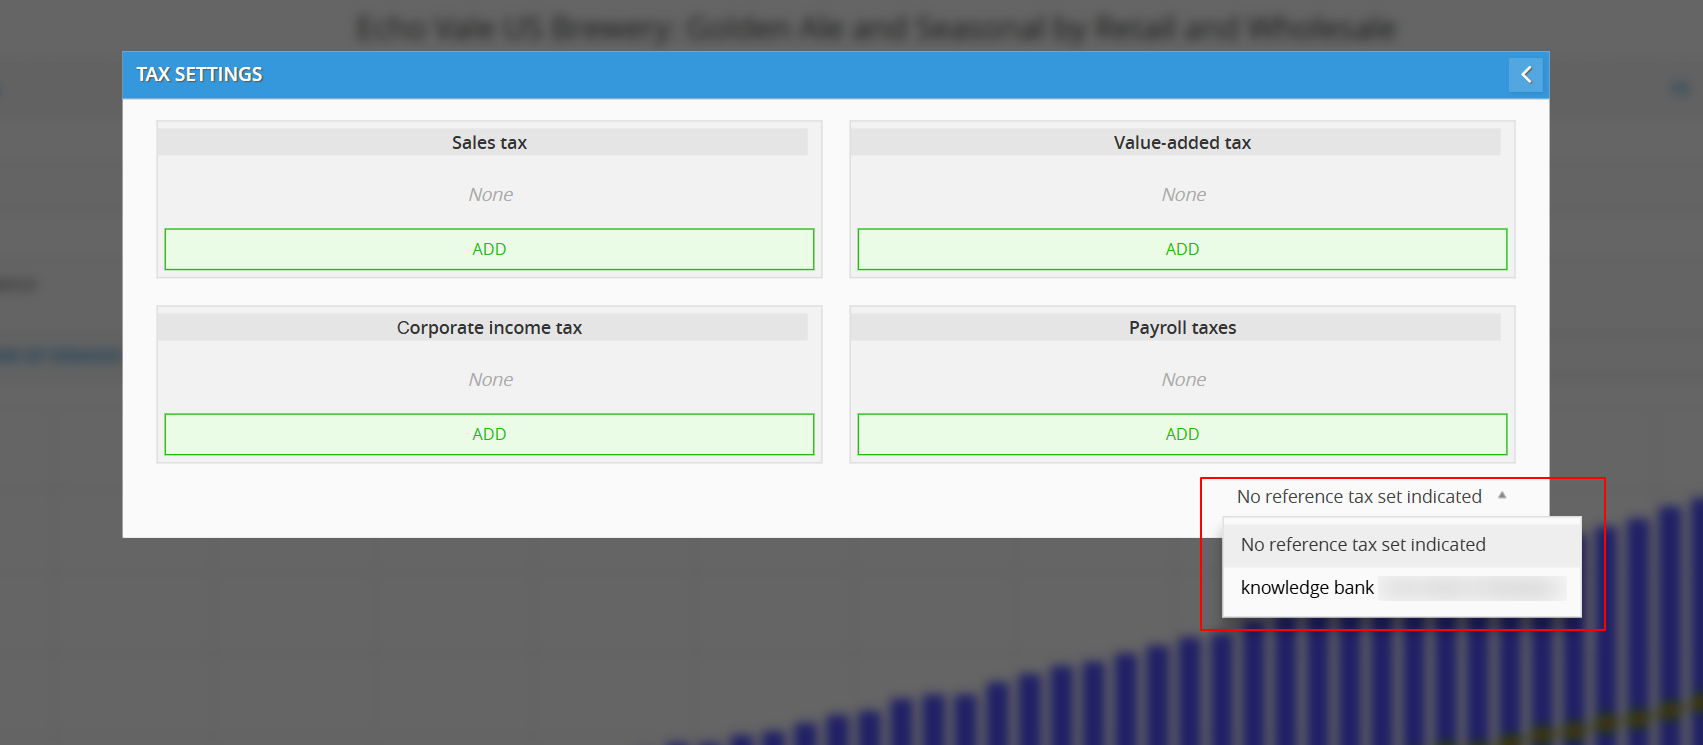
- Step 3: Set the Reference tax set dropdown to match your company's knowledge bank (e.g., knowledge bank '...' ).
- Step 4 (Importing Rates):
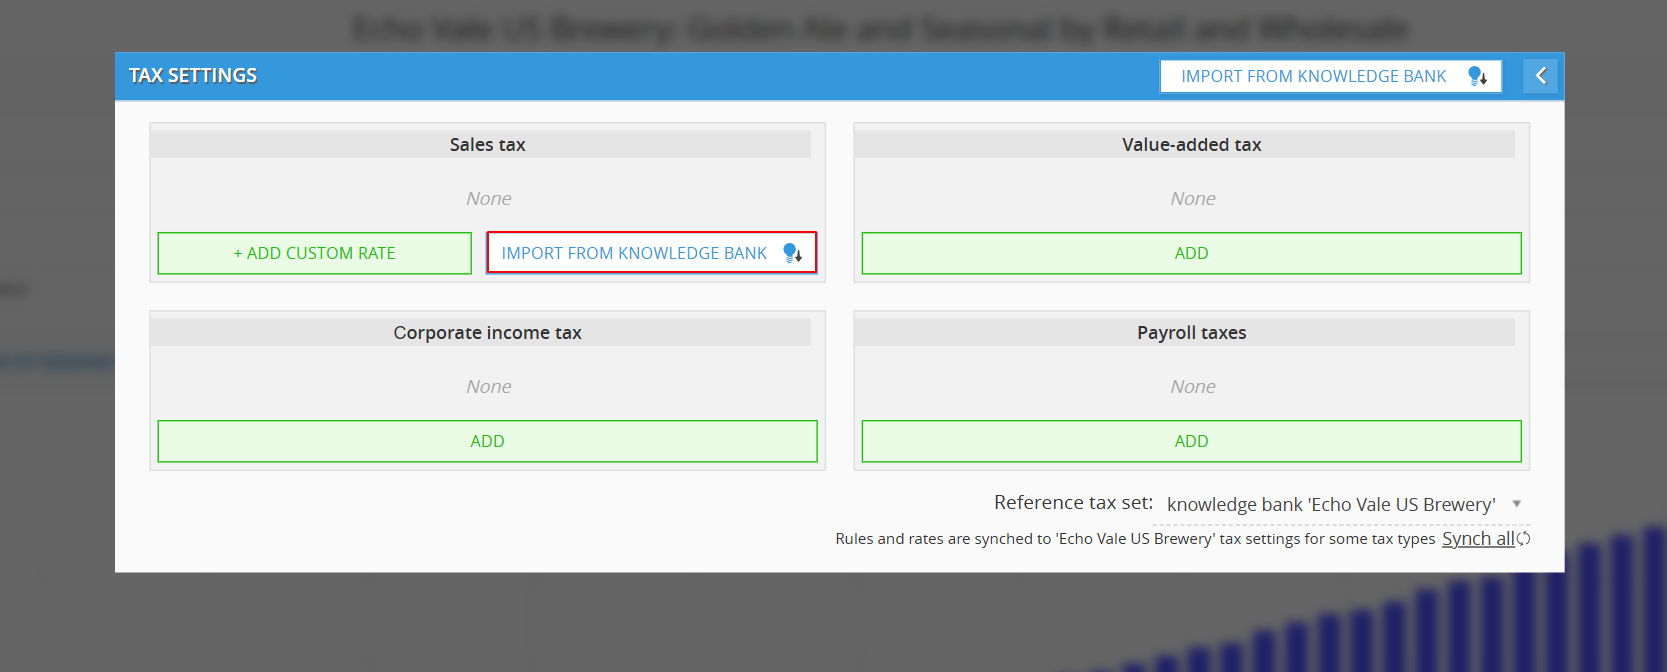
- Import Specific Tax: Inside an individual tax card (e.g., Sales tax), click the dedicated IMPORT FROM KNOWLEDGE BANK button to pull only that specific stream.
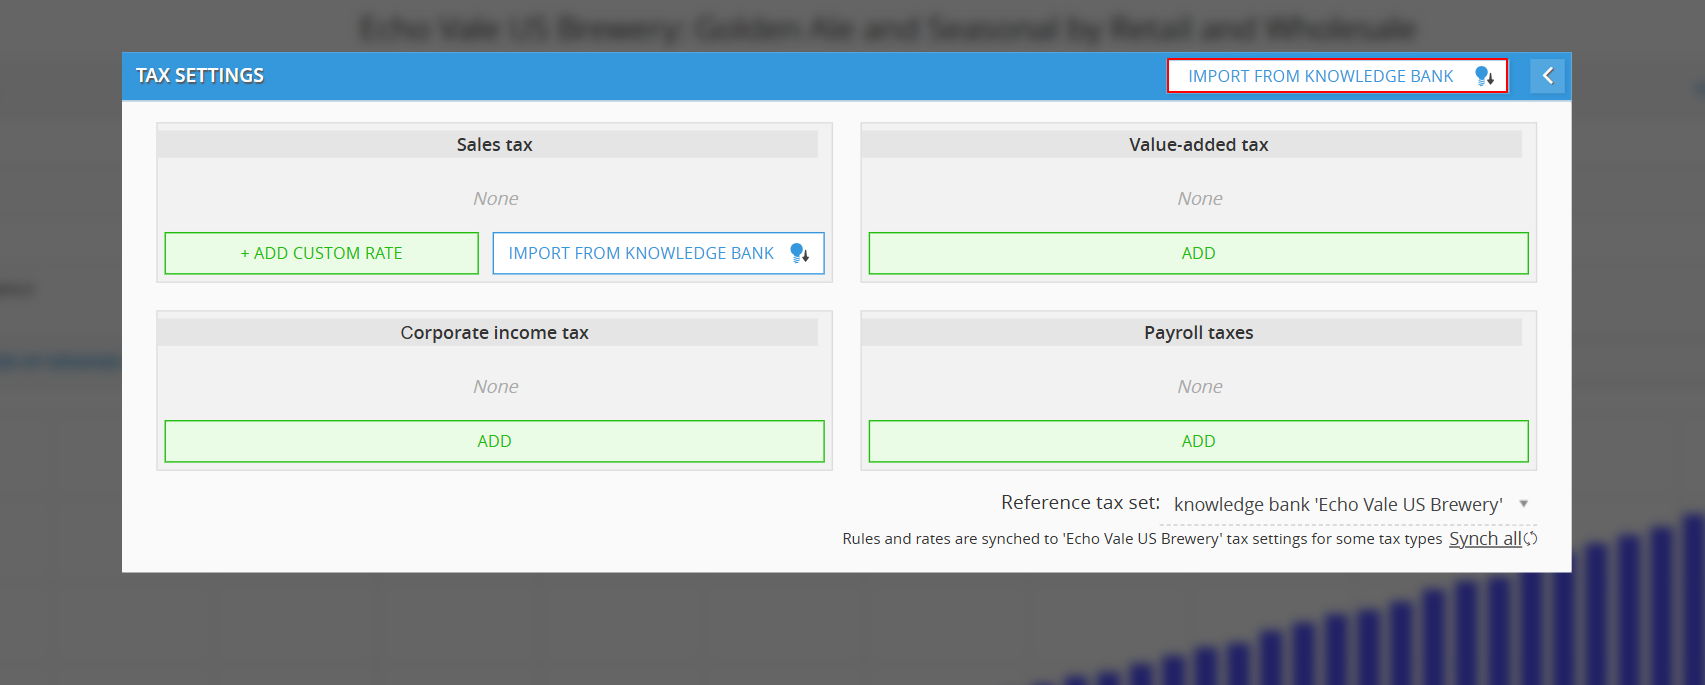
- Import All: Click the master IMPORT FROM KNOWLEDGE BANK button (with the lightbulb icon) on the top right header to pull all four tax types at once. Alternatively, click Synch all at the bottom.
- Import Specific Tax: Inside an individual tax card (e.g., Sales tax), click the dedicated IMPORT FROM KNOWLEDGE BANK button to pull only that specific stream.
- Result: The tax card updates with the KB rate and displays a blue checkmark indicating active synchronization.
2. Uploading Tax Settings (Active Model ➔ KB)
Use this workflow when you define custom tax rules directly inside an active scenario and want to save them as master corporate standards:
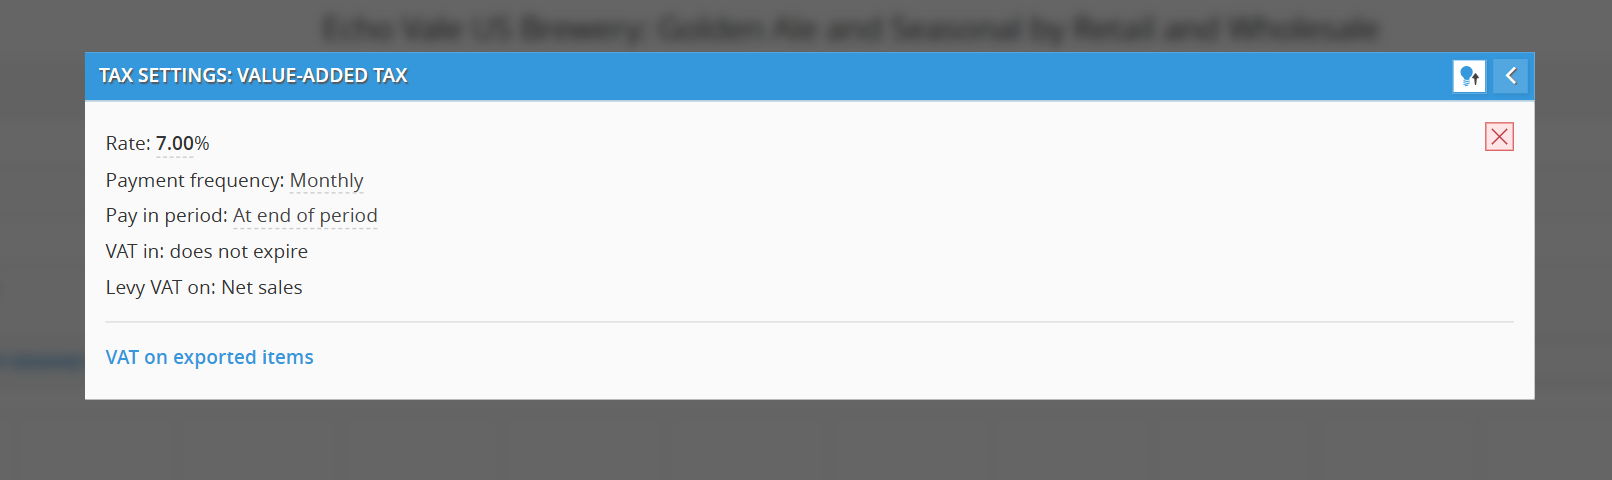
- Step 1: Configure the custom rates and schedule manually
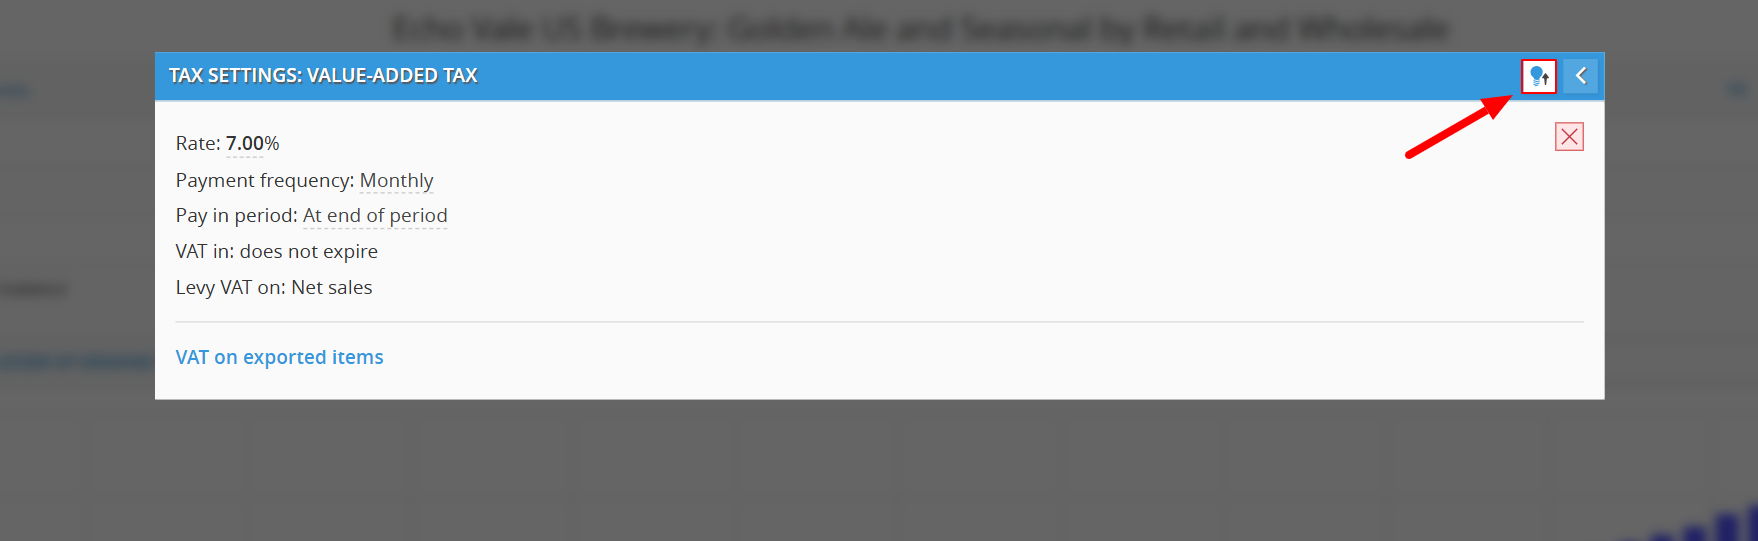
- Step 2: Click the lightbulb upload icon with the upward arrow in the top right corner of the window header.
- Result: The scenario's custom tax profile uploads directly to the Knowledge Bank master directory, standardizing it across all future models and branches.
💡 If this doesn’t solve your issue or you have more questions, feel free to reach out through our [contact form]. We’ll get back to you within 2–3 business days.
