How to add a basic semi-finished products to product assumptions?
Product card of basic semi-finished products
Production settings for a basic semi-finished products
Unit (unit conversion rates) for a basic semi-finished products
Storage rules settings for a basic semi-finished products
By-products settings for a basic semi-finished products
Other expenses (product-driven expenses)
How to add a basic semi-finished products to your Product assumptions?
To add basic semi-finished products:
- Click PRODUCTS assumptions in the Business Concept section.

In some cases, you will encounter the Product List. Also, simply click Add New Product To Begin Working or Add New Product to begin working.

- In the Add New Product window, click Basic Semi-finished Products.
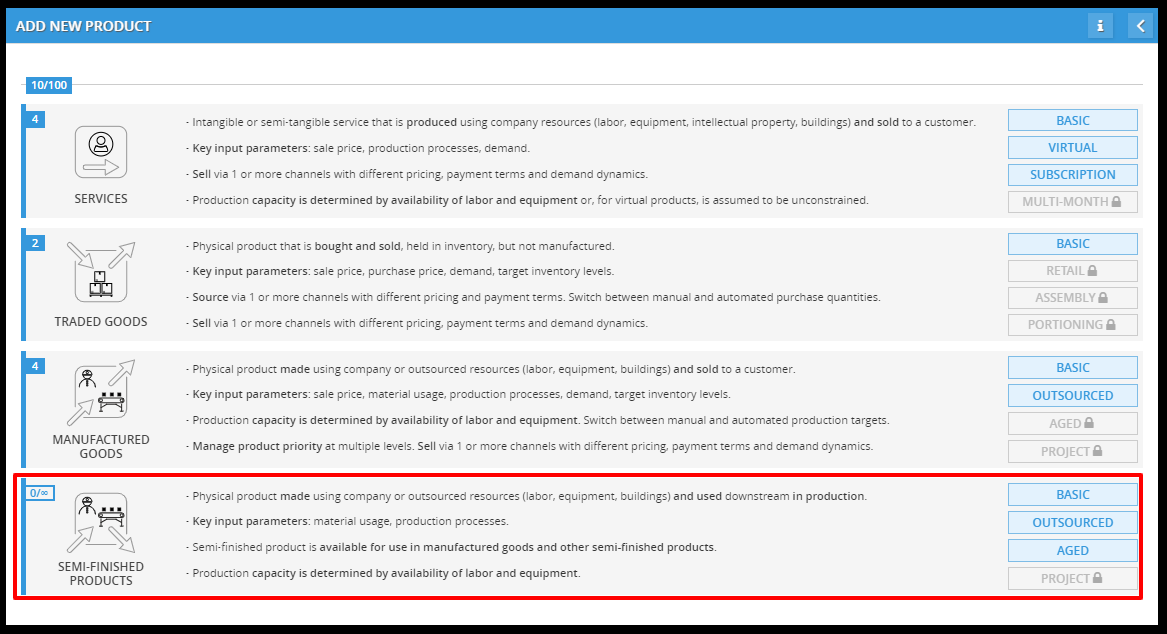
- Select subtype of product as a basic semi-finished products, Click BASIC.
WHAT IS A "BASIC SEMI-FINISHED PRODUCTS" PRODUCT TYPE IN DECISION CRITICAL?
Basic semi-finished products: This product type represents the creation of physical goods through a series of distinct, sequential steps using raw materials. These goods are not yet final products but serve as building blocks for more complex finished products manufactured later.
Imagine you manufacture wooden furniture (finished products). The wooden boards you use to construct the furniture wouldn't be considered finished products themselves. These wooden boards are semi-finished products created through a basic manufacturing process.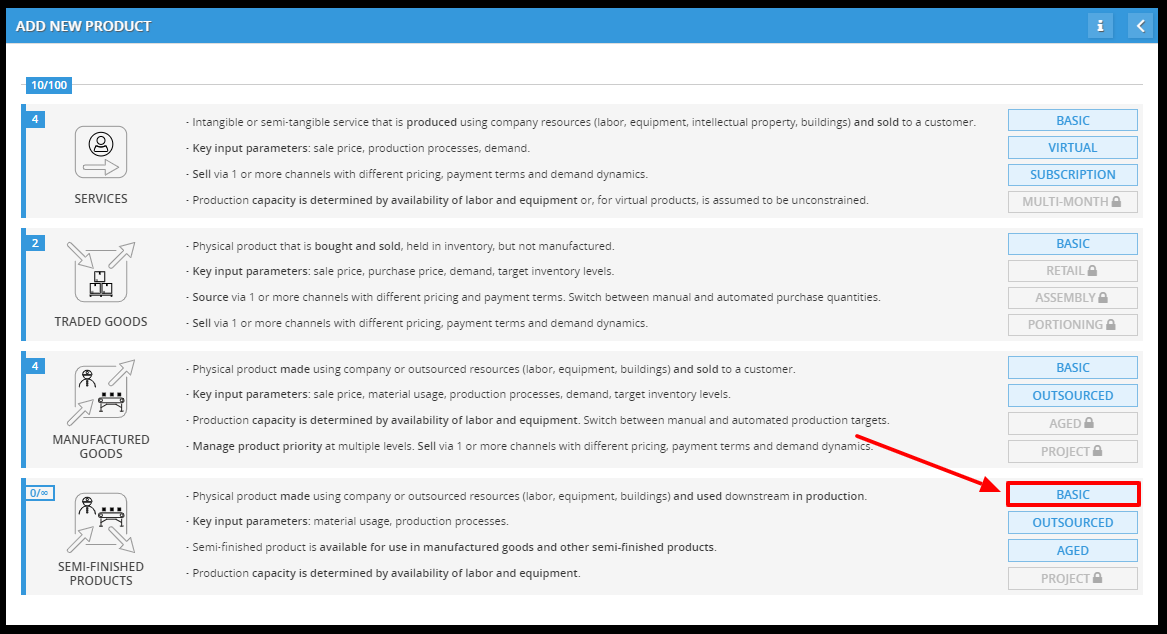
- Enter the details of your semi-finished products:
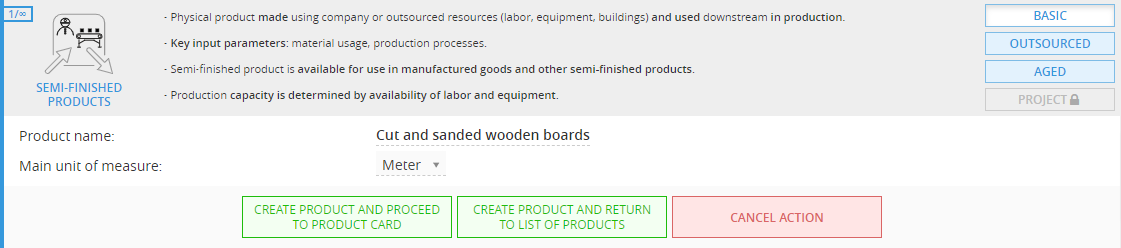
- Product Name: Clearly identify the physical product you're creating as a semi-finished good. (e.g., Cut and Sanded Wooden Boards)
- Main Unit of Measure: Specify the primary unit used to measure and track the quantity of your semi-finished product. This could be based on individual units (e.g., "Piece" for buttons), size (e.g., "Square Meter" for fabric), or other relevant measures depending on the type of semi-finished good you're producing.
- After you have entered all the details, simply click on "CREATE PRODUCT AND PROCEED TO PRODUCT CARD" to continue to the Product card.

- Add your product settings to the product card.
Product card is a blueprint for each unique product in your company.
It serves as a centralized location within a scenario, where you define key assumptions about that product. For each product, the product card will be different based on the type of product.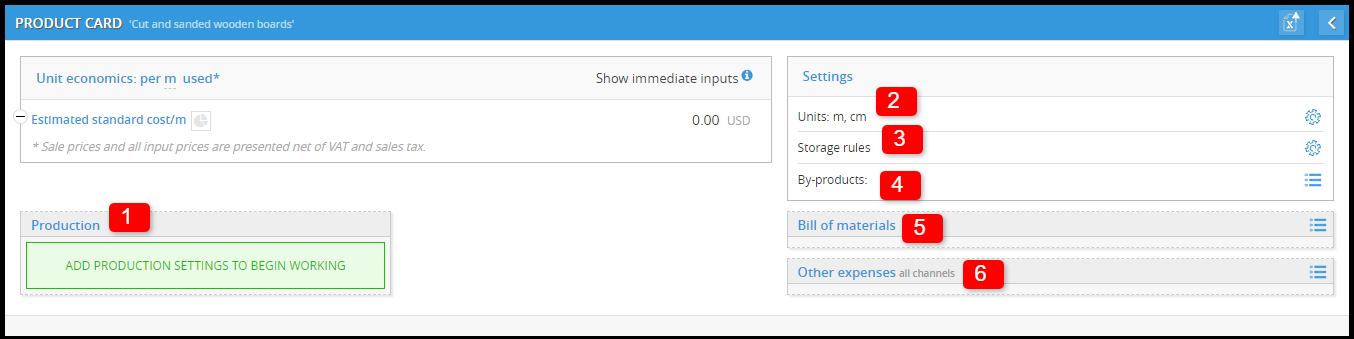
Here are the essential settings you'll need for your semi-finished products:
- Production: This section deals with defining your production plan for the semi-finished products.
- Units: This specifies the primary unit of measure used to track your semi-finished good. This could be based on individual units (e.g., "Piece" for buttons), size (e.g., "Square Meter" for fabric), or other relevant measures depending on the type of product you're creating.
- Storage rules: This section allows you to define how you manage the inventory levels of your semi-finished.
- By-products: During the manufacturing process of your semi-finished good, you might generate by-products.
- Bill of Materials: This crucial section details all the raw materials, components, and sub-assemblies required to produce one unit of your semi-finished products.
- Product-driven Expenses: Define any additional costs associated with producing your semi-finished product beyond the raw material cost.
- After you have finished setting up the Product card, simply return to the Product list and you will be able to see the product you just created on the list.

Product card for basic semi-finished products
Here are the essential settings in product card you'll need for your basic semi-finished products:
 Read the full instructions of each settings step-by-step below.
Production settings for basic semi-finished products

To add production settings:
- Open Production settings.
- Before you begin working in Production settings, it is essential to familiarize yourself with an important product rule.
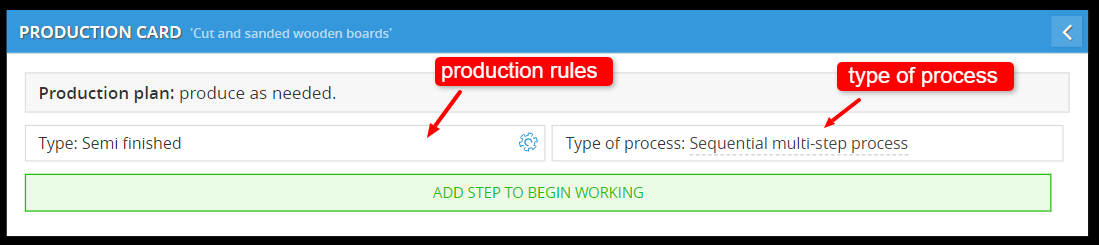
- Production rules ("Type: Semi finished"): Set of options that define how you manage the production of a semi-finished products.


- Allow Purchase:
Unable: This is only set to "No". This means Decision Critical won't automatically generate purchase orders for raw materials to produce the semi-finished good. - Allow Production:
Enabled: This is only set to "Yes". This is always enabled for basic semi-finished products, including semi-finished products.
Production goals:- Set Production Goals Automatically (Dynamic Production Plan): Production planning for semi-finished products should be based on the internal demand from your final assembly processes. Decision Critical can help you set "dynamic" production goals that automatically adjust based on forecasted demand for your finished goods.
- Set Production Goals Automatically (Dynamic Production Plan): Production planning for semi-finished products should be based on the internal demand from your final assembly processes. Decision Critical can help you set "dynamic" production goals that automatically adjust based on forecasted demand for your finished goods.
- Allow Use in Other Products:
Enabled: Set to "Yes"(Enable). This depends on your specific workflow. If the product you're creating is semi-finished product, it's required to enable this option as it's used in various final assembly products.
Be careful: If you select "No" for this option, this product will immediately transform from a "semi-finished product" into "manufactured goods". - Allow Sale:
Enabled: This is typically set to "No", since it's a semi-finished good, it likely won't be sold directly, so "Allow Sale" won't be relevant.
- Allow Purchase:
- Type of process:
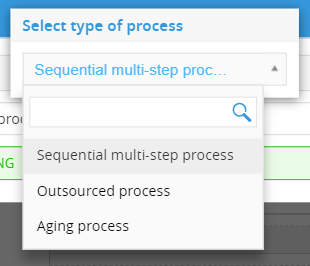
When defining a basic semi-finished product in Decision Critical, you'll typically choose the process type sequential muti-step process:
- Sequential Multi-step Process: This option is the most likely scenario for basic semi-finished products. It refers to a production process where the raw materials undergo a series of distinct steps in a specific order to transform them into the semi-finished product.
If you are willing to create the basic semi-finished products, you need to select the type of process as "Sequential Multi-Step Process" only. - Outsourced Process: This option is meant for situations where willing to create "outsourced semi-finished products" with your overall production process for a semi-finished good is outsourced to a third-party manufacturer
Read about outsourced semi-finished products at:
Knowledge Base → Getting Started → Product Building Assumptions → Building Product Assumptions: Outsourced Semi-finished Products. - Aging Process: This option applies to semi-finished products that require a controlled aging period as part of the production process. During this time, the product undergoes some transformation (e.g., chemical changes) to develop its desired characteristics.
Read about aging semi-finished products at:
Knowledge Base → Getting Started → Product Building Assumptions → Building Product Assumptions: Aged Semi-finished Products.
- Sequential Multi-step Process: This option is the most likely scenario for basic semi-finished products. It refers to a production process where the raw materials undergo a series of distinct steps in a specific order to transform them into the semi-finished product.
- Production rules ("Type: Semi finished"): Set of options that define how you manage the production of a semi-finished products.
- Click ADD STEP TO BEGIN WORKING to add production process.

- Add production process.
To add process: Click Select a process to get started > select the process that shows in dropdown (or click Add new process to create a new process.)
To create a new process: Click Select process > Add new process > Enter a descriptive name for your new production process > Click OK to save the new process. Your newly created process will be automatically selected to proceed.
- Once you've have a production process, add its details.

- Direct Labor: Specify the labor resources (from Staffing assumptions) required for each production step.
To add Direct labor: Click ADD DIRECT LABOR > click Select direct labor (dropdown) > select the direct labor you want to add.
You might assign specific personnel types (e.g., machine operators, assembly line workers) or roles needed for each step.
Once you select the direct labor, it will shows (position): (x quantity).
**You might encounter prompts if you haven't defined staff (from Staffing assumptions under Resource Allocation) in the scenario yet.
To change the direct labor, simply click on the name of the labor and select the other labor you prefer. If you wish to adjust the number of labor, just click on the number and enter your desired quantity.
To reset direct labor details, hover on direct labor wait until delete button appear.
You can either skip these sections and define them later or create the necessary staff resources before proceeding.
- Direct Equipment
Specify any equipment (from Equipment assumption) directly used in completing process step (e.g., machinery, production lines, specific tools).
To add Direct labor: Click ADD DIRECT EQUIPMENT > click Select direct equipment (dropdown) > select the equipment you want to add.
Once you select the direct labor, it will shows (Position): (x QUANTITY).
To change the direct labor, simply click on the name of the labor and select the other labor you prefer. If you wish to adjust the number of labor, just click on the number and enter your desired quantity.
To reset direct labor details, hover on direct labor wait until delete button appear.
**You might encounter prompts if you haven't defined equipment (from Equipment assumptions under Resource Allocation) in the scenario yet.
You can either skip these sections and define them later or create the necessary equipment resources before proceeding. - Unit Time Type
Define how you measure the time it takes to complete each step. Options is between time per unit and :
Time/Unit: This means you'll specify the average time required to produce one unit of your good (e.g., 1 hour per unit assembled).
Units/Time: This option is used if a specific number of units can be completed within a given time frame (e.g., 5 units assembled per hour).
- Direct Labor: Specify the labor resources (from Staffing assumptions) required for each production step.
- Once you done with all settings for production process, return to production card to save.

- To add more steps, just click on the "ADD STEP" button. Then, repeat steps 4 to 6 again until you have completed the entire process. Finally, return to the Product card.

- Return to Product card and check the station time absorbed per unit in Production settings.
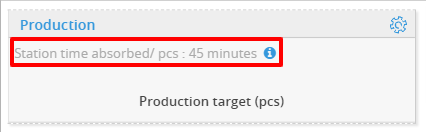
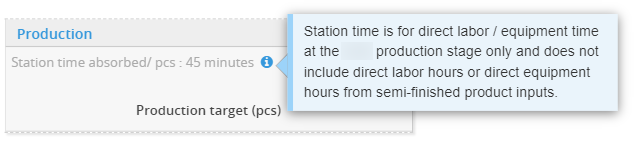
"Station time absorbed/ [unit]: {process times}" refers to the average amount of time a single unit of your semi-finished product spends at a specific production stage only and does not include direct labor hours or direct equipment hours from from semi-finished product inputs within your overall manufacturing process.
- For a more accurate picture, you might need to define additional factors like staffing and equipment availability in the "Staffing" and "Equipment" sections of the product card.
-
Here's a breakdown of "Station time absorbed/ [unit]: {process times}":
Station Time Absorbed: This represents the total time a unit of your semi-finished product spends at a particular production station.
[unit]: This specifies the unit used to measure your semi-finished product (e.g., "piece," "square meter").
{process times}: This indicates the actual processing time required at the station, typically displayed in minutes, seconds, or hours depending on the software.
- In case you want to come back to edit the production settings, just simply click on the settings icon located in the top-right corner.

Units (unit conversion rates) settings for basic semi-finished products

In Unit conversion rates window: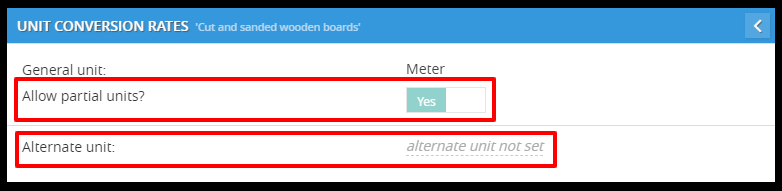
- Allow partial units: This option, likely enabled by default (Yes), allows you to track and manage your semi-finished products in partial units This provides greater flexibility, especially when dealing with:

- Production processes: You might produce semi-finished products in batches that don't perfectly align with whole unit quantities (e.g., producing 12.5 meters of fabric).
- Internal consumption: Your final assembly processes might require consuming fractional units of semi-finished products (e.g., needing 1.75 meters of fabric for a specific product).
- Alternate unit: This feature allows you to define additional units for your product alongside the primary unit. You can then set a conversion rate (CR) for each alternate unit, indicating how many units of the alternate unit are equivalent to one unit of the general unit.
- To enable alternate unit: Click "alternate unit not set" > select the alternate unit > enter the conversion rate.


- To enable alternate unit: Click "alternate unit not set" > select the alternate unit > enter the conversion rate.
Example: Basic Semi-Finished Products with Unit Options
Let's consider a scenario where you manufacture wooden boards as a basic semi-finished product for your furniture production. You can define two unit options in Decision Critical:Primary Unit: Meter (represents the length of a single wooden board) Alternative Unit: Square Meter (represents the area covered by a single board)
Conversion Rate: (Specify a conversion rate based on the board's width)
For example, if your wooden boards are 20 centimeters wide, the conversion rate would be:
- 1 Square Meter = 5 Meters (assuming the boards are long enough)
Explanation:
With this setup, you can track your inventory of wooden boards in both meters (length) and square meters (area). This provides flexibility for different needs within your production process:
- Length-based tracking: When purchasing raw materials (wood planks) or planning cuts for specific furniture pieces, tracking meters might be more convenient.
- Area-based tracking: When calculating material requirements for furniture pieces with specific surface areas, tracking square meters might be more efficient.
The conversion rate ensures clear communication between the two units. You can easily determine the required length of wooden boards (in meters) based on the needed surface area (in square meters) for your furniture projects.
Storage rules settings for basic semi-finished products

Storage rules
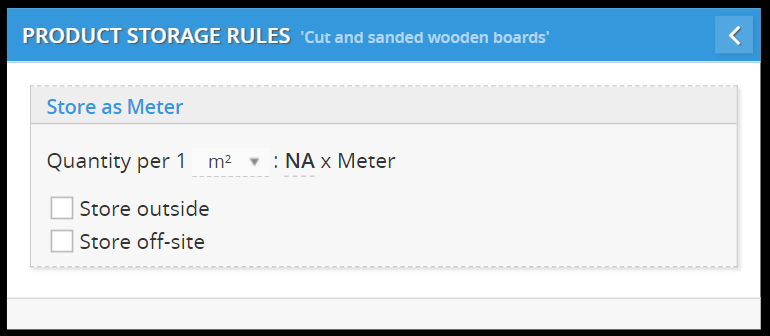
- Storage Unit: "Store as (general unit)" indicates that products are stored and tracked in inventory using the general unit (e.g., meter). This aligns with how you would typically count buttons.
- Storage Efficiency: Quantity per Square Meter

- This allows you to define the storage efficiency of your manufactured products (wooden board in this case) within your inventory management system.
- In "NA", You will need to enter a numerical value representing the maximum number of units that can be efficiently stored in a space of one square meter (m²).
-
Storage Options:

- Store outside: This option might be selected if products are typically stored in an external warehouse or storage facility. To enable this option, just checking its box.
- Store off-site: This could indicate that products are stored in a separate location from the main production facility. To enable this option, just checking its box.
- Storage Efficiency: Quantity per Square Meter
Here's a practical example:
Imagine your wooden boards are all the same size (length and width). You can neatly stack a specific number of these boards on top of each other to optimize storage space within a square meter of your inventory area.
Using the NA Field:
- Primary Unit: Meter (represents the length of a single wooden board)
- NA Field: Enter the number of boards you can efficiently stack per square meter.
If you can stack 20 wooden boards on top of each other in a single square meter of storage space, you would enter "20" in the NA field.
By-products settings for basic semi-finished products

During the process of transforming raw materials into your semi-finished product, you might generate by-products. These are secondary or unintended materials produced alongside your main product.

Why Track By-products?
- Accurate Cost Calculation: By factoring in potential disposal costs, you get a more accurate picture of the overall production cost for your semi-finished product.
- Environmental Considerations: Understanding by-product generation allows you to explore ways to minimize waste or identify potential recycling or reuse opportunities.
- Inventory Management: If your by-product has value, tracking it as a separate inventory item helps manage its storage and potential sales.
To add By-products
- Open By-products by clicking the list icon at the right side of By-products.

- In BY-PRODUCTS window, click "+ADD BY-PRODUCTS".
- Create the by-products by enter the name.

- Once you have added all the by-products, return back to BY-PRODUCTS window.
- Click "ADD NEW PRODUCT"
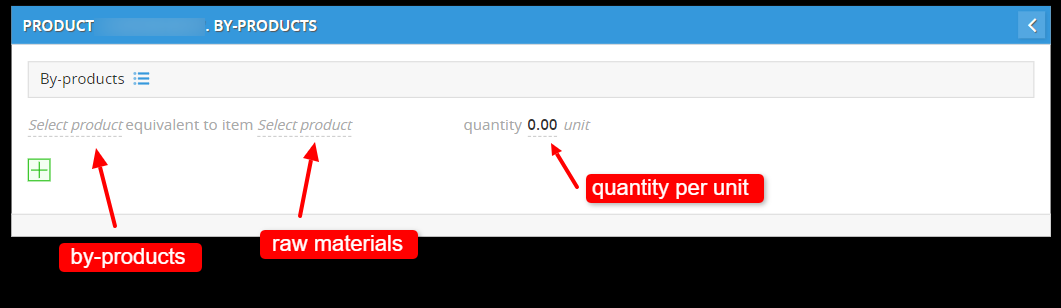
- Select by-product and raw materials that are equivalent for "(By-products) that equivalent to item (Raw materials)" then add its quantity with unit:
For example
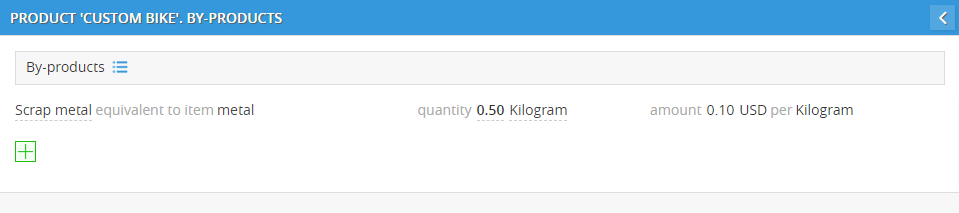
If the manufactured process produced "Scrap metal" as the by-products and one scrap metal is equal 0.5 kilogram, you will need to enter:
By-products (e.g., Scrap metal)
Raw materials (e.g., Metal)
Quantity per unit (e.g., 0.5 per KG)
Bill of materials (BOM) settings for semi-finished products

Bill of materials
This allows you to define the raw materials and components directly used in manufacturing your product. This information is essential for accurate production planning, cost estimation, and inventory management.
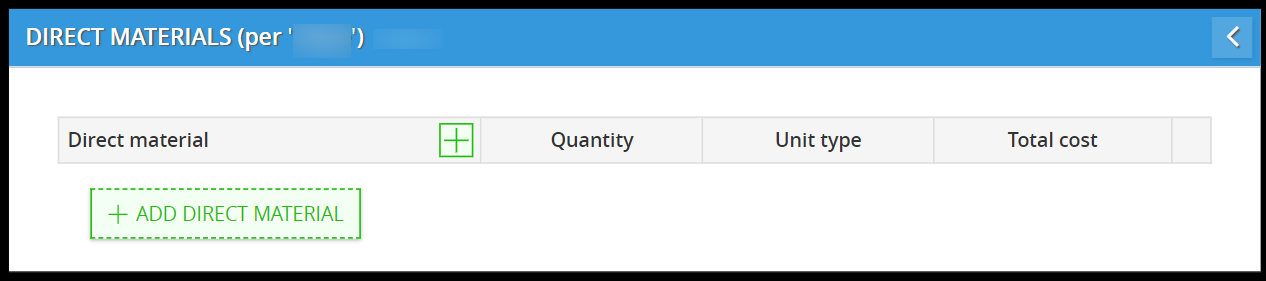
Key Elements in the Image:
- Direct Material: This column lists all the raw materials or components required to produce one unit of your finished good (you need to add the raw material manually.
- Quantity: This column specifies the exact amount of each direct material needed to produce one unit of the product.
- Unit Type: This will defines the unit of measurement for each direct material. Examples might include grams, meters, liters, or units.
- Total Cost: This column will display the calculated total cost per unit for each direct material. (It will be automatically calculated based on your entered data and material cost information)
Adding Direct Materials:![]()
Add direct material button; "+ ADD DIRECT MATERIAL", allows you to add new lines to the table for each additional raw material or component required in your product's production process.
To add direct material:
- Open Bill of material by clicking the list icon at the right side of bill of material.
- In DIRECT MATERIALS, Click "+ ADD DIRECT MATERIAL" to add new direct material list.
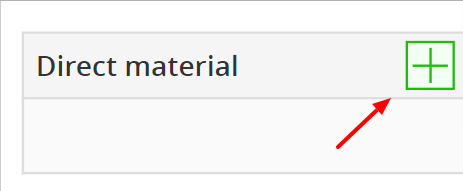
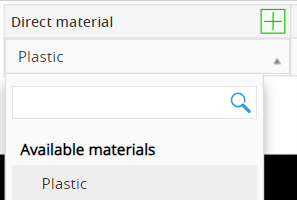
- Add raw material by clicking add button (+) near column "Direct material"
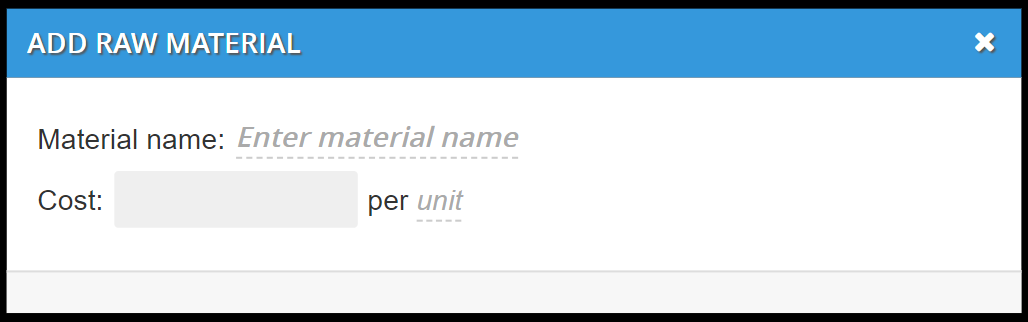
- In ADD RAW MATERIAL window, enter material's name in "Material name" (e.g., Plastic) then set its cost and unit (e.g., cost: 0.2, unit: gram).
- Once you finished entering raw material details, return back to DIRECT MATERIALS.
- Add the raw material to Direct Material by selecting it from the drop-down list.
- Then set the quantity and unit type of the direct material (Total cost will be automatically calculated).

- Once you have finished, you can close the window to save and return to product card. The newly added bill of materials will be on the list.

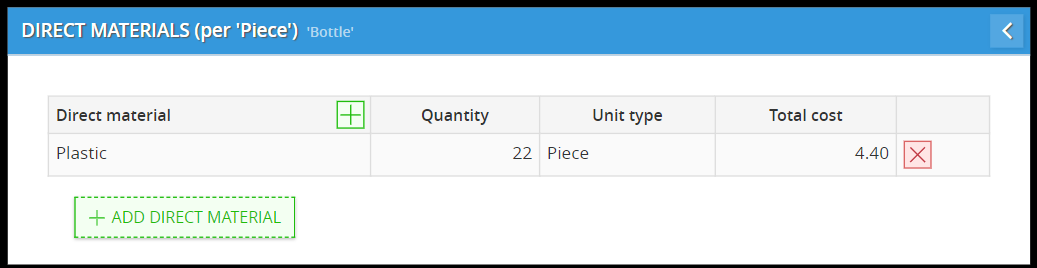
22 grams of plastic
When adding raw materials, you would enter
- Material name: Plastic
- Cost: 0.2
- Per: Gram
When adding these materials to the bill of material, you would enter:
- Direct Material: Plastic
- Quantity: 22
- Unit Type: Gram
- Total Cost: 4.40
- To delete the direct material, simply click on the delete button located on the right side of the list in DIRECT MATERIAL.

Other expenses (product-driven expenses for all channels) settings for semi-finished products

Other Expenses (Product-driven) for Semi-Finished Products:
This section allows you to define additional costs associated with producing your semi-finished good, beyond the raw material cost. These expenses are considered variable costs as they typically fluctuate based on the production volume of your semi-finished product.
Examples of Other Expenses:
- Machine Maintenance: Costs associated with maintaining the machinery used in the production process for your semi-finished product.
- Energy Costs: The cost of electricity or other power sources used to run the production machinery.
- Overhead Costs (Optional): You might allocate a portion of your facility overhead costs to the production of the semi-finished good. This can be a more complex calculation depending on your accounting practices.
To add product-driven expenses:
- Open PRODUCT-DRIVEN EXPENSES by clicking the list icon on the right side of Other expenses (all channels).
- In PRODUCT-DRIVEN EXPENSES window, click "+ ADD EXPENSES" to add new expenses. To add expenses:
- Enter expenses name (e.g., Energy Costs).
- Select a calculation method and set the number of expenses (e.g., $0.25 per meter of board.)
- Once you finished adding expenses, return back to PRODUCT-DRIVEN EXPENSES.

- Review the expenses you added, and then return to the product card. The newly added product-driven expenses will be listed.

Here's what you can specify for each expense:
- Expense Name: Give your expense a clear and descriptive name.
- Calculation Method: Choose how the expense is calculated:
- Per Unit Cost: This method assigns a fixed cost per unit of your product sold (e.g., "$2 USD per Piece").
- %(Percentage) of Amount Sold: This method calculates the expense as a percentage of the base wholesale cost per unit (e.g., "10% of Wholesale Cost for Packaging").
- By defining these product-driven expenses and utilizing expense rules, you gain a clear understanding of your overall costs per unit and their impact on your accounting practices.
- To delete the expenses, simply click on the delete button located on the right side of the list in PRODUCT-DRIVEN EXPENSES.
