How to add a virtual services to product assumptions?
Product card for virtual service
Production settings for virtual service
Demand assumptions settings for virtual service
Collection terms (product Sales Terms) for virtual service
Unit (unit conversion rates) for virtual service
Other expenses (product-driven expenses) for virtual service
How to add a virtual services to your Product assumptions?
To add a virtual service:
- Click PRODUCTS assumption under the Business Concept section.

- In the Add New Product window, click SERVICES.

In case you don't see the ADD NEW PRODUCT window right after you click PRODUCTS.
Just simply click the Add New Product To Begin Working or Add New Product to begin working button, you will still access the Add New Product window directly.


- Select subtype of services as a basic service, Click VIRTUAL.
WHAT IS A "VIRTUAL SERVICE" PRODUCT TYPE IN DECISION CRITICAL?
Virtual service: For service products that do not require significant use of labor or equipment in order to support ongoing production and sale. Generally used for electronic products for which processes have been fully-automated and which do not involve acquisition of physical inventory.
Imagine a service like music streaming. You access a vast library of songs instantly, without needing a physical CD or someone to hand-deliver it. This is a virtual service - it's delivered electronically, doesn't require ongoing physical equipment use, and uses automated processes (like servers and software) to function. There might be some labor involved behind the scenes (maintaining the service), but it's not the main way you experience it.
- Provide details of your virtual service.
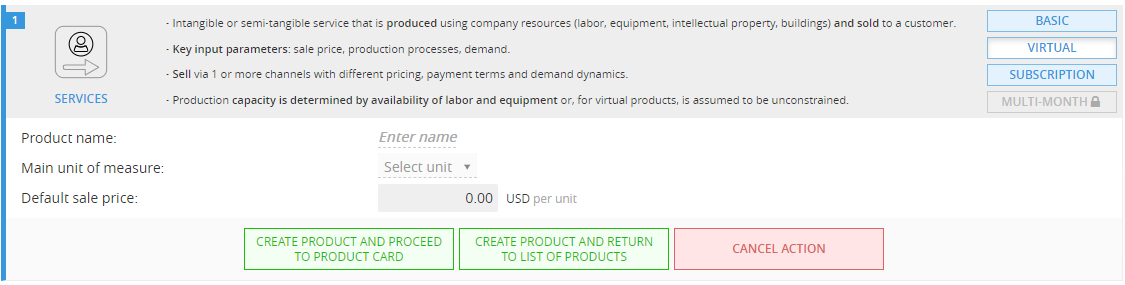
- Product(service) Name (e.g., Cloud Storage)
- Main Unit of Measure (e.g., Megabyte, Terabyte)
- Default Sale Price (e.g., 10 USD per TB)
- Once you finished entering the details, click "CREATE PRODUCT AND PROCEED TO PRODUCT CARD" to proceed to the Product card (we recommend this). If you are not willing to proceed to the Product card, click "CREATE PRODUCT AND RETURN TO LIST OF PRODUCTS" to return to the Products list. In case you are willing to go to the Product card at a later time, you can do so.

- Add the settings to the product card.
Here are the essential settings you'll need for your virtual service:
- Production: This section focuses on how your service is delivered to customers. It doesn't involve physical production processes like manufacturing, but rather outlines the resources required to fulfill the service.
- Demand: This section focuses on how customers will interact with your service. It allows you to forecast how much demand you expect for the service and how it might fluctuate.
- Product sales terms: This section allows you to specify the conditions under which you'll sell your service. It outlines the financial aspects of the customer transaction.
- Unit conversion rates: This section allows you to precisely define how you measure and track your service offerings within Decision Critical. It's particularly relevant for services with variable units of measure, allowing for consistent financial modeling across your scenarios.
- Product-driven expenses (if any): This section allows you to define any additional expenses directly associated with delivering the service.
- Once the product card is set up, return to the product list.
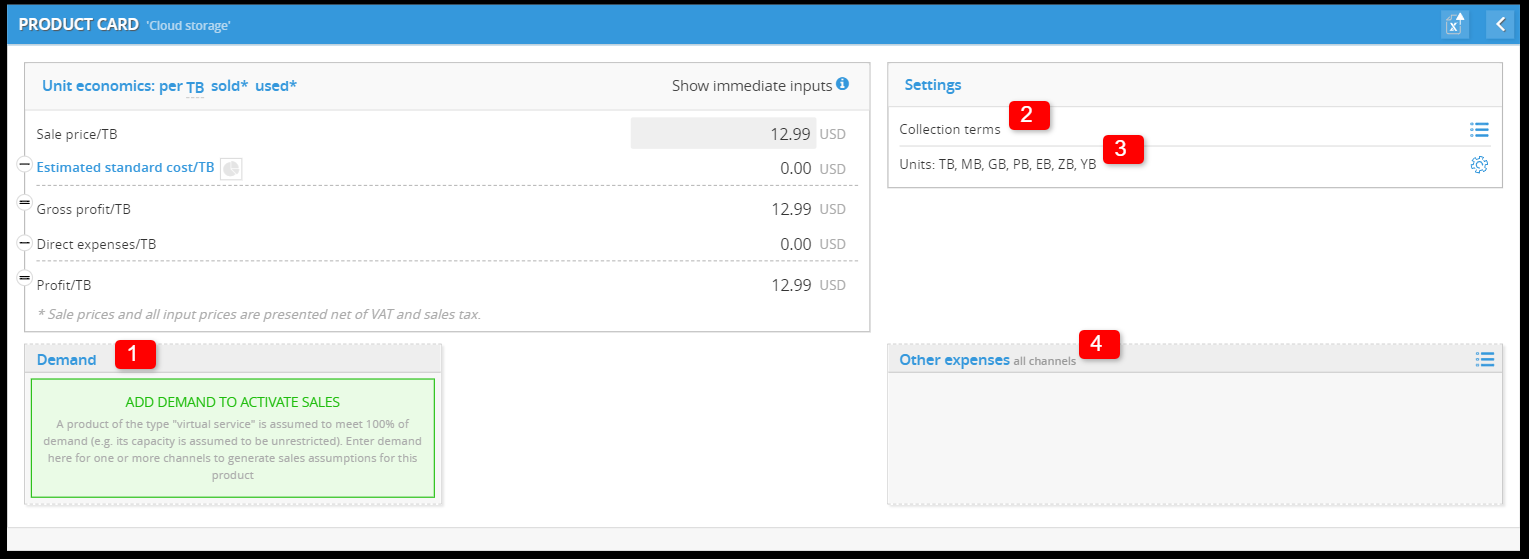
Product card for virtual service product
The essential settings you'll need for your basic service:
- Demand
- Collection terms
- Units
- Other expenses

Demand settings for virtual service

Note:
Since virtual services are highly flexible, we assume they can handle all incoming requests (100% capacity).
Tell us how much demand you expect for your virtual service through different channels (e.g., website, phone sales). This helps us estimate future sales.
To add a market demand assumptions:
- Click "ADD DEMAND TO ACTIVATE SALES"

- In 'MARKET DEMAND ASSUMPTIONS' window, Click on "Select Channel" and choose the specific channel. (If this is your very first time setting up demand assumptions, you can starting with the default channel. However, we recommend setting up additional channels yourself. You can find more information in the "Here's a tips" section.)

- Choose the demand assumptions relevant to your selected sales channel.

- Constant Demand: Demand for your service remains consistent over time.
- Step Growth: Demand for your service increases in steps or jumps at specific points in time.
- Linear Demand Growth: Demand for your service increases steadily over time at a constant rate.
- Phased Linear Demand: Demand for your service exhibits periods of constant linear growth followed by plateaus or slower growth phases.
- Seasonal Demand: Demand for your service fluctuates predictably throughout the year based on seasonal trends.
- Segment Dynamics: Demand for your service varies depending on specific customer segments you target.
- Demand Funnel (various growth types): This models the conversion process of potential customers into paying customers, considering different growth patterns at each stage of the funnel (e.g., Constant demand for website visitors, Step growth for qualified leads).
- Geographic Demand: Demand for your service varies depending on the geographic location of your customers.
- Provide the specific details and click "CREATE DEMAND".

- Check the demand of your selected channel.

Note: Data in the images (e.g., name, unit, price) is for demonstration purposes only and may not reflect your actual values.
This might includes:
- Demand Overview: After you've selected and configured the sales channel and demand type, you'll see a summary of the forecasted demand for your outsourced manufactured good. This summary displays:

For example: "Y1: 60 x Terabyte , USD 12.99 (Excluding VAT)"
That's mean in the first forecasted year (year 1), there will be 1,200 TB with the price of each TB as 12.99 USD (excluding VAT). -
Detailed Breakdown (Click to Expand): This summary provides a high-level overview. By clicking on this section (it might appear collapsed or expandable), you'll be able to see a more detailed breakdown of the demand forecast:
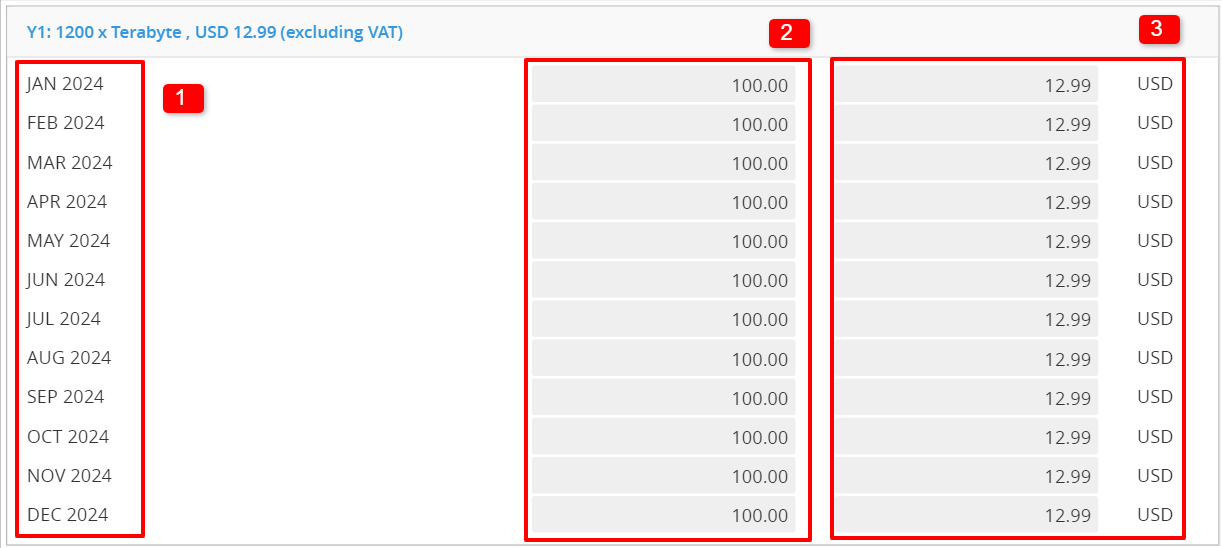
- Month: Each month within the forecast year will be listed.
- Demand per Month: The specific number of units demanded for each month.
- Unit Price per Month: The sales price per unit for each month (excluding VAT). This allows you to see if there are any price fluctuations planned throughout the year.
- Demand Overview: After you've selected and configured the sales channel and demand type, you'll see a summary of the forecasted demand for your outsourced manufactured good. This summary displays:
- Click "UPDATE AND CONTINUE" to save and return to Product card. (Click RESET in case you want to cancel and return)
 To cancel and return: click RESET, on the top left.
Here's a tip:
- In case you want to come back to edit the demand assumptions later, just simply click on the settings icon located in the top-right corner.

- We highly recommend setting up your sales channels. Choose clear names, add all relevant channels, and configure cross-border settings if needed.
For detailed instructions on setting collection rules, adding channels, or renaming (including cross-border settings),
Read more: Adding more channels and Cross-border setting.
Collection terms settings for basic service

The Collection terms (or Product Sales Terms) settings within a product card in Decision Critical helps you define how revenue for your service is recognized. Here's a breakdown of the key aspects:
Channels and Collection Terms:
- Channels: These represent the different ways customers can purchase your service. Common channels might include direct sales, online sales, or through partner resellers.
- Collection Terms: This specifies when revenue is recognized for each channel. Decision Critical likely uses a standard term (e.g., "month" or "year") after delivery, indicating when payment is typically collected after the service is delivered.
To set the collection terms:
-
Locate the "Collection terms" settings within Product Card, click the list icon button to access.

- In the "PRODUCT SALES TERMS" window, select the specific sales channel you want to configure.

- The key takeaway here is that you have the flexibility to adjust the standard collection rule for each channel. Here are the customization options Decision Critical might offer:
- On Account: Revenue is recognized when the customer receives an invoice for the service.
- On Delivery: Revenue is recognized when the service is delivered to the customer. (so you don't need to set its collection period)
- Prepayment: Revenue is recognized when the customer pays for the service upfront, before it occurs.
- Set collection terms: Define timeframe when revenue is recognized for this channel (e.g., 1 Days after delivery for "on account").
- Once you finished, you can return to Product card to proceed.
- We highly recommend setting up your purchasing channels. Choose clear names, add all relevant channels, and configure cross-border settings if needed.
For detailed instructions on setting collection rules, adding channels, or renaming (including cross-border settings),
Read more: Adding more channels and Cross-border setting.
Units (unit conversion rates) settings for basic service.

The "Units" settings within your product card allows you to configure how units are handled. This section offers flexibility to accommodate different scenarios.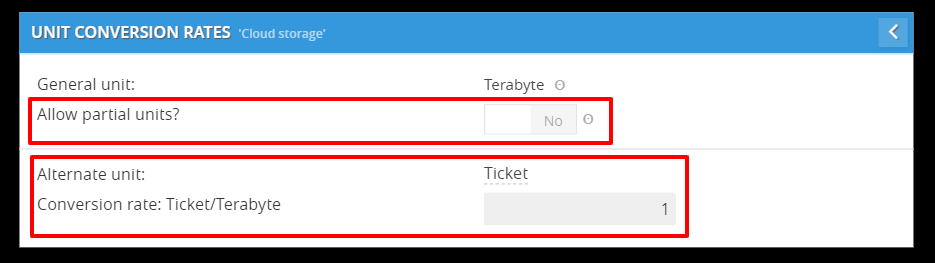
- Allow partial Units: Enable this option if you want to allow users to purchase your service in parts (applicable only to some specific units). This provides greater flexibility for your customers.

- Alternative Units: This feature allows you to define additional units for your service alongside the primary unit. You can then set a conversion rate (CR) for each alternative unit, indicating how many units of the alternative unit are equivalent to one unit of the primary unit. This caters to users who might prefer to see prices or purchase your service in different units.
- To enable alternate unit: Click "alternate unit not set" > select the alternate unit option from dropdown menu.


- To enable alternate unit: Click "alternate unit not set" > select the alternate unit option from dropdown menu.
Example:
Cloud Storage with Flexible Purchasing
Imagine you offer a cloud storage service with multiple purchasing options. Here's how you could define units and pricing:
- Primary Unit: Gigabyte (GB) (represents the actual storage space used)
- Alternative Unit: Ticket (represents a pre-defined storage quota)
Conversion Rate: Varies by Ticket (e.g., 1 Bronze Ticket = 1 TB)
With this setup, customers can see the base price per GB of storage (in Gigabytes). However, you can also offer pre-defined storage quotas called "Tickets" (e.g., Bronze, Silver, Gold).
The conversion rate clarifies the storage capacity associated with each Ticket (e.g., 1 Bronze Ticket provides 1 Terabyte of storage).
Other expenses (product-driven expenses for all channels) settings for basic service

The "Other Expenses (all channels)" section empowers you to define additional costs associated with your service. These are considered product-driven expenses, meaning they're directly tied to the use of your service.
To add product-driven expenses:
- Open PRODUCT-DRIVEN EXPENSES by clicking the list icon on the right side of Other expenses (all channels).
- In PRODUCT-DRIVEN EXPENSES window, click "+ ADD EXPENSES" to add new expenses. To add expenses:
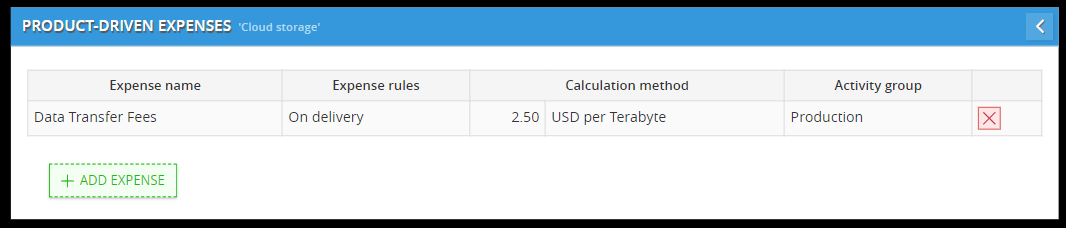
- Enter expenses name (e.g., Data Transfer Fees).
- Select a calculation method and set the number of expenses (e.g., $2.5 per TB).
- Set the activity group.
- Review the expenses you added, and then return to the product card. The newly added product-driven expenses will be listed.

What you can specify for each expense:
- Expense Name: Give your expense a clear and descriptive name specific to virtual services (e.g., "Data Transfer Fees," "API Integration Cost").
- Expense Rule: Select an existing expense rule from your settings. These rules might represent virtual service delivery components like bandwidth usage, API calls, or storage utilization.
- Calculation Method: Choose how the expense is calculated:
- Per Unit Cost: This method assigns a fixed cost per unit of your service usage (e.g., "$0.01 USD per API call").
- %(Percentage) of Amount Sold: This method calculates the expense as a percentage of the total revenue generated from selling your service (e.g., "2% of Subscription Revenue for Support").
- Activity Group: Categorize the expense by its nature, considering the virtual nature of the service:
- General: Expenses that apply broadly to your business operations.
- Administrative: Administrative costs associated with managing your service.
- Selling: Costs related to marketing and selling your service.
- Production: Costs incurred during the production or delivery of your service.
- Non-Operating: Expenses not directly related to your service's core operations.
- By defining these product-driven expenses and utilizing expense rules, you gain a clear understanding of your overall costs per unit and their impact on your accounting practices.
- This information empowers you to set competitive prices, optimize your supply chain, and ultimately ensure the profitability of your product offering.
- To delete the expenses, simply click on the delete button located on the right side of the list in PRODUCT-DRIVEN EXPENSES.
