How to Import Data in Historical Performance
Preparing Your Data for Import
Importing data into Decision Critical is a fast, easy way to get historical company data into Decision Critical and to new update monthly data as it becomes available.
To ensure a smooth import process, it’s important to prepare your data. Here’s a comprehensive guide on how to do it:
-
File preparation
-
Accepted Formats: .XLSX and .CSV files are supported for all data imports.
-
Separate Files for Separate Reports: Import your balance sheets and income statements (P&L) as separate files. This helps keep your data organized and allows for easier management and analysis.
-
Monthly Data: Arrange your financial data on a monthly basis. This level of detail enhances financial analysis and provides better performance tracking over time.
-
-
Organizing Account Codes, Names, and Dates:
- Unique Account Codes: Each entry must have a unique account code - this is the primary identifier for an account in the Source Format interface and it plays an important role in account mapping and, therefore, in Variance Analysis / Performance Tracking. The account code is crucial for accurately mapping data to system-level accounts used in the Modeling module ("the Constructor"), which has its own reporting format. For example, label an entry like "Accounts Receivable" with a unique code such as "1100" to ensure the system recognizes it correctly during import. This is how you can add account codes:
- Spreadsheet Mode in Decision Critical: Directly enter account codes in the Source Format interface.
- Import from Spreadsheet: Alternatively, add account codes in a spreadsheet program before importing.
- Account Name: List the name of each account in its own column. Examples include "Cash in Bank", "Inventory" and "Accounts Receivable". This descriptive label aligns with the account codes, making your financial data easier to understand.
- Date Formatting: When importing period data, include a date column for each data entry. Ensure all dates are formatted consistently (e.g., 1 JAN 2023) to maintain proper alignment and sorting within the system. Correct date formatting is essential for accurate time-based analysis and reporting
The following date formats are recognized by the import tool:
- 1 January 2022
- 2022 January 1
- January 2022
- JAN 2022
- 2022 January
- 2022 JAN
- 1/2022
- 2022/1
- January 1 2022
- January 1, 2022
Recommended date formats:- Balance Sheet: Use the format DD MMM YYYY, with the "days" entry as the last day of the month (e.g., 31 JAN 2024).
Note: Beginning balance dates will be converted to the first day of the following month for presentation purposes. This does not impact the analysis. - Income Statement: Use the format MMM YYYY (e.g., JAN 2024).
- Unique Account Codes: Each entry must have a unique account code - this is the primary identifier for an account in the Source Format interface and it plays an important role in account mapping and, therefore, in Variance Analysis / Performance Tracking. The account code is crucial for accurately mapping data to system-level accounts used in the Modeling module ("the Constructor"), which has its own reporting format. For example, label an entry like "Accounts Receivable" with a unique code such as "1100" to ensure the system recognizes it correctly during import. This is how you can add account codes:
-
DATA HANDLING TIPS:
Multiple Periods in One File: When importing data for multiple periods, set up consecutive months as adjacent columns on the same tab to streamline the import process.
How to Import Data in Historical Performance
Variance Analysis in Decision Critical compares projections from your scenario analysis with actual results from the same period. Projections are modeled directly in Decision Critical as scenarios. Actual results from your accounting system are uploaded into Decision Critical's "Historical Performance" module for easy comparison.
Importing your financial data is fast and straightforward. It begins with accessing the import menu:

Step 1: Accessing the import menu

To start importing your data, follow these steps:
-
Locate the Import Menu: On the top right of the Historical Performance page, you’ll see a set of icons. The Import icon is highlighted in the image above. It looks like an arrow pointing down into a box. The same icon can also be found in the Source Format interface.

-
Click on the Import Icon: Click the icon to open the data import options for the report type you are currently working in. This will allow you to bring in your financial data from external sources (spreadsheet files).
.
Step 2: Add your source file (& spreadsheet mode)
After clicking the Import icon, you'll have the option to choose how you want to import your data. You can either drag and drop your selected file into the designated area or use the 'Upload file' button to browse your computer and upload the file.

Before choosing your data source, make sure it is correctly formatted and meets all required conditions (we mentioned it in the previous section). This is important to ensure a smooth import process.
What you can import:
- You can import just account names and codes, which allows you to set up your chart of accounts.
- You can also import Income Statement or Balance Sheet data for a single period or multiple periods, depending on your needs. It’s important to note that Income Statement and Balance Sheet data are imported separately.
Formatting tips:
- Our preview tool performs some data cleaning to help you, but the import process will be much smoother if your file is well-formatted from the start.
- We highly recommend exporting our template before you begin. By pressing the "SAMPLE FILE" button, you can download an empty spreadsheet file that is already formatted correctly for import into Decision Critical. Using this template will make it easier to ensure your data meets all requirements.
Alternatively, you can select "Spreadsheet view" to open a blank preview grid and manually copy values directly into it without importing a file.
Spreadsheet mode:
If your file is not in .XLSX or .CSV format or you prefer to input data directly, you can use Spreadsheet Mode.
- Spreadsheet Mode allows you to open a blank preview grid where you can directly copy and paste values from your file. This is a flexible option that enables you to input data without needing to convert your file into a specific format.
- This method is also useful if you need to quickly make adjustments or corrections directly within the system without having to go back to your original file.
.
Step 3: Review your uploaded file(s)
If your file uploads successfully, you will see a confirmation message showing the quantity of uploaded files and the file names.
Once the correct file is uploaded, click "Import Preview" button to proceed.

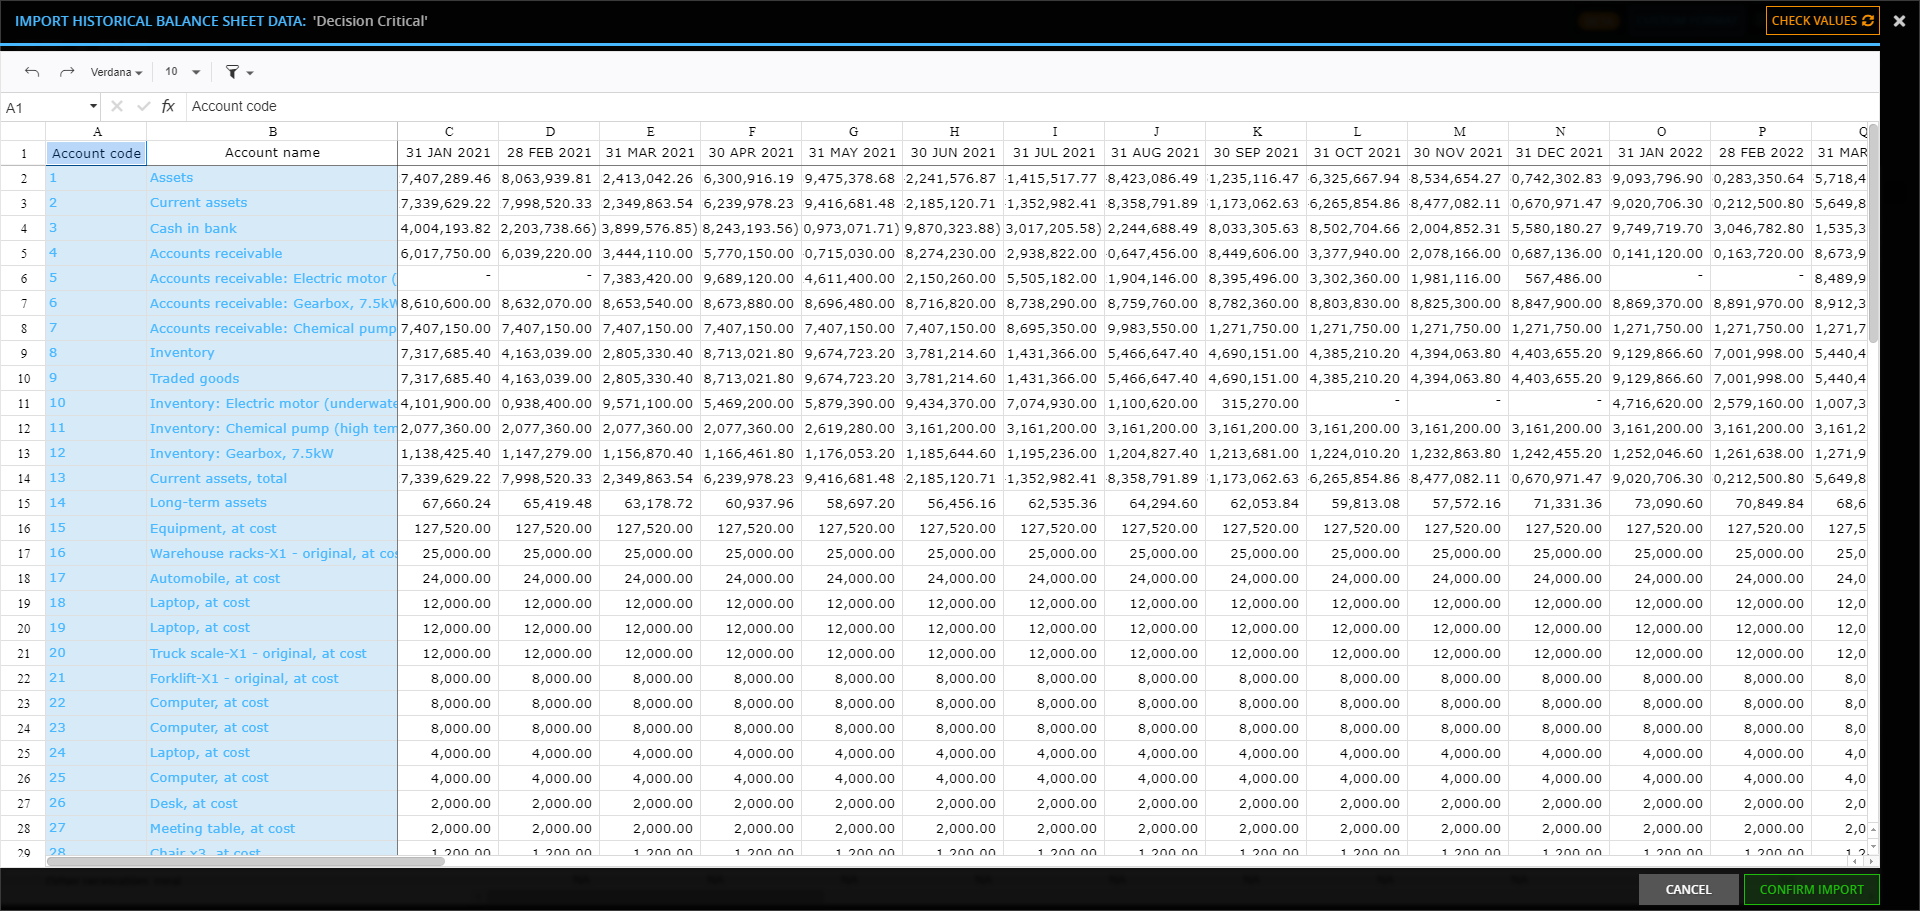
Step 4: Preview & check values of your imported data
After clicking "Import Preview," you'll go to the 'Import Historical Data' screen. This is a spreadsheet view where you can check and clean your data.
To start the validation, click "Check Values" at the top right of the screen. The system will review your data, show the results in a heatmap and automatically correct certain error.
Color indicators in the heat map help you spot any issues that need fixing, making sure your data is accurate and ready for use.
.png)
Understanding heatmap statuses in Data Import
When importing data into Decision Critical, the heatmap is an essential tool that highlights potential issues or important information about your data. To effectively use the heatmap, simply hover over any highlighted cell to see a description of its status. This will provide you with detailed information on what might need your attention. Here’s what each color in the heatmap represents and how to address them:
Heatmap Status: Red
The red color indicates critical issues that require immediate attention. Some examples are:
-
Invalid Numeric Values: A negative value in an account which only takes positive numbers will show up crossed out and red. If you press "Check values" again, the value will be cleared from the import preview. See also "Flagged data entries", below.
-
Missing Account Codes: Red also indicates missing account codes. Account codes are crucial for organizing source data on historical Performance in Decision Critical. If an account does not have an associated account code in your source file, the system will flag this with a red highlight. To resolve this, make sure every account in your source file has a unique account code, or enter an account code in the Import Preview manually.

Heatmap Status: Orange
The orange color highlights cells that may need further review or correction. Some examples are:
-
Truncated Values: Orange indicates that a value has been truncated to USD 0.01. This usually occurs when the original value is less than USD 0.01. Check these values to ensure they are correct and adjust them if needed.
-
Unmapped Accounts: Orange also signifies that an account is not properly mapped to a balance sheet account. Review these accounts and make sure they are correctly mapped to ensure accurate financial reporting.
-
Negative Values: If a balance sheet account shows a negative value, it will be highlighted in orange. Since most balance sheet accounts shouldn’t have negative values, review these cells to confirm if the negative value is appropriate.
![]()
Heatmap Status: Blue
The blue color represents new account information that will be added to the system. For example:
- New Account Names: Blue highlights indicate that the import file contains a new account name not currently present in the company’s chart of accounts (Source Format). This means the new account will be added upon completing the data import. It’s important to review these entries to ensure the new accounts are accurate and necessary for your financial data.

Heatmap Status: Grey (Crossed-Out Value)
The grey color serves as a neutral or informational indicator for new data entries. For example:
- New Account Entries: Light grey text and crossed-out values signifies is applied to numbers with invalid or incomplete account information. They cannot be imported correctly without an update to the reference account information.
Heatmap Status: YELLOW
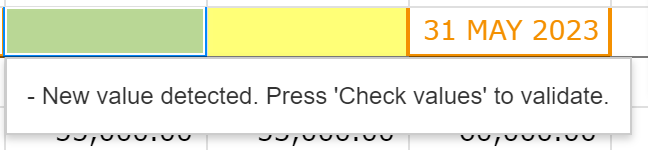
The yellow color indicates that new values have been detected in your data entries. For example:
- Pending Validation: Yellow highlights signify that a new value has been entered but not yet validated. This is an alert for you to review and confirm the data entry. Press 'Check values' to activate validation for these entries, ensuring they are correct and ready to be included in your financial analysis. This step helps maintain data accuracy and reliability in your reports.
Date correction rules in Spreadsheets mode
When you click 'Check Values' in Decision Critical's spreadsheet mode, the system not only validates but also corrects your data to ensure it is consistent and complete. Here’s how the process works:
- Contextual Autofill for Missing Dates: If the system detects missing date values, it analyzes the surrounding data to determine the most appropriate date. This feature helps fill in any gaps, maintaining the chronological integrity of your dataset.
- Automatic Day Filling for Balance Sheet Entries: For Balance Sheet data, if you provide only the month and year (e.g., "JAN 2023") without a specific day, the system uses contextual information to select an appropriate day and complete the date entry.
- Automatic Date Standardization: If your data entries have inconsistent date formats, the system standardizes them based on the most frequently used format within your dataset. This ensures uniformity across all entries, making data easier to analyze and compare without worrying about format discrepancies.
- Auto Sorting for Data Consistency: The system will automatically sort your data if it is not in the correct chronological order. This auto-sorting helps maintain logical organization and prevents potential analysis errors due to out-of-sequence data entries.
- Handling Small Values: Any values less than USD 0.01 will be truncated to maintain data consistency and prevent unnecessary discrepancies.
- Multiple Entries for Balance Sheet: If there are multiple entries for the same month, the system will prioritize the data from the latest date within that month and convert it to a month-end number. This approach ensures the most recent and accurate data is used for analysis. For example, if entries exist for the 5th, 15th, and 25th of January 2023, the system will apply the data from January 25th, 2023 as a month-end balance.
- Multiple Entries for Income Statement: All entries within the same month will be aggregated into a single total. This means that any revenue or expense figures reported on different days within the same month will be combined to provide a monthly total, simplifying the reporting process and offering a clear overview of monthly financial performance without daily breakdowns.
- Flagged Data Entries: If a value is highlighted in red with a crossed-out format in the heatmap, it indicates that the data entry is flagged for removal due to errors or inconsistencies.
Clicking 'Check Values' will automatically remove any value in this status to prevent incorrect data from being used in further analysis. It is recommended to review these flagged entries before confirming, as this action cannot be undone and may result in the loss of data that could potentially be corrected instead of removed.
Step 5: Finalize your data import
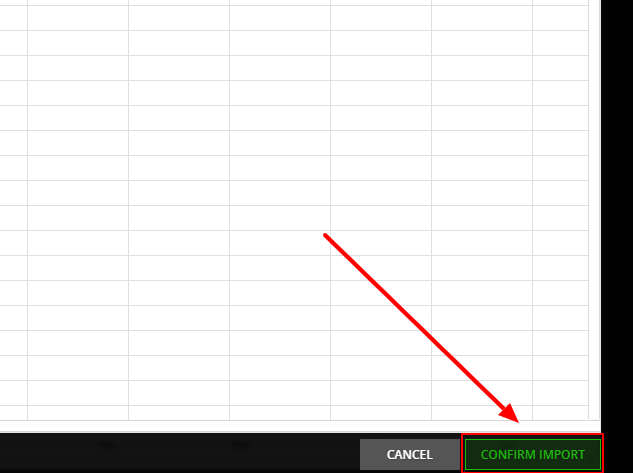
After the system has corrected your data, review the heatmap to see the status of each entry. The heatmap will highlight any remaining issues or confirm that your data is now valid. Carefully go through each highlighted entry and make any necessary adjustments until you are satisfied with the accuracy and completeness of your data.
Once everything looks correct and all discrepancies have been resolved, click the "Confirm Import" button to finalize the import process (which should now be green). This action will officially add your data to Decision Critical, making it available for analysis and reporting. Always ensure your data is fully reviewed and accurate before confirming the import to maintain the integrity of your financial analyses.
Step 6: Prepare for mapping
Once you've successfully confirmed the import and the data import process is complete, the next crucial step is to map your data to ensure it aligns with the relevant accounts and categories within Decision Critical.
This guide will walk you through the mapping process step by step.
Need help? 💡
If you need additional help, reach out to us at:
support@decisioncritical.pro