Account Mapping in Decision Critical
In order to enable Decision Critical to interpret your (usually very granular) company data and present a useful comparison with forecasts which are less specific, you will need to conduct account mapping.
This process ensures that all your financial information is accurately aligned with the account structure of your company model. It is an essential step for Variance Analysis.
The initial mapping exercise, however, can be time-consuming and we advise setting aside 2-3 hours if your source reports are very granular.
Subsequent updates / addition of accounts (after initial setup) is quite fast.
Step 1: Accessing the Account Mapping interface via 'Source Format'
Once you’ve confirmed your data import, you will be directed to the "Source Format with Mapping" screen for that report.
You can also open it directly at any time by clicking on the "SOURCE FORMAT" button in the upper righthand corner of the 'Historical Performance' interface.

.
Step 2: Understanding the mapping interface
-
Company Chart of Accounts (Source Format):
The left side of the mapping interface is the company's Chart of Accounts from the company's accounting system - the "Source Format".
Note that each report (balance sheet, income statement, etc. is mapped in a separate interface to avoid confusion). Here, you’ll see a list of all the accounts you’ve imported (or input manually), along with their associated Account Codes and Account Names. -
Map to (Destination Format):
To the right of the Source Format section is the mapping column (titled "Map to Decision Critical as"). This column controls the flow of numeric data from the Source Format interface to the "Destination Format", which is the chart of accounts the company uses for forecasting.
Initially, all accounts will be marked as "Not mapped," indicating that they haven’t yet been linked to an account in Decision Critical.
To map an account, simply select a destination account from the dropdown in the "Map to" column. -
Actual Results (Source Data):
On the right-hand side, you’ll see the Actual result (source format from accounting records) section. This area shows the financial data for each account, broken down by date, as it was imported from your source file.
.
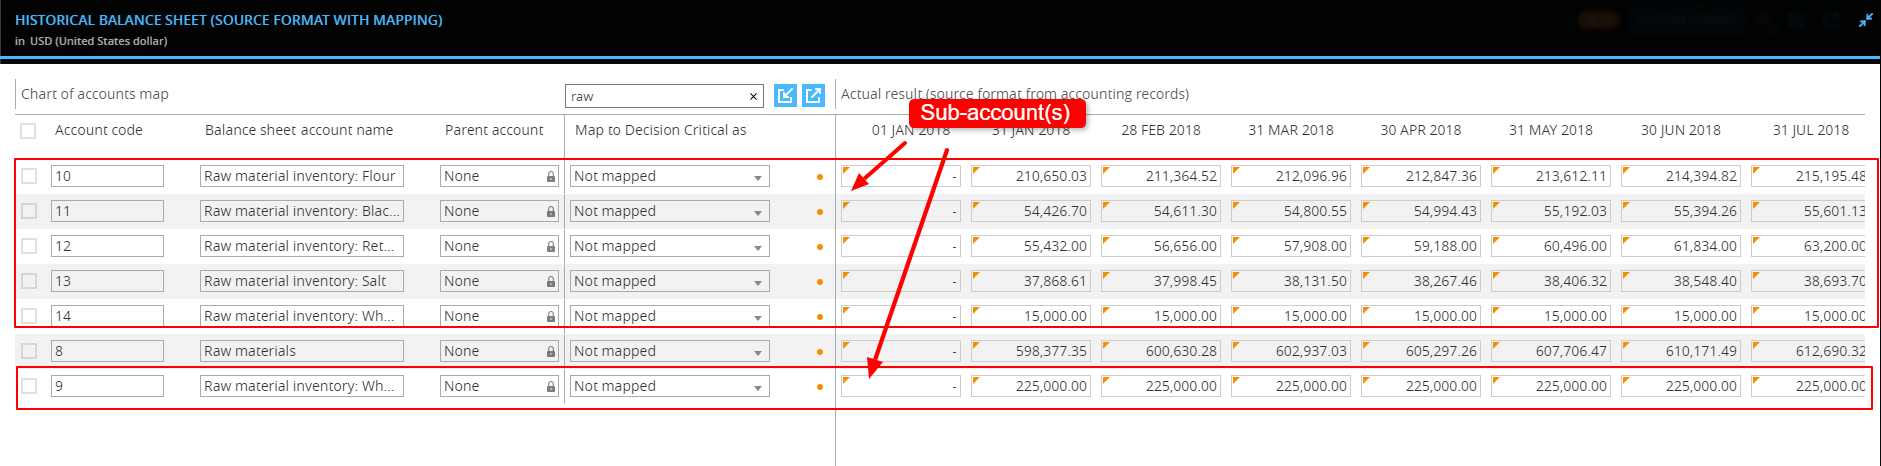
Step 3: Parent account(s) and sub-account(s)
As you map your financial data, it’s important to distinguish between parent accounts (which are calculated from sub accounts) and sub-accounts.
Sub-accounts should be mapped to the Decision Critical company chart of accounts, whereas parent accounts should be ignored and, ideally, purged from the import file in advance.
For more details and specific examples, read on.
Sub-accounts (Map to Decision Critical company accounts)
- Sub-accounts are specific accounts that track individual components within a larger category. For example, under a parent category like "Raw materials", accounts like "Raw material inventory: Flour" and "Raw material inventory: Black peppercorn"
Each sub-account tracks a particular item or component, allowing for detailed financial analysis and reporting.Parent accounts (Purge or ignore)
- A parent account is a summary account that aggregates the values of its related sub-accounts. It represents the total of all its sub-accounts combined. For example, "Raw materials" would be a parent account summarizing all receivables under it.

Mapping guidelines:
- Map the Sub-Accounts Only: During the mapping process in Decision Critical, focus on mapping the sub-accounts to the appropriate categories. This ensures that all individual components are correctly categorized, providing a detailed and accurate financial picture.
- Do Not Map the Parent Account: The parent account should not be directly mapped. Decision Critical automatically calculates the total for the parent account by summing the values of all its sub-accounts. Mapping the parent account separately could lead to duplication of values and incorrect financial data. Ensure only the sub-accounts are mapped to maintain data integrity and accuracy.
.
Step 4: Mapping your accounts
With an understanding of the structure of the "Source Format" module, you can now begin the main mapping task, which can be done account-by-account or in batches, depending on your preference:
- Individual account mapping (For mapping individual or a small number of accounts) refers to mapping of a single "Source Format" account using the dropdown menu in the "Map to column":
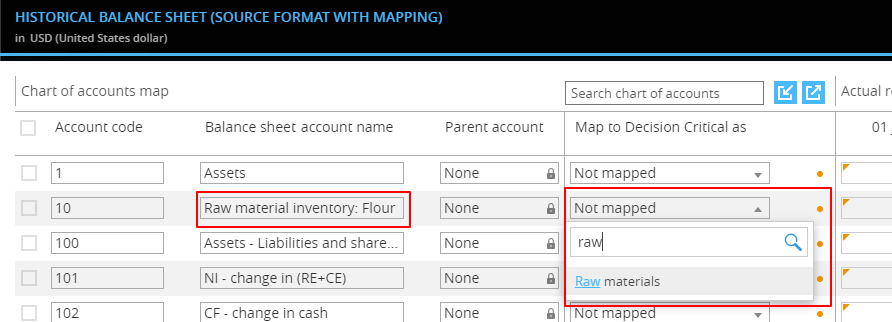
- Locate the Account: Start by finding the account you want to map in the Chart of Accounts Map section. This is the area where all your imported accounts are listed.
- Select Mapping: Click on the dropdown menu in the "Map to Decision Critical as" column next to the account you want to map. This action will display a list of available accounts in Decision Critical.
- Choose the Appropriate Account: From the dropdown list, select the account in Decision Critical that best matches the account you're mapping. Ensure you choose an account that correctly represents the financial data you are importing for accurate reporting.
- Confirm Mapping: After selecting the correct account, the system will automatically save your choice. If you have only a few accounts to map, this method allows for precise and careful mapping.
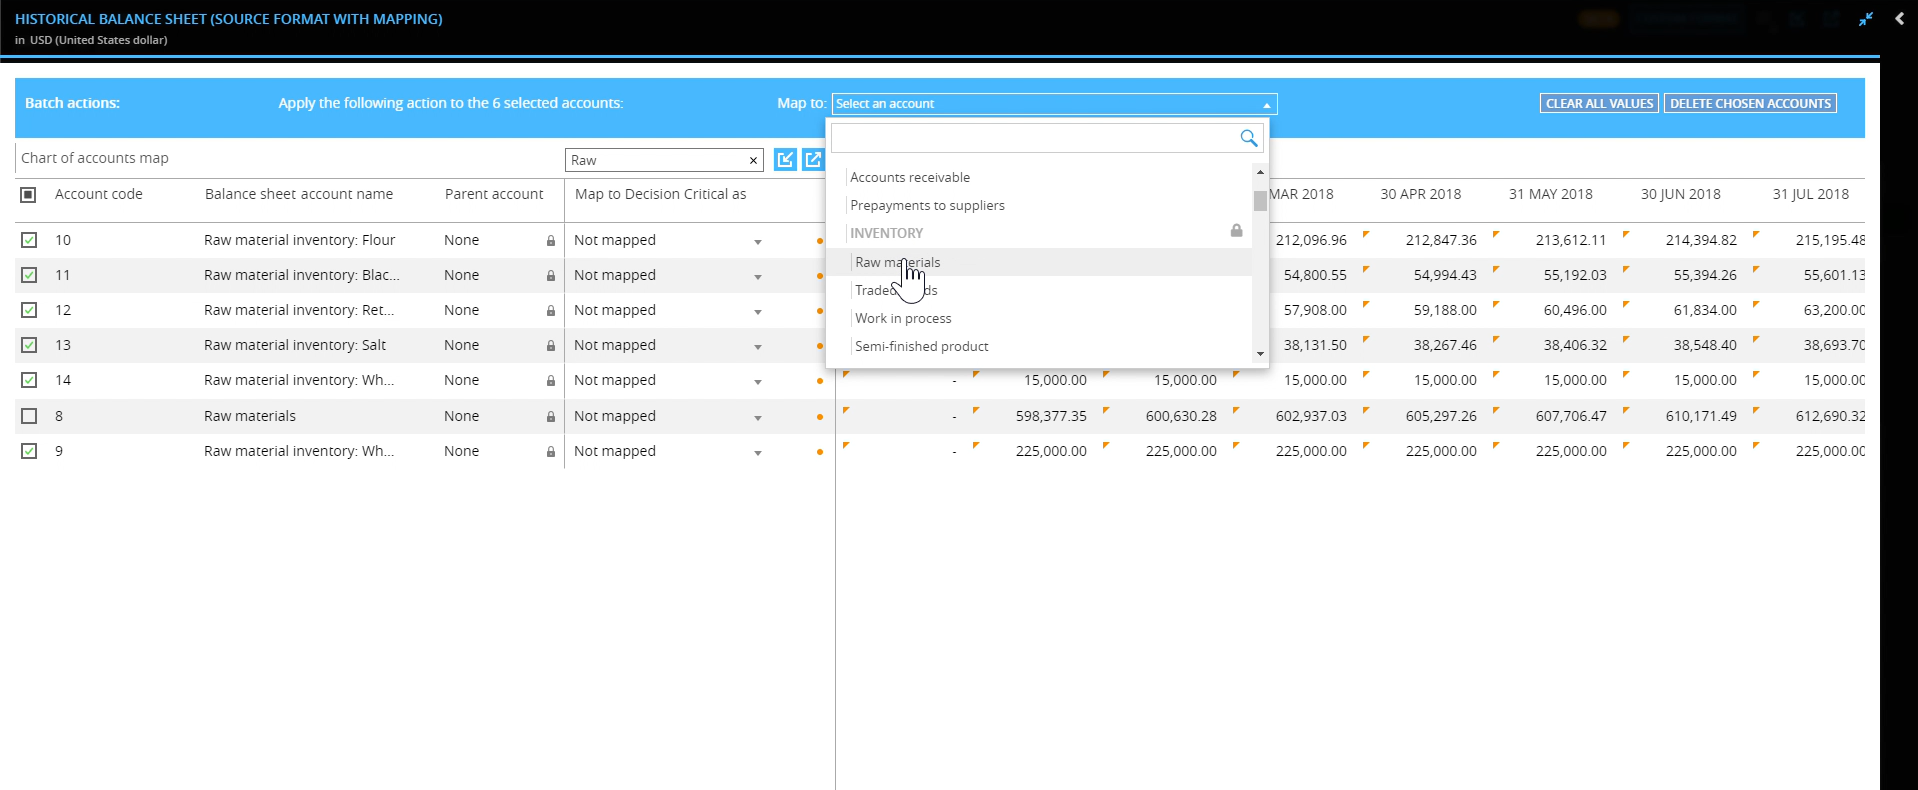
- Batch Mapping (For mapping multiple accounts at once) uses the checkboxes to the left of the account numbers to map several Source Format accounts to a single destination account all at once:
-
Find Accounts: To begin batch mapping, you can either manually select each account you want to map or use the search box in the Chart of Accounts Map section to filter relevant accounts.

For instance, if you want to map several "Raw Material" inventory accounts, type "Raw Material" into the search box. This action filters and displays only the relevant accounts. -
Select Filtered Accounts: If you decide to use the search box to filter accounts, you can manually check each relevant account or use the "Select All" option to choose all filtered accounts.
-
Map Accounts in Bulk: Once you've selected all the desired accounts, look for the blue bar that appears at the top of the screen, indicating that multiple accounts are selected.
Click on the "Map to" dropdown menu in this blue bar and select the appropriate Decision Critical account to which all selected accounts will be mapped.
-
Review Before Mapping: Before finalizing the mapping, check the text appearing under the map button. It will show you how many accounts are about to be mapped, ensuring you have selected the correct accounts.

-
Execute Batch Mapping: After choosing the target account from the dropdown, click the "Map" button. This action will apply the selected mapping to all checked accounts, making the process quicker and more efficient when handling large, detailed charts of accounts.
-
.
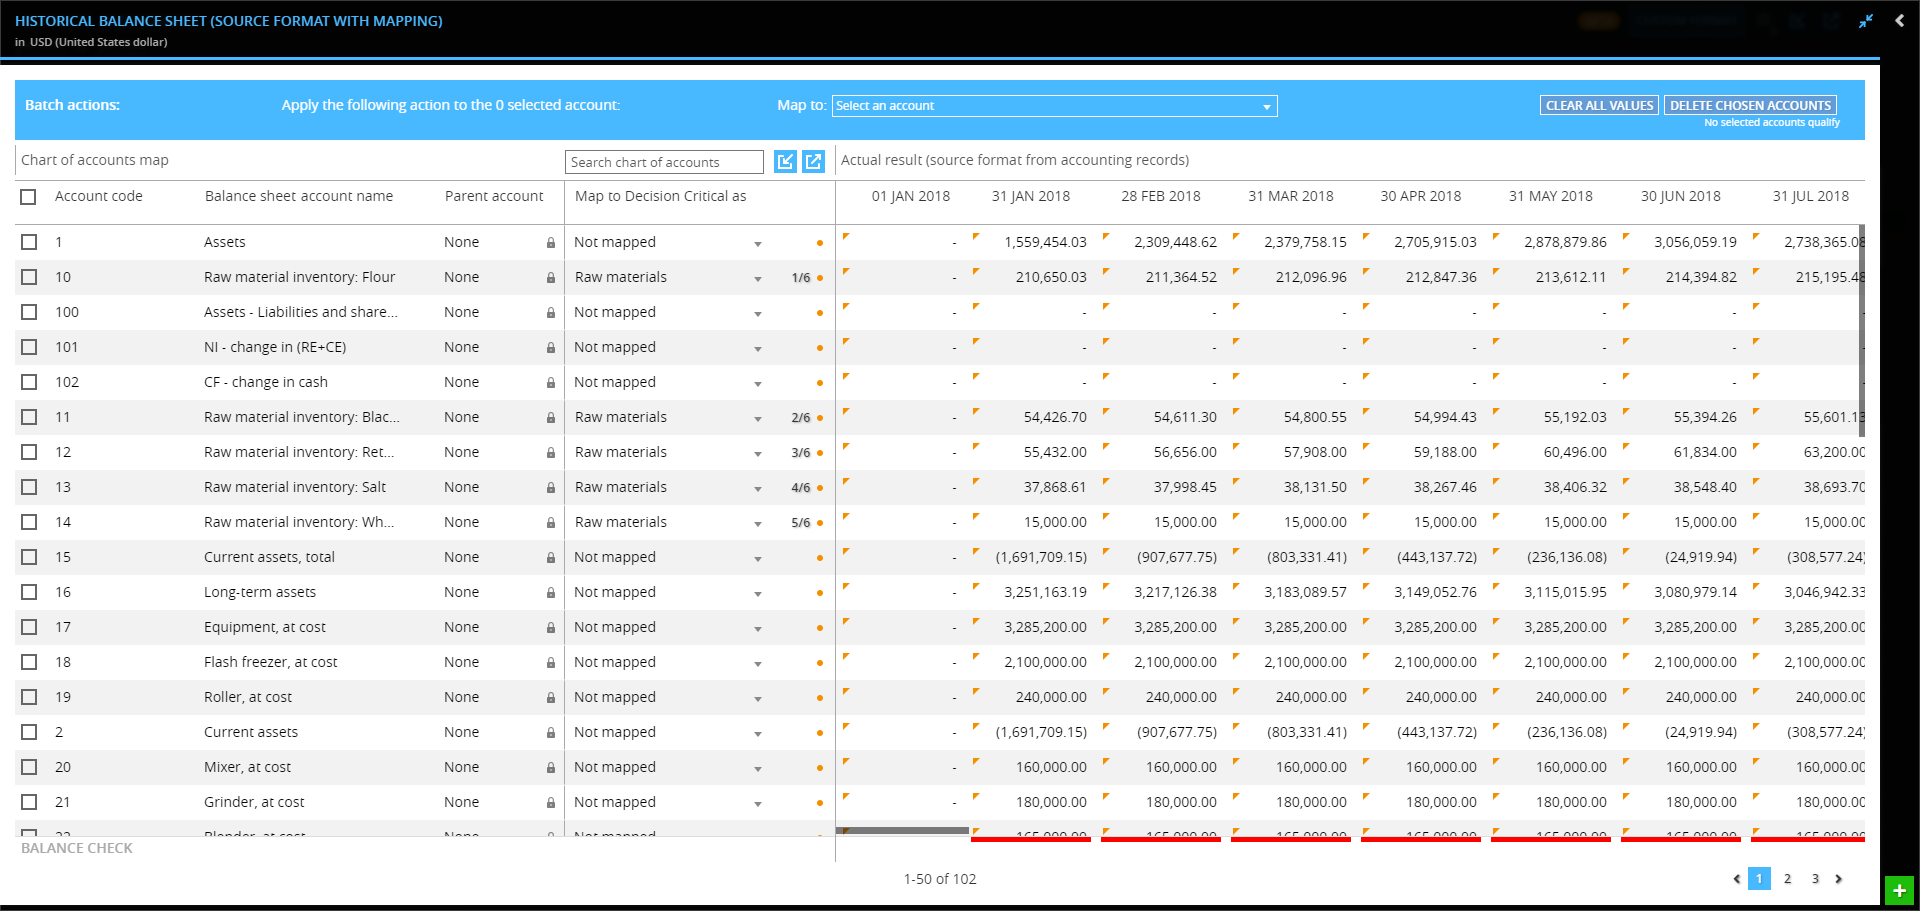
Step 5: Balance check (in Balance Sheet interface only)
After you’ve completed mapping, if the imported data were supposed to be a comprehensive set, you can perform a Balance Check (if the source data are not supposed to be a complete set, then skip this step):
-
Balance Check Row:
On the left side of the balance sheet interface, click on the "Balance Check" button. This will allow you to verify that the totals in your Balance Sheet are correct and also that Net Income from the Income Statement has properly carried over to cumulative earnings accounts on the Balance Sheet.
The check line will show any discrepancies. -
Review and Adjust if Necessary:
If the balance check reveals any discrepancies (where Assets do not equal Liabilities and Shareholders' Equity or Net Income does not carry over to cumulative earnings accounts on the Balance Sheet), you may need to review your mapping or data entries to identify and correct the issue.
.
Step 6: Synchronize Source Format and Historical Performance
Work in the Source Format interface can affect large volumes of data. As such, in order to avoid the risk associated with an automatic mass overwrite, synchronization of data from Source Format to Historical Performance is confirmed manually.
There are three ways to synchronize data. Which one you choose will depend on your company's review process:
-
Update the Entire Report: Click the small orange icon next to the report header to refresh all data in the report at once.

-
Update a Specific Period: Click the orange icon next to the period date to update all data for that specific period only.

-
Update a Specific Value: Click the orange icon in the cell for the account and period you want to update. This lets you refresh just that data point.

These options let you control how and when your data is updated in Historical Performance after mapping.
Even after completing the mapping, you can always return to the Source Format with Mapping window to review or edit your data. Simply click the Custom Format button to go back and make any necessary adjustments.

And that's it for mapping! 🎉
With your data now fully mapped and updated in Historical Performance, you're ready for the next step. In the following article, we'll dive into data validation to ensure everything is accurate and ready for analysis.
For detailed instructions on how to validate your data, please read the article: Historical Performance: Data validation.
This guide will walk you through the mapping process step by step.
Need help? 💡
If you need additional help, reach out to us at:
support@decisioncritical.pro